How The Lost Mystery Pigment ‘Maya Blue’ Got Recreated

A distinct blue pigment reminiscent of turquoise or a clear sky was used by the ancient Maya to paint pottery, sculptures, clothing, murals, jewelry, and even human sacrifices. What makes it so interesting is not only its rich palette — ranging from bright turquoise to a dark greenish blue — but also its remarkable durability. Only a small number of blue pigments were created by ancient civilizations, and even among those Maya blue is unique. The secret of its creation was thought to be lost, until ceramicist and artist [Luis May Ku] rediscovered it.

Maya blue is not just a dye, nor a ground-up mineral like lapis lazuli. It is an unusual and highly durable organic-inorganic hybrid; the result of a complex chemical process that involves two colorants. Here is how it is made: Indigotin is a dye extracted from ch’oj, the Mayan name for a specific indigenous indigo plant. That extract is combined with a very specific type of clay. Heating the mixture in an oven both stabilizes it produces a second colorant: dehydroindigo. Together, this creates Maya blue.

Luis May Ku posing with Maya blue.

The road to rediscovery was not a simple one. While the chemical makeup and particulars of Maya blue had been known for decades, the nuts and bolts of actually making it, not to mention sourcing the correct materials, and determining the correct techniques, was a long road. [May] made progress by piecing together invaluable ancestral knowledge and finally cracked the code after a lot of time and effort and experimentation. He remembers the moment of watching a batch shift in color from a soft blue to a vibrant turquoise, and knew he had finally done it.

Before synthetic blue pigments arrived on the scene after the industrial revolution, blue was rare and highly valuable in Europe. The Spanish exploitation of the New World included controlling Maya blue until synthetic blue colorants arrived on the scene, after which Maya blue faded from common knowledge. [May]’s rediscovered formula marks the first time the world has seen genuine Maya blue made using its original formula and methods in almost two hundred years.

Maya blue is a technological wonder of the ancient world, and its rediscovery demonstrates the resilience and scientific value of ancestral knowledge as well as the ingenuity of those dedicated to reviving lost arts.

We’re reminded that paints and coatings have long been fertile ground for experimentation, and as an example we’ve seen the success people had in re-creating an ultra-white paint that actually has a passive cooling effect.
Use Movie Tools To Make Your Robot Move Like Movie Robots

Robots of the entertainment industry are given life by character animation, where the goal is to emotionally connect with the audience to tell a story. In comparison, real-world robot movement design focus more on managing physical limitations like sensor accuracy and power management. Tools for robot control are thus more likely to resemble engineering control consoles and not artistic character animation tools. When the goal is to build expressive physical robots, we’ll need tools like ROBiTS project to bridge the two worlds.

As an exhibitor at Maker Faire Bay Area 2019, this group showed off their first demo: a plugin to Autodesk Maya that translate joint movements into digital pulses controlling standard RC servos. Maya can import the same STL files fed to 3D printers, easily creating a digital representation of a robot. Animators skilled in Maya can then use all the tools they are familiar with, working in full context of a robot’s structure in the digital world. This will be a far more productive workflow for animation artists versus manipulating a long flat list of unintuitive slider controls or writing code by hand.

Of course, a virtual world offers some freedoms that are not available in the physical world. Real parts are not allowed to intersect, for one, and then there are other pesky physical limitations like momentum and center of gravity. Forgetting to account for them results in a robot that falls over! One of the follow-up projects on their to-do list is a bridge in the other direction: bringing physical world sensor like an IMU into digital representations in Maya.

We look forward to seeing more results on their YouTube channel. They join the ranks of other animated robots at Maker Faire and a promising addition to the toolbox for robot animation from Disney Research’s kinetic wires to Billy Whiskers who linked servos to Adobe Animate.

Continue reading “Use Movie Tools To Make Your Robot Move Like Movie Robots”

Soviet-Era Tank Gets The 3D Printed Treatment

3D printers are celebrated for their capacity to replace missing or broken parts. How about an entire T-62 tank?

Now hold on a second — this is only a model replica. It is, however another expression of the myriad uses for 3D printers. Designed in Maya and requiring almost three weeks to print all 62 parts from about 70 meters of PLA filament.  The assembly is not terribly involved, made easier by printing a few large sections such as the crew section and hull while the parts don’t get much smaller than the turret hatches. Nonetheless, he final product is about as true to life as you can get when designing the parts from scratch.

Continue reading “Soviet-Era Tank Gets The 3D Printed Treatment”

3D Real-World Rig

Rigging Your 3D Models In The Real-World

Computer animation is a task both delicate and tedious, requiring the manipulation of a computer model into a series of poses over time saved as keyframes, further refined by adjusting how the computer interpolates between each frame. You need a rig (a kind of digital skeleton) to accurately control that model, and researcher [Alec Jacobson] and his team have developed a hands-on alternative to pushing pixels around.

3D Rig with Control Curves
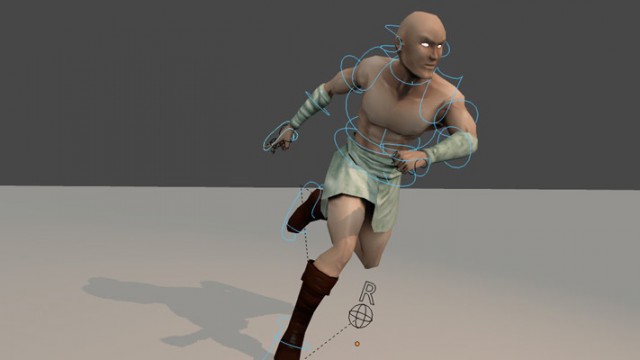
Control curves (the blue circles) allow for easier character manipulation.

The skeletal systems of computer animated characters consists of kinematic chains—joints that sprout from a root node out to the smallest extremity. Manipulating those joints usually requires the addition of easy-to-select control curves, which simplify the way joints rotate down the chain. Control curves do some behind-the-curtain math that allows the animator to move a character by grabbing a natural end-node, such as a hand or a foot. Lifting a character’s foot to place it on chair requires manipulating one control curve: grab foot control, move foot. Without these curves, an animator’s work is usually tripled: she has to first rotate the joint where the leg meets the hip, sticking the leg straight out, then rotate the knee back down, then rotate the ankle. A nightmare.

[Alec] and his team’s unique alternative is a system of interchangeable, 3D-printed mechanical pieces used to drive an on-screen character. The effect is that of digital puppetry, but with an eye toward precision. Their device consists of a central controller, joints, splitters, extensions, and endcaps. Joints connected to the controller appear in the 3D environment in real-time as they are assembled, and differences between the real-world rig and the model’s proportions can be adjusted in the software or through plastic extension pieces.

The plastic joints spin in all 3 directions (X,Y,Z), and record measurements via embedded Hall sensors and permanent magnets. Check out the accompanying article here (PDF) for specifics on the articulation device, then hang around after the break for a demonstration video.

Continue reading “Rigging Your 3D Models In The Real-World”