Archive for the ‘VMWare’ Category
Disk Space Allocation
It’s necessary to check for adequate disk space on your Virtual Machine (VM) before installing Oracle 23c Free in a Docker container or as a podman service. Either way, it requires about 13 GB of disk space. On Ubuntu, the typical install of a VM allocates 20 GB and a 500 MB swap. You need to create a 2 GB swap when you install Ubuntu or plan to change the swap, as qualified in this excellent DigitalOcean article. Assuming you installed it with the correct swap or extended your swap area, you can confirm it with the following command:
sudo swapon --show |
It should return something like this:
NAME TYPE SIZE USED PRIO /swapfile file 2.1G 1.2G -2 |
Next, check your disk space allocation and availability with this command:
df -h |
This is what was in my instance with MySQL and PostgreSQL databases already installed and configured with sandboxed schemas:
Filesystem Size Used Avail Use% Mounted on tmpfs 388M 2.1M 386M 1% /run /dev/sda3 20G 14G 4.6G 75% / tmpfs 1.9G 28K 1.9G 1% /dev/shm tmpfs 5.0M 4.0K 5.0M 1% /run/lock /dev/sda2 512M 6.1M 506M 2% /boot/efi tmpfs 388M 108K 388M 1% /run/user/1000 |
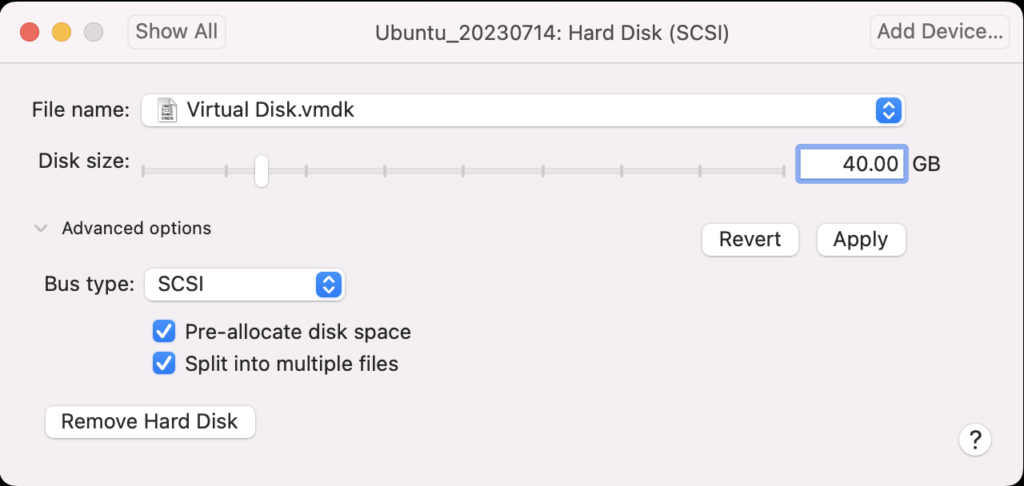
Using VMware Fusion on my Mac (Intel-based i9), I changed the allocated space from 20 GB to 40 GB by navigating to Virtual Machine, Settings…, Hard Disk. I entered 40.00 as the disk size and clicked the Pre-allocate disk space checkbox before clicking the Apply button, as shown in below. This added space is necessary because Oracle Database 23c Free as a Docker instance requires almost 10 GB of local space.
After clicking the Apply button, I checked Ubuntu with the “df -h” command and found there was no change. That’s unlike doing the same thing on AlmaLinux or a RedHat distribution, which was surprising.
The next set of steps required that I manually add the space to the Ubuntu instance:
- Start the Ubuntu VM and check the instance’s disk information with fdisk:
sudo fdisk -l
The log file for this is:
Display detailed console log →
Disk /dev/loop0: 238.77 MiB, 250372096 bytes, 489008 sectors
Units: sectors of 1 * 512 = 512 bytes
Sector size (logical/physical): 512 bytes / 512 bytes
I/O size (minimum/optimal): 512 bytes / 512 bytes


Disk /dev/loop1: 73.86 MiB, 77443072 bytes, 151256 sectors
Units: sectors of 1 * 512 = 512 bytes
Sector size (logical/physical): 512 bytes / 512 bytes
I/O size (minimum/optimal): 512 bytes / 512 bytes


Disk /dev/loop2: 349.7 MiB, 366682112 bytes, 716176 sectors
Units: sectors of 1 * 512 = 512 bytes
Sector size (logical/physical): 512 bytes / 512 bytes
I/O size (minimum/optimal): 512 bytes / 512 bytes


Disk /dev/loop3: 91.69 MiB, 96141312 bytes, 187776 sectors
Units: sectors of 1 * 512 = 512 bytes
Sector size (logical/physical): 512 bytes / 512 bytes
I/O size (minimum/optimal): 512 bytes / 512 bytes


Disk /dev/loop4: 496.98 MiB, 521121792 bytes, 1017816 sectors
Units: sectors of 1 * 512 = 512 bytes
Sector size (logical/physical): 512 bytes / 512 bytes
I/O size (minimum/optimal): 512 bytes / 512 bytes


Disk /dev/loop5: 45.93 MiB, 48160768 bytes, 94064 sectors
Units: sectors of 1 * 512 = 512 bytes
Sector size (logical/physical): 512 bytes / 512 bytes
I/O size (minimum/optimal): 512 bytes / 512 bytes


Disk /dev/loop6: 128.92 MiB, 135184384 bytes, 264032 sectors
Units: sectors of 1 * 512 = 512 bytes
Sector size (logical/physical): 512 bytes / 512 bytes
I/O size (minimum/optimal): 512 bytes / 512 bytes


Disk /dev/loop7: 63.45 MiB, 66531328 bytes, 129944 sectors
Units: sectors of 1 * 512 = 512 bytes
Sector size (logical/physical): 512 bytes / 512 bytes
I/O size (minimum/optimal): 512 bytes / 512 bytes


Disk /dev/fd0: 1.41 MiB, 1474560 bytes, 2880 sectors
Units: sectors of 1 * 512 = 512 bytes
Sector size (logical/physical): 512 bytes / 512 bytes
I/O size (minimum/optimal): 512 bytes / 512 bytes
Disklabel type: dos
Disk identifier: 0x90909090

Device     Boot      Start        End    Sectors  Size Id Type
/dev/fd0p1      2425393296 4850786591 2425393296  1.1T 90 unknown
/dev/fd0p2      2425393296 4850786591 2425393296  1.1T 90 unknown
/dev/fd0p3      2425393296 4850786591 2425393296  1.1T 90 unknown
/dev/fd0p4      2425393296 4850786591 2425393296  1.1T 90 unknown
GPT PMBR size mismatch (41943039 != 83886079) will be corrected by write.


Disk /dev/sda: 40 GiB, 42949672960 bytes, 83886080 sectors
Disk model: VMware Virtual S
Units: sectors of 1 * 512 = 512 bytes
Sector size (logical/physical): 512 bytes / 512 bytes
I/O size (minimum/optimal): 512 bytes / 512 bytes
Disklabel type: gpt
Disk identifier: 7906AE0B-498C-4FE4-8B45-9CD1B2265197

Device       Start      End  Sectors  Size Type
/dev/sda1     2048     4095     2048    1M BIOS boot
/dev/sda2     4096  1054719  1050624  513M EFI System
/dev/sda3  1054720 41940991 40886272 19.5G Linux filesystem


Disk /dev/loop8: 40.84 MiB, 42827776 bytes, 83648 sectors
Units: sectors of 1 * 512 = 512 bytes
Sector size (logical/physical): 512 bytes / 512 bytes
I/O size (minimum/optimal): 512 bytes / 512 bytes


Disk /dev/loop9: 304 KiB, 311296 bytes, 608 sectors
Units: sectors of 1 * 512 = 512 bytes
Sector size (logical/physical): 512 bytes / 512 bytes
I/O size (minimum/optimal): 512 bytes / 512 bytes


Disk /dev/loop10: 452 KiB, 462848 bytes, 904 sectors
Units: sectors of 1 * 512 = 512 bytes
Sector size (logical/physical): 512 bytes / 512 bytes
I/O size (minimum/optimal): 512 bytes / 512 bytes


Disk /dev/loop13: 496.88 MiB, 521015296 bytes, 1017608 sectors
Units: sectors of 1 * 512 = 512 bytes
Sector size (logical/physical): 512 bytes / 512 bytes
I/O size (minimum/optimal): 512 bytes / 512 bytes


Disk /dev/loop12: 240.05 MiB, 251707392 bytes, 491616 sectors
Units: sectors of 1 * 512 = 512 bytes
Sector size (logical/physical): 512 bytes / 512 bytes
I/O size (minimum/optimal): 512 bytes / 512 bytes


Disk /dev/loop11: 4 KiB, 4096 bytes, 8 sectors
Units: sectors of 1 * 512 = 512 bytes
Sector size (logical/physical): 512 bytes / 512 bytes
I/O size (minimum/optimal): 512 bytes / 512 bytes


Disk /dev/loop14: 346.33 MiB, 363151360 bytes, 709280 sectors
Units: sectors of 1 * 512 = 512 bytes
Sector size (logical/physical): 512 bytes / 512 bytes
I/O size (minimum/optimal): 512 bytes / 512 bytes


Disk /dev/loop16: 12.32 MiB, 12922880 bytes, 25240 sectors
Units: sectors of 1 * 512 = 512 bytes
Sector size (logical/physical): 512 bytes / 512 bytes
I/O size (minimum/optimal): 512 bytes / 512 bytes


Disk /dev/loop17: 73.9 MiB, 77492224 bytes, 151352 sectors
Units: sectors of 1 * 512 = 512 bytes
Sector size (logical/physical): 512 bytes / 512 bytes
I/O size (minimum/optimal): 512 bytes / 512 bytes


Disk /dev/loop15: 175.83 MiB, 184373248 bytes, 360104 sectors
Units: sectors of 1 * 512 = 512 bytes
Sector size (logical/physical): 512 bytes / 512 bytes
I/O size (minimum/optimal): 512 bytes / 512 bytes


Disk /dev/loop18: 63.46 MiB, 66547712 bytes, 129976 sectors
Units: sectors of 1 * 512 = 512 bytes
Sector size (logical/physical): 512 bytes / 512 bytes
I/O size (minimum/optimal): 512 bytes / 512 bytes


Disk /dev/loop19: 40.86 MiB, 42840064 bytes, 83672 sectors
Units: sectors of 1 * 512 = 512 bytes
Sector size (logical/physical): 512 bytes / 512 bytes
I/O size (minimum/optimal): 512 bytes / 512 bytes
After running fdisk, I rechecked disk allocation with df -h and saw no change:
Filesystem      Size  Used Avail Use% Mounted on
tmpfs           388M  2.1M  386M   1% /run
/dev/sda3        20G   14G  4.6G  75% /
tmpfs           1.9G   28K  1.9G   1% /dev/shm
tmpfs           5.0M  4.0K  5.0M   1% /run/lock
/dev/sda2       512M  6.1M  506M   2% /boot/efi
tmpfs           388M  108K  388M   1% /run/user/1000
- So, I installed Ubuntu’s user space utility gparted:
sudo apt install gparted
The log file for this is:
Display detailed console log →
Reading package lists... Done
Building dependency tree... Done
Reading state information... Done
The following additional packages will be installed:
  gparted-common
Suggested packages:
  dmraid gpart jfsutils kpartx mtools reiser4progs reiserfsprogs udftools
  xfsprogs exfatprogs
The following NEW packages will be installed:
  gparted gparted-common
0 upgraded, 2 newly installed, 0 to remove and 4 not upgraded.
Need to get 490 kB of archives.
After this operation, 2,128 kB of additional disk space will be used.
Do you want to continue? [Y/n] Y
Get:1 http://us.archive.ubuntu.com/ubuntu jammy/main amd64 gparted-common all 1.3.1-1ubuntu1 [71.9 kB]
Get:2 http://us.archive.ubuntu.com/ubuntu jammy/main amd64 gparted amd64 1.3.1-1ubuntu1 [418 kB]
Fetched 490 kB in 2s (211 kB/s)
Selecting previously unselected package gparted-common.
(Reading database ... 203026 files and directories currently installed.)
Preparing to unpack .../gparted-common_1.3.1-1ubuntu1_all.deb ...
Unpacking gparted-common (1.3.1-1ubuntu1) ...
Selecting previously unselected package gparted.
Preparing to unpack .../gparted_1.3.1-1ubuntu1_amd64.deb ...
Unpacking gparted (1.3.1-1ubuntu1) ...
Setting up gparted-common (1.3.1-1ubuntu1) ...
Setting up gparted (1.3.1-1ubuntu1) ...
Processing triggers for mailcap (3.70+nmu1ubuntu1) ...
Processing triggers for desktop-file-utils (0.26-1ubuntu3) ...
Processing triggers for hicolor-icon-theme (0.17-2) ...
Processing triggers for gnome-menus (3.36.0-1ubuntu3) ...
Processing triggers for man-db (2.10.2-1) ...
- After installing the gparted utility (manual can be found here), you can launch it with the following syntax:
sudo gpartedYou’ll see the following in the console, which you can ignore.
GParted 1.3.1
configuration --enable-libparted-dmraid --enable-online-resize
libparted 3.4
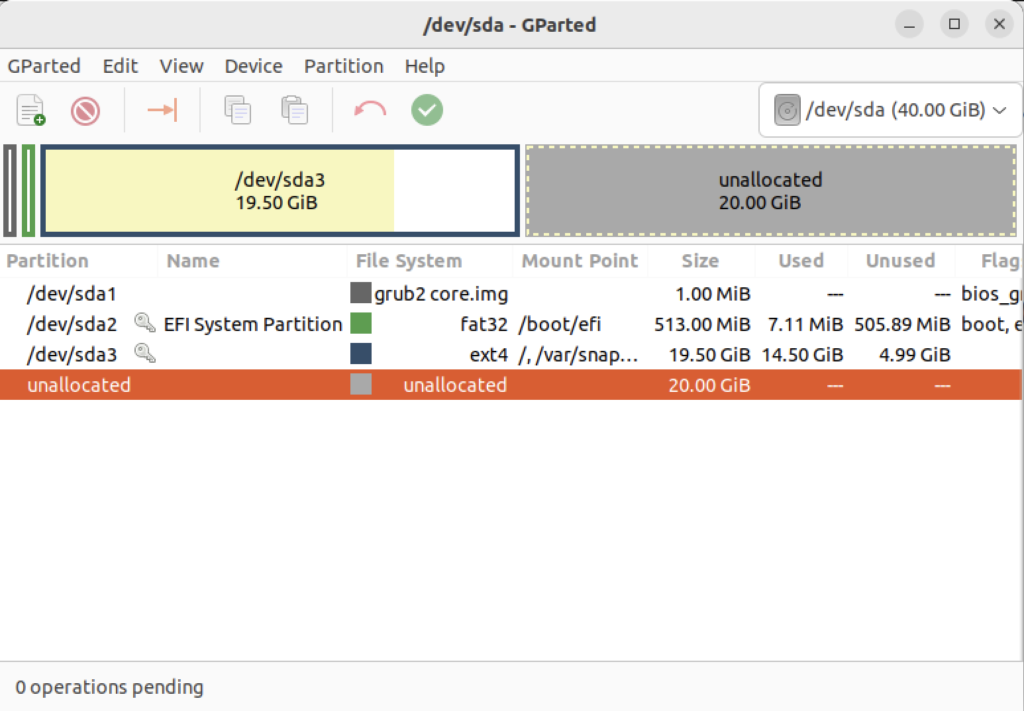
It launches a GUI interface that should look something like the following:
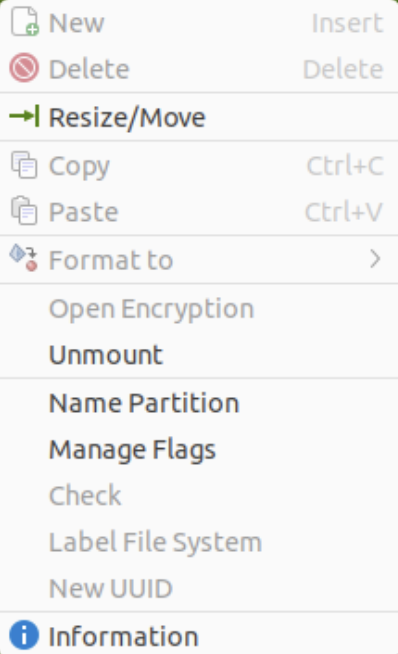
Right-click on the /dev/sda3 Partition and the GParted application will present the following context popup menu. Click the Resize/Move menu option.
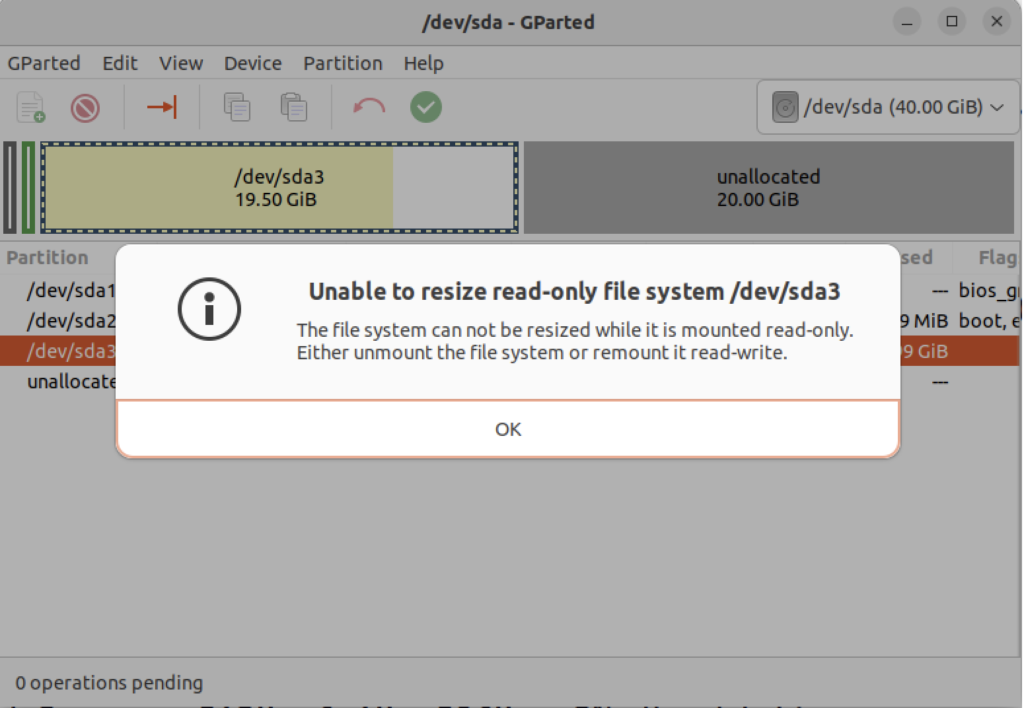
The attempt to resize the disk at this point GParted will raise a read-only exception like the following:
You might open a new shell and fix the disk at the command-line but you’ll need to relaunch gparted regardless. So, you should close gparted and run the following commands:
sudo mount -o remount -rw /
sudo mount -o remount -rw /var/snap/firefox/common/host-hunspell
When you relaunch GParted, you see that the graphic depiction has changed when you right-click on the /dev/sda3 Partition as follows:
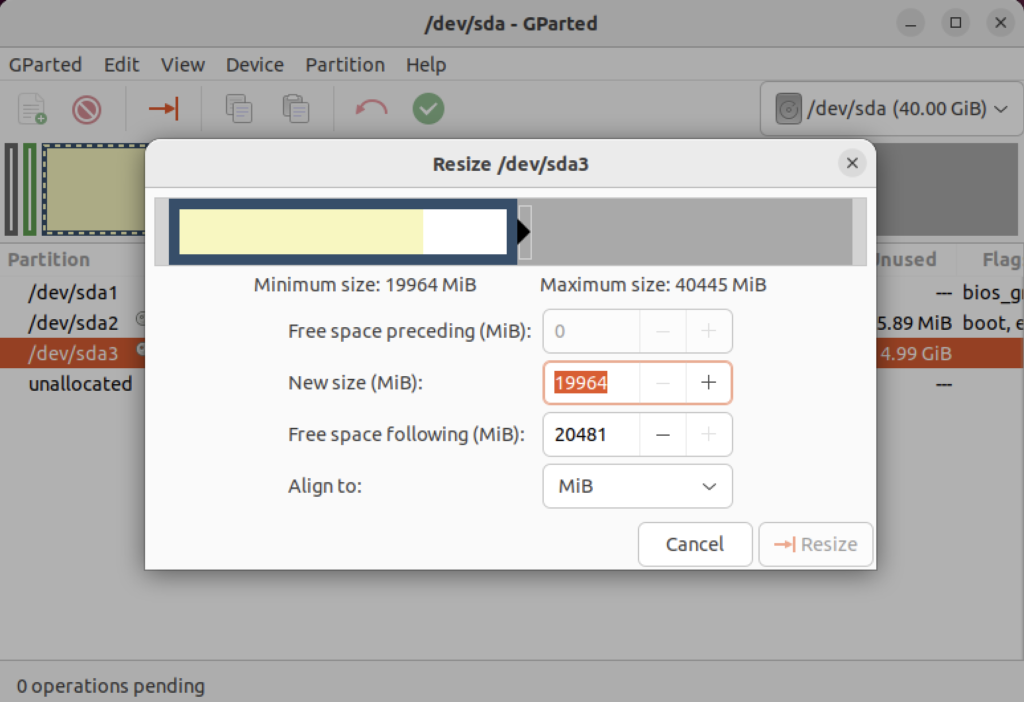
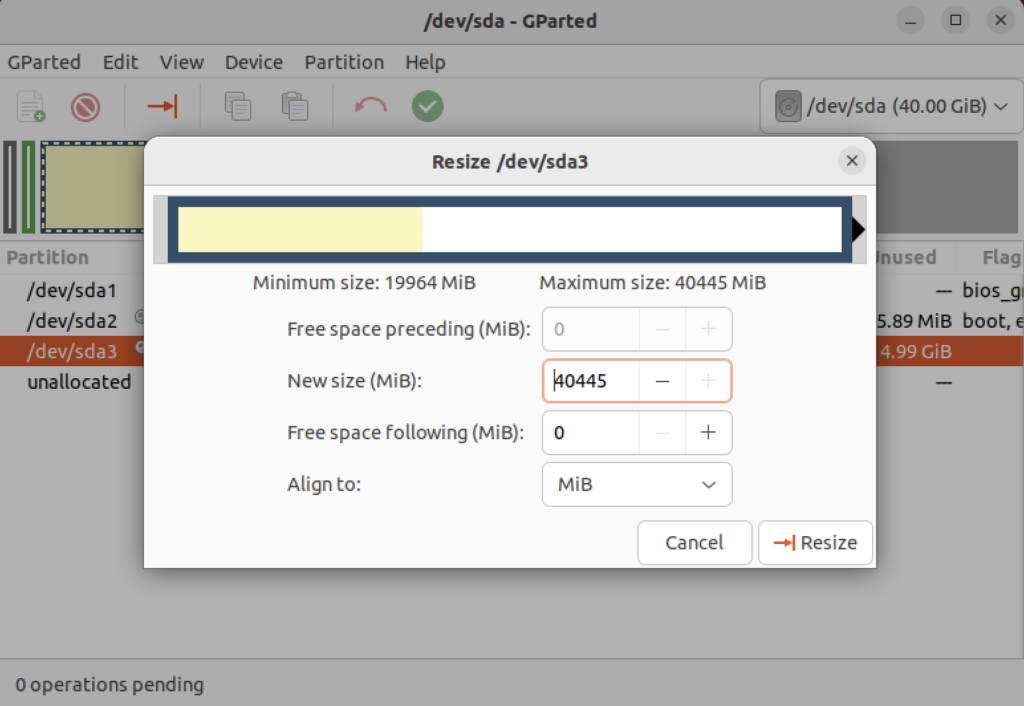
Click on the highlighted box with the arrow and drag it all the way to the right. It will then show you something like the following.
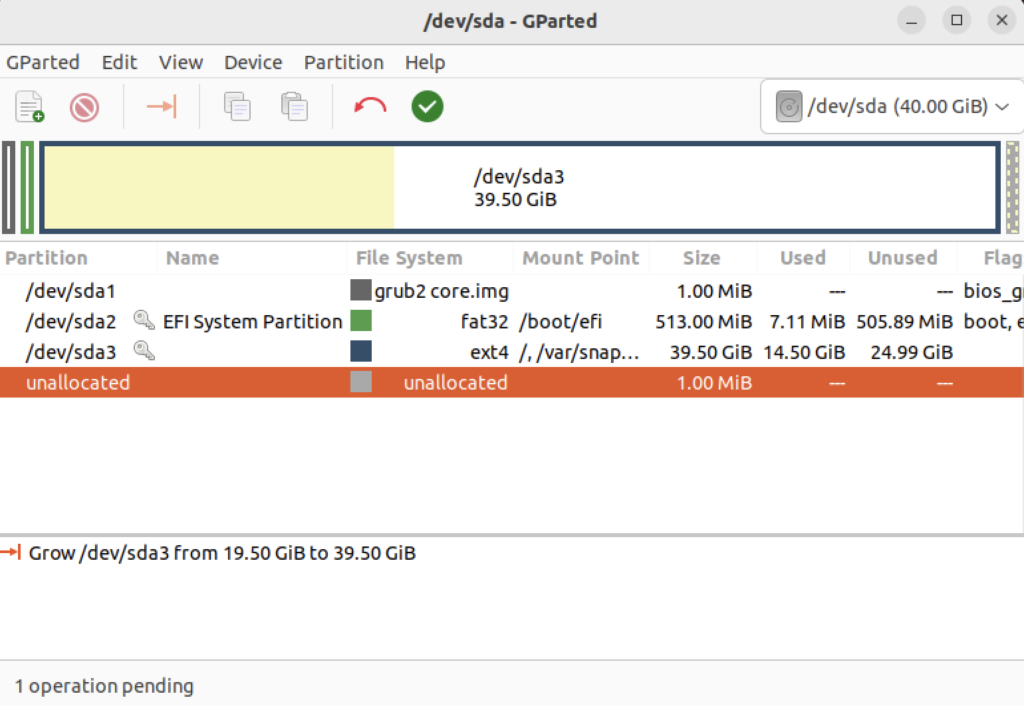
Click the Resize button to make the change and add the space to the Ubuntu file system and see something like the following in Gparted:
Choose Edit in the menu bar and then Apply All Operations to effect the change in the disk allocation. The last dialog will require you to verify you want to make the changes. Click the Apply button to make the changes.
Click the close for the GParted application and then you can rerun the following command:
df -h
You will see that you now have 19.5 GB of additional space:
Filesystem      Size  Used Avail Use% Mounted on
tmpfs           388M  2.2M  386M   1% /run
/dev/sda3        39G 19.5G   23G  39% /
tmpfs           1.9G   28K  1.9G   1% /dev/shm
tmpfs           5.0M  4.0K  5.0M   1% /run/lock
/dev/sda2       512M  6.1M  506M   2% /boot/efi
tmpfs           388M  116K  388M   1% /run/user/1000
- Finally, you can now successfully download the latest Docker version of Oracle Database 23c Free with the following command:
docker run --name oracle23c -p 1521:1521 -p 5500:5500 -e ORACLE_PWD=cangetin container-registry.oracle.com/database/free:latest
Since you haven’t downloaded the container, you’ll get a warning that it is unable to find the image before it discovers it and downloads it. This will take several minutes. At the conclusion, it will start the Oracle Database Net Listener and begin updating files. the updates may take quite a while to complete.
The basic download console output looks like the following and if you check your disk space you’ve downloaded about 14 GB in the completed container.
Unable to find image 'container-registry.oracle.com/database/free:latest' locally
latest: Pulling from database/free
089fdfcd47b7: Pull complete
43c899d88edc: Pull complete
47aa6f1886a1: Pull complete
f8d07bb55995: Pull complete
c31c8c658c1e: Pull complete
b7d28faa08b4: Pull complete
1d0d5c628f6f: Pull complete
db82a695dad3: Pull complete
25a185515793: Pull complete
Digest: sha256:5ac0efa9896962f6e0e91c54e23c03ae8f140cf6ed43ca09ef4354268a942882
Status: Downloaded newer image for container-registry.oracle.com/database/free:latest
My detailed log file for the complete recovery operation is:
Display detailed console log →
Starting Oracle Net Listener.
Oracle Net Listener started.
Starting Oracle Database instance FREE.
Oracle Database instance FREE started.

The Oracle base remains unchanged with value /opt/oracle

SQL*Plus: Release 23.0.0.0.0 - Production on Thu Nov 30 22:40:55 2023
Version 23.3.0.23.09

Copyright (c) 1982, 2023, Oracle.  All rights reserved.


Connected to:
Oracle Database 23c Free Release 23.0.0.0.0 - Develop, Learn, and Run for Free
Version 23.3.0.23.09

SQL>
User altered.

SQL>
User altered.

SQL>
Session altered.

SQL>
User altered.

SQL> Disconnected from Oracle Database 23c Free Release 23.0.0.0.0 - Develop, Learn, and Run for Free
Version 23.3.0.23.09
The Oracle base remains unchanged with value /opt/oracle
#########################
DATABASE IS READY TO USE!
#########################
The following output is now a tail of the alert.log:
Completed: Pluggable database FREEPDB1 opened read write
Completed: ALTER DATABASE OPEN
2023-11-30T22:40:55.538359+00:00
===========================================================
Dumping current patch information
===========================================================
No patches have been applied
===========================================================
2023-11-30T22:40:57.521629+00:00
FREEPDB1(3):TABLE AUDSYS.AUD$UNIFIED: ADDED INTERVAL PARTITION SYS_P342 (3440) VALUES LESS THAN (TIMESTAMP' 2023-12-01 00:00:00')
2023-11-30T22:41:00.565540+00:00
TABLE SYS.WRP$_REPORTS: ADDED AUTOLIST FRAGMENT SYS_P413 (3) VALUES (( 1418518649, TO_DATE(' 2023-11-27 00:00:00', 'syyyy-mm-dd hh24:mi:ss', 'nls_calendar=gregorian') ))
TABLE SYS.WRP$_REPORTS_DETAILS: ADDED AUTOLIST FRAGMENT SYS_P414 (3) VALUES (( 1418518649, TO_DATE(' 2023-11-27 00:00:00', 'syyyy-mm-dd hh24:mi:ss', 'nls_calendar=gregorian') ))
TABLE SYS.WRP$_REPORTS_TIME_BANDS: ADDED AUTOLIST FRAGMENT SYS_P417 (3) VALUES (( 1418518649, TO_DATE(' 2023-11-27 00:00:00', 'syyyy-mm-dd hh24:mi:ss', 'nls_calendar=gregorian') ))
2023-11-30T22:41:45.639208+00:00
FREEPDB1(3):Resize operation completed for file# 13, fname /opt/oracle/oradata/FREE/FREEPDB1/sysaux01.dbf, old size 317440K, new size 327680K
2023-11-30T22:41:45.663044+00:00
FREEPDB1(3):Resize operation completed for file# 13, fname /opt/oracle/oradata/FREE/FREEPDB1/sysaux01.dbf, old size 327680K, new size 337920K
2023-11-30T22:46:51.616417+00:00
Resize operation completed for file# 201, fname /opt/oracle/oradata/FREE/temp01.dbf, old size 20480K, new size 86016K
Resize operation completed for file# 201, fname /opt/oracle/oradata/FREE/temp01.dbf, old size 86016K, new size 151552K
Resize operation completed for file# 201, fname /opt/oracle/oradata/FREE/temp01.dbf, old size 151552K, new size 217088K
2023-11-30T22:46:53.024736+00:00
Resize operation completed for file# 201, fname /opt/oracle/oradata/FREE/temp01.dbf, old size 217088K, new size 282624K
Resize operation completed for file# 201, fname /opt/oracle/oradata/FREE/temp01.dbf, old size 282624K, new size 348160K
2023-11-30T22:50:45.816010+00:00
Resize operation completed for file# 3, fname /opt/oracle/oradata/FREE/sysaux01.dbf, old size 573440K, new size 593920K
2023-11-30T23:00:46.159283+00:00
Resize operation completed for file# 3, fname /opt/oracle/oradata/FREE/sysaux01.dbf, old size 593920K, new size 604160K
2023-11-30T23:00:46.228087+00:00
FREEPDB1(3):Resize operation completed for file# 13, fname /opt/oracle/oradata/FREE/FREEPDB1/sysaux01.dbf, old size 337920K, new size 358400K
2023-12-01T00:30:43.494249+00:00
--ATTENTION--
Heavy swapping observed on system
WARNING: Heavy swapping observed on system in last 5 mins.
Heavy swapping can lead to timeouts, poor performance, and instance eviction.
2023-12-01T12:40:07.820678+00:00
Warning: VKTM detected a forward time drift.
Please see the VKTM trace file for more details:
/opt/oracle/diag/rdbms/free/FREE/trace/FREE_vktm_46.trc
2023-12-01T16:09:32.702179+00:00
Warning: VKTM detected a forward time drift.
Time drifts can result in unexpected behavior such as time-outs.
Please see the VKTM trace file for more details:
/opt/oracle/diag/rdbms/free/FREE/trace/FREE_vktm_46.trc
2023-12-01T18:02:02.658867+00:00
FREEPDB1(3):Resize operation completed for file# 13, fname /opt/oracle/oradata/FREE/FREEPDB1/sysaux01.dbf, old size 358400K, new size 368640K
2023-12-01T18:22:03.858970+00:00
Resize operation completed for file# 3, fname /opt/oracle/oradata/FREE/sysaux01.dbf, old size 604160K, new size 624640K
2023-12-01T20:31:39.671144+00:00
Warning: VKTM detected a forward time drift.
Time drifts can result in unexpected behavior such as time-outs.
Please see the VKTM trace file for more details:
/opt/oracle/diag/rdbms/free/FREE/trace/FREE_vktm_46.trc
2023-12-01T22:16:50.007797+00:00
Warning: VKTM detected a forward time drift.
Time drifts can result in unexpected behavior such as time-outs.
Please see the VKTM trace file for more details:
/opt/oracle/diag/rdbms/free/FREE/trace/FREE_vktm_46.trc
2023-12-01T23:11:39.776733+00:00
Resize operation completed for file# 3, fname /opt/oracle/oradata/FREE/sysaux01.dbf, old size 624640K, new size 634880K
2023-12-01T23:11:39.920882+00:00
FREEPDB1(3):Resize operation completed for file# 13, fname /opt/oracle/oradata/FREE/FREEPDB1/sysaux01.dbf, old size 368640K, new size 378880K
2023-12-01T23:11:45.530407+00:00
Begin automatic SQL Tuning Advisor run for special tuning task "SYS_AUTO_SQL_TUNING_TASK".
2023-12-01T23:11:46.626668+00:00
End automatic SQL Tuning Advisor run for special tuning task "SYS_AUTO_SQL_TUNING_TASK".
2023-12-01T23:11:56.518724+00:00
TABLE SYS.WRI$_OPTSTAT_HISTHEAD_HISTORY: ADDED INTERVAL PARTITION SYS_P473 (45260) VALUES LESS THAN (TO_DATE(' 2023-12-02 00:00:00', 'SYYYY-MM-DD HH24:MI:SS', 'NLS_CALENDAR=GREGORIAN'))
TABLE SYS.WRI$_OPTSTAT_HISTGRM_HISTORY: ADDED INTERVAL PARTITION SYS_P476 (45260) VALUES LESS THAN (TO_DATE(' 2023-12-02 00:00:00', 'SYYYY-MM-DD HH24:MI:SS', 'NLS_CALENDAR=GREGORIAN'))
2023-12-01T23:13:58.659641+00:00
Resize operation completed for file# 1, fname /opt/oracle/oradata/FREE/system01.dbf, old size 1085440K, new size 1095680K
2023-12-01T23:14:27.016016+00:00
Thread 1 advanced to log sequence 3 (LGWR switch),  current SCN: 3248652
  Current log# 3 seq# 3 mem# 0: /opt/oracle/oradata/FREE/redo03.log
2023-12-01T23:14:47.256059+00:00
cellip.ora not found.
2023-12-01T23:14:54.365395+00:00
Resize operation completed for file# 11, fname /opt/oracle/oradata/FREE/undotbs01.dbf, old size 40960K, new size 46080K
Resize operation completed for file# 11, fname /opt/oracle/oradata/FREE/undotbs01.dbf, old size 46080K, new size 51200K
2023-12-01T23:16:40.460917+00:00
--ATTENTION--
Heavy swapping observed on system
WARNING: Heavy swapping observed on system in last 5 mins.
Heavy swapping can lead to timeouts, poor performance, and instance eviction.
2023-12-02T11:40:23.802013+00:00
Warning: VKTM detected a forward time drift.
Please see the VKTM trace file for more details:
/opt/oracle/diag/rdbms/free/FREE/trace/FREE_vktm_46.trc
2023-12-02T11:40:24.917287+00:00
Warning: VKTM detected a forward time drift.
Time drifts can result in unexpected behavior such as time-outs.
Please see the VKTM trace file for more details:
/opt/oracle/diag/rdbms/free/FREE/trace/FREE_vktm_46.trc
2023-12-02T11:40:34.601396+00:00
TABLE SYS.ACTIVITY_TABLE$: ADDED INTERVAL PARTITION SYS_P493 (2) VALUES LESS THAN (202)
2023-12-02T19:35:06.380899+00:00
Warning: VKTM detected a forward time drift.
Time drifts can result in unexpected behavior such as time-outs.
Please see the VKTM trace file for more details:
/opt/oracle/diag/rdbms/free/FREE/trace/FREE_vktm_46.trc
2023-12-02T19:35:11.094760+00:00
Begin automatic SQL Tuning Advisor run for special tuning task "SYS_AUTO_SQL_TUNING_TASK".
2023-12-02T19:35:11.913190+00:00
FREEPDB1(3):TABLE SYS.WRI$_OPTSTAT_HISTHEAD_HISTORY: ADDED INTERVAL PARTITION SYS_P442 (45261) VALUES LESS THAN (TO_DATE(' 2023-12-03 00:00:00', 'SYYYY-MM-DD HH24:MI:SS', 'NLS_CALENDAR=GREGORIAN'))
FREEPDB1(3):TABLE SYS.WRI$_OPTSTAT_HISTGRM_HISTORY: ADDED INTERVAL PARTITION SYS_P445 (45261) VALUES LESS THAN (TO_DATE(' 2023-12-03 00:00:00', 'SYYYY-MM-DD HH24:MI:SS', 'NLS_CALENDAR=GREGORIAN'))
2023-12-02T19:35:12.623823+00:00
FREEPDB1(3):TABLE SYS.ACTIVITY_TABLE$: ADDED INTERVAL PARTITION SYS_P446 (2) VALUES LESS THAN (202)
2023-12-02T19:35:15.630900+00:00
End automatic SQL Tuning Advisor run for special tuning task "SYS_AUTO_SQL_TUNING_TASK".
2023-12-02T19:35:26.656198+00:00
TABLE SYS.WRI$_OPTSTAT_HISTHEAD_HISTORY: ADDED INTERVAL PARTITION SYS_P513 (45261) VALUES LESS THAN (TO_DATE(' 2023-12-03 00:00:00', 'SYYYY-MM-DD HH24:MI:SS', 'NLS_CALENDAR=GREGORIAN'))
TABLE SYS.WRI$_OPTSTAT_HISTGRM_HISTORY: ADDED INTERVAL PARTITION SYS_P516 (45261) VALUES LESS THAN (TO_DATE(' 2023-12-03 00:00:00', 'SYYYY-MM-DD HH24:MI:SS', 'NLS_CALENDAR=GREGORIAN'))
2023-12-02T19:36:00.842540+00:00
FREEPDB1(3):TABLE SYS.WRP$_REPORTS: ADDED AUTOLIST FRAGMENT SYS_P482 (2) VALUES (( 2054829351, TO_DATE(' 2023-11-27 00:00:00', 'syyyy-mm-dd hh24:mi:ss', 'nls_calendar=gregorian') ))
FREEPDB1(3):TABLE SYS.WRP$_REPORTS_DETAILS: ADDED AUTOLIST FRAGMENT SYS_P483 (2) VALUES (( 2054829351, TO_DATE(' 2023-11-27 00:00:00', 'syyyy-mm-dd hh24:mi:ss', 'nls_calendar=gregorian') ))
FREEPDB1(3):TABLE SYS.WRP$_REPORTS_TIME_BANDS: ADDED AUTOLIST FRAGMENT SYS_P486 (2) VALUES (( 2054829351, TO_DATE(' 2023-11-27 00:00:00', 'syyyy-mm-dd hh24:mi:ss', 'nls_calendar=gregorian') ))
2023-12-02T19:36:49.488283+00:00
cellip.ora not found.
2023-12-02T19:36:59.941785+00:00
FREEPDB1(3):Resize operation completed for file# 12, fname /opt/oracle/oradata/FREE/FREEPDB1/system01.dbf, old size 286720K, new size 296960K
2023-12-02T19:38:11.214065+00:00
FREEPDB1(3):cellip.ora not found.
2023-12-02T19:39:38.144241+00:00
Resize operation completed for file# 3, fname /opt/oracle/oradata/FREE/sysaux01.dbf, old size 634880K, new size 645120K
2023-12-02T19:39:38.254317+00:00
FREEPDB1(3):Resize operation completed for file# 13, fname /opt/oracle/oradata/FREE/FREEPDB1/sysaux01.dbf, old size 378880K, new size 389120K
2023-12-02T19:39:45.971914+00:00
--ATTENTION--
Heavy swapping observed on system
WARNING: Heavy swapping observed on system in last 5 mins.
Heavy swapping can lead to timeouts, poor performance, and instance eviction.
2023-12-02T19:49:39.226372+00:00
Resize operation completed for file# 3, fname /opt/oracle/oradata/FREE/sysaux01.dbf, old size 645120K, new size 655360K
2023-12-02T19:49:55.006771+00:00
Thread 1 cannot allocate new log, sequence 4
Private strand flush not complete
  Current log# 3 seq# 3 mem# 0: /opt/oracle/oradata/FREE/redo03.log
2023-12-02T19:49:58.006305+00:00
Thread 1 advanced to log sequence 4 (LGWR switch),  current SCN: 3327607
  Current log# 1 seq# 4 mem# 0: /opt/oracle/oradata/FREE/redo01.log
2023-12-02T19:51:10.096706+00:00
cellip.ora not found.
2023-12-02T19:59:39.923548+00:00
Resize operation completed for file# 3, fname /opt/oracle/oradata/FREE/sysaux01.dbf, old size 655360K, new size 665600K
2023-12-02T23:44:23.322751+00:00
Warning: VKTM detected a forward time drift.
Time drifts can result in unexpected behavior such as time-outs.
Please see the VKTM trace file for more details:
/opt/oracle/diag/rdbms/free/FREE/trace/FREE_vktm_46.trc
2023-12-03T01:20:19.592589+00:00
Warning: VKTM detected a forward time drift.
Time drifts can result in unexpected behavior such as time-outs.
Please see the VKTM trace file for more details:
/opt/oracle/diag/rdbms/free/FREE/trace/FREE_vktm_46.trc
2023-12-03T01:25:01.817094+00:00
FREEPDB1(3):Resize operation completed for file# 13, fname /opt/oracle/oradata/FREE/FREEPDB1/sysaux01.dbf, old size 389120K, new size 399360K
2023-12-03T01:25:11.199280+00:00
TABLE SYS.WRI$_OPTSTAT_HISTHEAD_HISTORY: ADDED INTERVAL PARTITION SYS_P553 (45262) VALUES LESS THAN (TO_DATE(' 2023-12-04 00:00:00', 'SYYYY-MM-DD HH24:MI:SS', 'NLS_CALENDAR=GREGORIAN'))
TABLE SYS.WRI$_OPTSTAT_HISTGRM_HISTORY: ADDED INTERVAL PARTITION SYS_P556 (45262) VALUES LESS THAN (TO_DATE(' 2023-12-04 00:00:00', 'SYYYY-MM-DD HH24:MI:SS', 'NLS_CALENDAR=GREGORIAN'))
2023-12-03T01:25:13.434023+00:00
FREEPDB1(3):TABLE SYS.WRI$_OPTSTAT_HISTHEAD_HISTORY: ADDED INTERVAL PARTITION SYS_P502 (45262) VALUES LESS THAN (TO_DATE(' 2023-12-04 00:00:00', 'SYYYY-MM-DD HH24:MI:SS', 'NLS_CALENDAR=GREGORIAN'))
FREEPDB1(3):TABLE SYS.WRI$_OPTSTAT_HISTGRM_HISTORY: ADDED INTERVAL PARTITION SYS_P505 (45262) VALUES LESS THAN (TO_DATE(' 2023-12-04 00:00:00', 'SYYYY-MM-DD HH24:MI:SS', 'NLS_CALENDAR=GREGORIAN'))
2023-12-03T01:26:29.620704+00:00
FREEPDB1(3):cellip.ora not found.
2023-12-03T01:26:36.758289+00:00
cellip.ora not found.
2023-12-03T02:25:52.946809+00:00
Warning: VKTM detected a forward time drift.
Time drifts can result in unexpected behavior such as time-outs.
Please see the VKTM trace file for more details:
/opt/oracle/diag/rdbms/free/FREE/trace/FREE_vktm_46.trc
2023-12-03T02:27:56.055089+00:00
--ATTENTION--
Heavy swapping observed on system
WARNING: Heavy swapping observed on system in last 5 mins.
Heavy swapping can lead to timeouts, poor performance, and instance eviction.
2023-12-03T02:32:47.996105+00:00
Resize operation completed for file# 3, fname /opt/oracle/oradata/FREE/sysaux01.dbf, old size 665600K, new size 675840K
You can connect to the Oracle Database 23c Free container with the following syntax:
docker exec -it -u root oracle23c bash |
At the command-line, you connect to the Oracle Database 23c Free container with the following syntax:
sqlplus system/cangetin@free |
You have arrived at the Oracle SQL prompt:
SQL*Plus: Release 23.0.0.0.0 - Production on Fri Dec 1 00:13:55 2023 Version 23.3.0.23.09 Copyright (c) 1982, 2023, Oracle. All rights reserved. Last Successful login time: Thu Nov 30 2023 23:27:54 +00:00 Connected to: Oracle Database 23c Free Release 23.0.0.0.0 - Develop, Learn, and Run for Free Version 23.3.0.23.09 SQL> |
As always, I hope this helps those trying to work with the newest Oracle stack.
AlmaLinux Install & Configuration
This is a collection of blog posts for installing and configuring AlmaLinux with the Oracle, PostgreSQL, MySQL databases and several programming languages. Sample programs show how to connect PHP and Python to the MySQL database.
- Installing AlmaLinux operating system
- Installing and configuring MySQL
- Installing Python-MySQL connector and provide sample programs
- Configuring Flask for Python on AlmaLinux with a complete software router instruction set.
- Installing Rust programming language and writing a sample program
- Installing and configuring LAMP stack with PHP and MySQL and a self-signed security key
- MySQL PNG Images in LAMP with PHP Programming
- Demonstration of how to write Perl that connects to MySQL
- Installing and configuring MySQL Workbench
- Installing and configuring PostgreSQL and pgAdmin4
- Identifying the required libnsl2-devel packages for SQL*Plus
- Writing and deploying a sqlplus function to use a read line wrapper
- Installing and configuring Visual Studio Code Editor
- Installing and configuring Java with connectivity to MySQL
- Installing and configuring Oracle SQL Developer
I used Oracle Database 11g XE in this instance to keep the footprint as small as possible. It required a few tricks and discovering the missing library that caused folks grief eleven years ago. I build another with a current Oracle Database XE after the new year.
If you see something that I missed or you’d like me to add, let me know. As time allows, I’ll try to do that. Naturally, the post will get updates as things are added later.
AlmaLinux Installation
These are the instructions for installing AlmaLinux 9 on MacOS Intel with VMware. It’s broken into three parts: Configuration, Installation, and Setup.
You should download the current or desired older version of AlmaLinux from the website. It’s a good idea to install it in a source directory or folder.
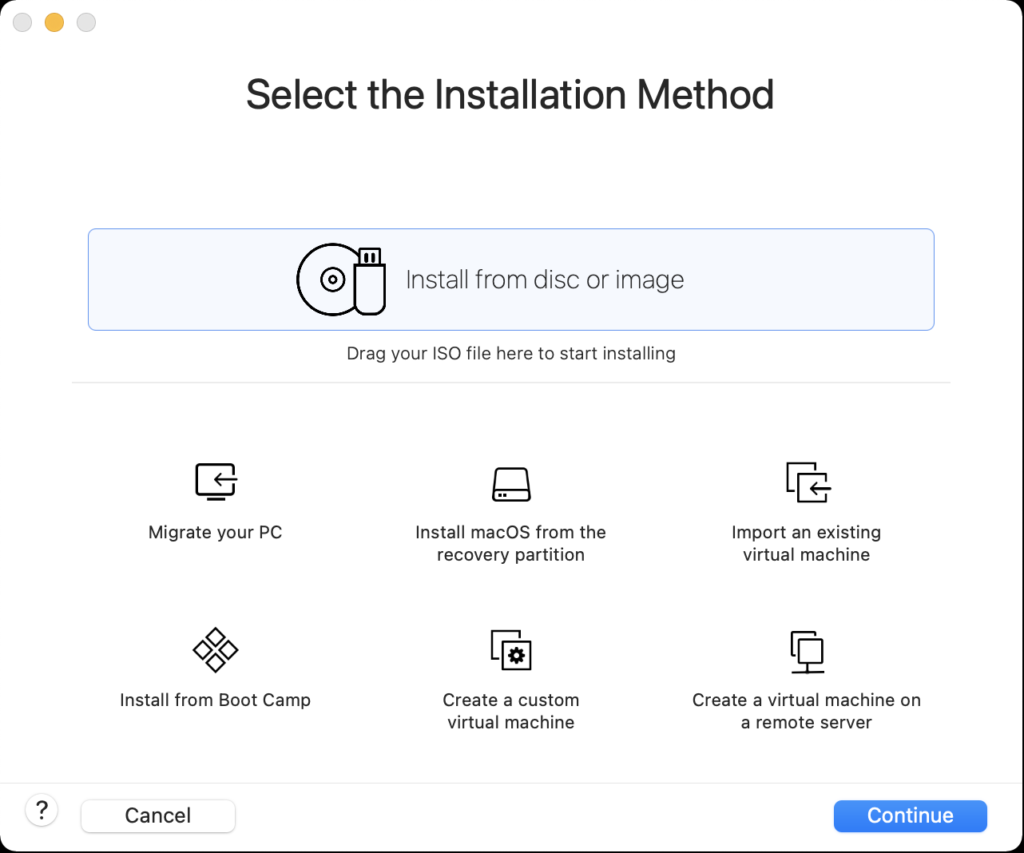
You need to launch VMware, click the File menu option and then the New menu option before you can configure, install, and setup AlmaLinux. It will show you the following dialog.
Use the Finder to drag the AlmaLinux-9-latest-x86_64-dvd.iso file on to the Install from disc or image to begin the configuration process.
Configuration
- The first thing you need to do is configure the VMware container. You click on the wrench icon in the menu bar that lets you edit the hardware settings for this virtual machine. This opens the general settings dialog.
- The General System Settings dialog lets you will configure the isolation properties for “drag and drop” and “copy and paste”, and define the network adapter.
- Click on the Isolation menu option from the General System Settings dialog, and enable “Drag adn Drop” and “Copy and Paste” checkboxes. Then, return to the General System Settings dialog/li>
- Click on the Network Adapter menu option from the General System Settings dialog, and click the “Autodetect” checkbox. Then, return to the General System Settings dialog.
Installation
- The first the install asks you to do is type an I for install or T for test. Generally, you can skip the test if this is a copied file rather than DVD.
- Click the Tab key to configure the target installation or Enter key to skip the automatic boot delay.
- Choose the installation language and click the Continue button.
- The Installation Summary dialog lets you fix anything with a warning message orange triangle. Fix the Root Password first by clicking on the text.
- Enter the Root Password twice, click the Lock root account checkbox to unselect it, and click the Allow root SSH login with password checkbox to enable it.
- Click the Done button to complete setting the root password.
- After fixing the root password, click on the Installation Destination item to change the default partition.
- Click the Done button to accept the initial size of the VM partition.
- Click the Software Selection element to add software components to the default installation.
- Click the checkboxes for the following additional software:
- Debugging Tools
- Performance Tools
- Remote Desktop Clients
- Remote Management for Linux
- Legacy UNIX Compatibility
- Console Internet Tools
- Development Tools
- .NET Development
- Graphical Administration Tools
- System Tools
Click the Done button to accept the added software elements.
- Click the Begin Installation button to begin the installation of AlmaLinux.
- The Installing Progress dialog will show a progress bar for several minutes.
- The Installing Progress dialog eventually completes, and you click the Reboot System button to complete the installation.
Setup
- The Welcome to AlmaLinux page begins the set up of the operating systems.
- Click the Slide to disable location services.
- After clicking the Slide location services are disabled.
- The Online Account dialog lets you connect your email, online calendar, contacts, documents, and photos. You click the Skip button to avoid setting up any of the online accounts.
- The About You dialog lets you enter user account with sudoer privileges.
- The About You dialog enters a title case user’s name and a lowercase user’s name.
- The Password dialog lets you enter a case sensitive password.
- The Password dialog displays the entry of the passwords as dots.
- The Setup Complete dialog leaves you to click the Start Using AlmaLinux button to complete the setup.
- The blank image page displays until you click on it.
- The Welcome to AlmaLinux dialog invites you to take a tour or decline it. Click the No Thanks button to decline the tour.
- After declining the tour, it displays the core AlmaLinux screen.
- Rebooting the system is necessary to complete the installation. Click on the circle icon on the right to begin the process to restart or shutdown the operating system. Click on the Power Off / Log Out dropdown to continue.
- Click the Restart… menu option to restart the operating system.
- Click the Restart… menu option to confirm the restart of the operating system.
- Click the Student icon to get prompted for a password.
- Enter the Student password to connect to the AlmaLinux operating system.
- This displays the standard working interface for the AlmaLinux operating system.
VMware 7 Upgrade

The message said it was incompatible, and that I should navigate to:
Virtual Machine -> Settings -> Compatibility -> Upgrade
The Upgrade button checks the Allow upgrading the virtual hardware for this virtual machine checkbox. You will get prompted with the Would you like to upgrade this virtual machine? dialog for the next virtual machine.
Fedora VMWare Upgrade
When a new update of VMWare comes out, and it is time to upgrade VMWare Tools. Here’s an update on the instructions for upgrading VMWare Tools 6.0.1 through 6.0.4:
- Navigate to the VMWare Menu, choose Virtual Machine and in the drop down menu Install VMWare Tools. This will mount a virtual CD in the Oracle Unbreakable Linux virtual machine and it launches the following dialog box:
- Open a terminal session by right clicking anywhere in the desktop, and then choose Open in Terminal from the context menu. You can then run the VMWare Toolkit by following these instructions as the
rootuser:
The instructions for VMWare 6.0.0 through 6.0.2 are:
cd /media/VMware\ Tools cp VMwareTools-9.6.2-1688356.tar.gz /tmp cd /tmp gunzip VMwareTools-9.6.2-1688356.tar.gz tar -xvf VMwareTools-9.6.2-1688356.tar cd vmware-tools-distrib sudo ./vmware-install.pl |
VMWare changed where the VMWare Tools CD are mounted. You can discover it by clicking on the VMware Tools in the left pane (this assumes you log on to Fedora as the student user, and the student user is a sudo-enabled user)
The instructions for VMWare Tools 6.0.4 forward are listed below. Only the first command changes. You should also note that the VMWare Tools library is the same:
cd /run/media/student/VMware\ Tools cp VMwareTools-9.6.2-1688356.tar.gz /tmp cd /tmp gunzip VMwareTools-9.6.2-1688356.tar.gz tar -xvf VMwareTools-9.6.2-1688356.tar cd vmware-tools-distrib sudo ./vmware-install.pl |
The last step requires that you reply to a set of prompts. If you’d like to accept the default at one time, you can use the following command:
sudo ./vmware-install.pl --default |
Lastly, you’ll get these instructions form the Perl script that installs the VMWare tools:
The configuration of VMware Tools 9.6.2 build-1688356 for Linux for this running kernel completed successfully. You must restart your X session before any mouse or graphics changes take effect. You can now run VMware Tools by invoking "/usr/bin/vmware-toolbox-cmd" from the command line. To enable advanced X features (e.g., guest resolution fit, drag and drop, and file and text copy/paste), you will need to do one (or more) of the following: 1. Manually start /usr/bin/vmware-user 2. Log out and log back into your desktop session; and, 3. Restart your X session. Enjoy, --the VMware team |
A/UX, NeXTSTEP, & OS X
One thing that gets tedious in the IT community and Oracle community is the penchant for Windows only solutions. While Microsoft does an excellent job in certain domains, I remain a loyal Apple customer. By the way, you can install Oracle Client software on Mac OS X and run SQL Developer against any Oracle Database server. You can even run MySQL Workbench and MySQL server natively on the Mac OS X platform, which creates a robust development platform and gives you more testing options with the MySQL monitor (the client software).
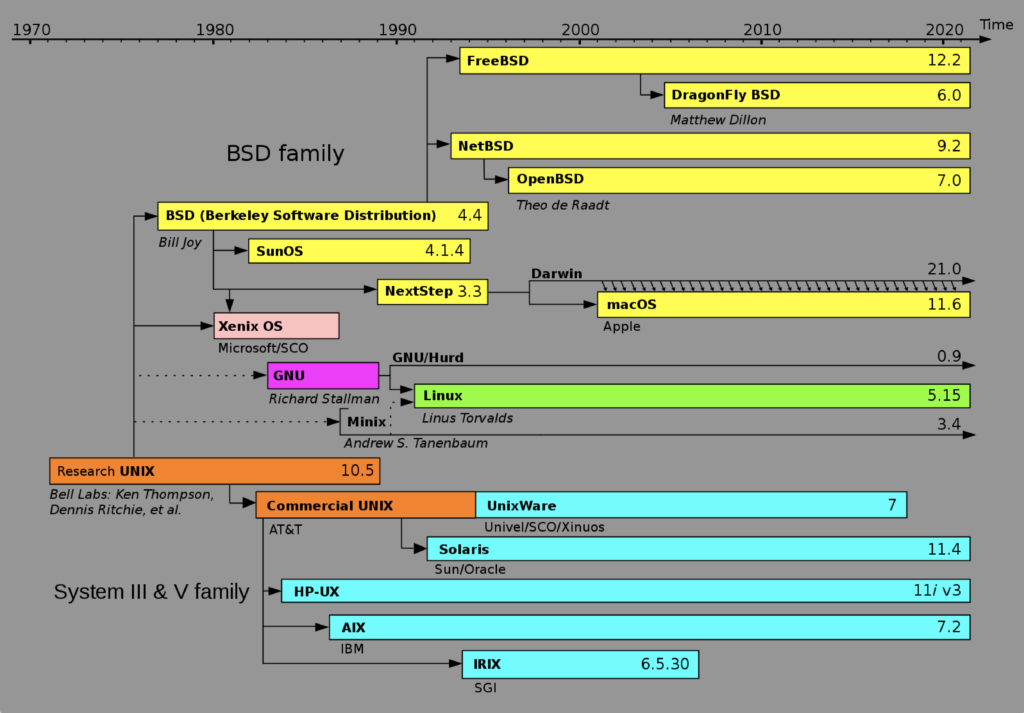
Notwithstanding, some Windows users appear to malign Apple and the Mac OS X on compatibility, but they don’t understand that it’s a derivative of the Research Unix, through BSD (Berkeley Software Distribution). This Unix lineage chart illustrates it well:
I’m probably loyal to Apple because in the early 1990’s I worked on Mac OS 6, Mac OS 7, A/UX, NeXTSTEP, and AIX/6000 (Version 3) while working at APL (American President Lines) in Oakland, California. Back then, my desktop was a pricey Macintosh Quadra 950 and today I work on a pricey Mac Pro desktop. The Mac Pro lets me use VMware virtualize development environments for Oracle Linux, Red Hat Enterprise Linux, Fedora, and as you might guess Windows 7/8. My question to those dyed in the wool Microsoft users is simple, why would you choose a single user OS like Windows over a multi-user OS like Mac OS X?
Fedora Install of MySQL
I built a new image on VMWare Fusion for my class, which required installing MySQL 5.6 on Fedora, Version 20. If you don’t know how to add your user to the sudoers list, you should check this older and recently updated blog post.
- Download the MySQL Yum Repository and launch the downloaded RPM.
- Install MySQL on Fedora, Version 20, which you can find with the following command:
shell> rpm -qa | grep mysql mysql-community-release-fc20-5.noarch |
The fc20-5 changes with point releases, but assuming that you’re installing the fc20-5 release:
shell> sudo yum localinstall mysql-community-release-fc20-5.noarch.rpm |
- Install MySQL on Fedora with the following command:
shell> sudo yum install mysql-server |
- Start the MySQL service on Fedora with the following command:
shell> sudo service mysqld start |
- Secure the MySQL installation with the following command:
shell> mysql_secure_installation |
- Set the MySQL Service to start with the Fedora operating system with the following command (not
chkconfig):
shell> sudo systemctl enable mysqld.service |
It sets the following two links:
ln -s '/usr/lib/systemd/system/mysqld.service' '/etc/systemd/system/mysql.service' ln -s '/usr/lib/systemd/system/mysqld.service' '/etc/systemd/system/multi-user.target.wants/mysqld.service' |
Restart the Fedora operating system to effect the changes.
- Reset the MySQL configuration file to enable external connections through Port 3306 with the following changes to the my:
Remark out the socket line, like this:
#socket=/var/lib/mysql/mysql.sock |
Add the bind-address and port lines below after you know the actual IP address of the server to the my.cnf file in the /etc directory.
You substitute the actual IP address for the nnn.nnn.nnn.nnn on the bind_address line with the actual IP address returned by the ifconfig command, like this:
shell> ifconfig |
Then, add these two lines to the my.cnf file.
bind-address=nnn.nnn.nnn.nnn port=3306 |
It’s actually easier to use localhost.localdomain than an IP address when you use DHCP, like:
bind-address=localhost.localdomain port=3306 |
If you plan to connect from a host system, like Windows or Mac OS X, to a virtual Linux environment using DHCP, change localhost.localdomain to 0.0.0.0:
bind-address=0.0.0.0 port=3306 |
- Restart the mysqld service with the following syntax:
shell> sudo service mysqld restart |
You can check whether MySQL is listening on Port 3306 with this syntax:
shell> sudo netstat –anp | grep 3306 |
It displays:
tcp 0 0 127.0.0.1:3306 0.0.0.0:* LISTEN 1311/mysqld |
Go to this page if you want to install MySQL Workbench.
Oracle Linux & VMWare Tools
Wow, I’ve been busy since OOW2011. This is the first post since I left for San Francisco. My Android phone got blown out by a forced upgrade and would only charge when actively connected across the USB to the computer. At the conference, my laptop was sidelined as a charger.
Anyway, I’m back working on virtual environments again. I found a couple slight variation installing VMWare Tools on Oracle Unbreakable Linux. Here are the post installation steps that I encountered, and the IP addresses are based on how VMWare configured DHCP, which is qualified in this older post.
- Navigate to the VMWare Menu, choose Virtual Machine and in the drop down menu Install VMWare Tools. This will mount a virtual CD in the Oracle Unbreakable Linux virtual machine and it launches the following dialog box:
- Open a terminal session by right clicking anywhere in the desktop, and then choose Open in Terminal from the context menu. You can then run the VMWare Toolkit by following these instructions:
cd /media/VMware\ Tools cp VMwareTools-8.4.7-416484.tar.gz /tmp cd /tmp gunzip VMwareTools-8.4.7-416484.tar.gz tar -xvf VMwareTools-8.4.7-416484.tar cd vmware-tools-distrib sudo ./vmware-install.pl |
The last step requires that you reply to a set of prompts. If you’d like to accept the default at one time, you can use the following command:
sudo ./vmware-install.pl --default |
You should most likely encounter an error like the following, which it appears you can ignore. If I find anything to the contrary, the post will be updated with findings.
(EE) Failed to load module "vmwgfx" (module does not exist, 0) (EE) vmware: Please ignore the above warnings about not being able to load module/driver vmwgfx (EE) open /dev/fb0: No such device |
- In the terminal session you should configure three files to make sure your networking works. I found that the dialogs failed to set one key element, so it’s simply easier to do this manually. Rather than using
sudo, you should open arootshell by doing:
su - root |
Enter your user’s password:
Password: |
You should use vi to edit and save the resolv.conf file with appropriate domain, search, and nameserver values. The values below work for VMWare when the gateway IP address is 172.16.123.2.
# Generated by NetworkManager
domain localdomain
search localdomain
nameserver 172.16.123.2 |
Using vi, edit the /etc/sysconfig/network file to include an appropriate gateway IP address, like so:
NETWORKING=yes HOSTNAME=localhost.localdomain GATEWAY=172.16.123.2 |
The last file to fix is /etc/sysconfig/network-scripts/ifcfg-eth0 file. This is the file that isn’t completely configured by the GUI component (it fails set the ONBOOT value to yes).
DEVICE=eth0 HWADDR=00:0c:29:31:ef:46 ONBOOT=yes NM_CONTROLLED=yes BOOTPROTO=dhcp TYPE=Ethernet DNS1=172.16.123.2 USERCTL=no PEERDNS=yes IPV6INIT=no |
You reset networking with the following command:
/etc/rc.d/init.d/network restart |
As always, I hope this helps a few folks.
VMWare Fusion Permissions
It’s always interesting when I have to sort out problems with VMWare Fusion on my Mac OS X. Right, as you guessed, interesting means frustrating. 😉 What started the whole thing was my investigating why VMWare networking would sometimes not start. I noticed the problem began after my upgrade to VMWare Fusion 3.1.0 (261058).
Rather than reboot the Mac OS X, which has fixed the problem, I tried to restart the service after closing my VMs. You can find how to do that in this older post of mine.
When I tried to restart it with the following command:
# sudo /Library/Application\ Support/VMware\ Fusion/boot.sh --restart |
I got the following error on VMWare file permissions:
VMware Fusion 261058: Shutting down VMware Fusion: Stopped DHCP service on vmnet1 Disabled hostonly virtual adapter on vmnet1 Stopped DHCP service on vmnet8 Stopped NAT service on vmnet8 Disabled hostonly virtual adapter on vmnet8 Stopped all configured services on all networks No matching processes were found No matching processes were found No matching processes were found No matching processes were found No matching processes were found No matching processes were found (kernel) Kext com.vmware.kext.vmcrosstalk not found for unload request. Failed to unload com.vmware.kext.vmcrosstalk - (libkern/kext) not found. (kernel) Kext com.vmware.kext.vmmon not found for unload request. Failed to unload com.vmware.kext.vmmon - (libkern/kext) not found. VMware Fusion 261058: Starting VMware Fusion: 2010-06-10 22:22:30.588 repair_packages[455:607] PackageKit: *** Missing bundle identifier: /Library/Receipts/vpn.pkg Verifying files from package 'com.vmware.fusion.application' on '/'. Permissions differ on "Library/Application Support/VMware Fusion/VMDKMounter.app/Contents/MacOS/vmware-vmdkMounter", should be -rwxr-xr-x , they are -rwsr-xr-x . Warning: SUID file 'Library/Application Support/VMware Fusion/VMDKMounter.app/Contents/MacOS/vmware-vmdkMounter' has been modified and will not be repaired. Finished verifying files from package 'com.vmware.fusion.application' on '/'. Started network services Verifying and re-installing files from /Library/Application Support/VMware Fusion/thnuclnt |
Navigating to the directory, an ls -al found the two files below and their respective permissions.
drwxr-xr-x 4 root wheel 136 Jun 10 22:51 . drwxr-xr-x 5 root wheel 170 May 27 21:22 .. -rwsr-xr-x 1 root wheel 1593620 May 21 03:51 vmware-vmdkMounter -rwsr-xr-x 1 root wheel 1475396 May 21 03:51 vmware-vmdkMounterTool |
I thought perhaps both files required the same permissions but I was wrong. If you change the permissions on the vmware-vmdkMounterTool file, you’ll raise an error telling you that it should be -rwsr-xr-x. If you make that same mistake too, I’ve got the reset syntax at the bottom of the post.
You should only change the file permissions of vmware-vmdkMounter file. The following syntax lets you remove the sticky bit from the user permissions but you’ll need the root password (the administrator password).
sudo chmod u=rwx,go=rx vmware-vmdkMounter |
That should leave you with the following permissions:
drwxr-xr-x 4 root wheel 136 Jun 10 22:51 . drwxr-xr-x 5 root wheel 170 May 27 21:22 .. -rwxr-xr-x 1 root wheel 1593620 May 21 03:51 vmware-vmdkMounter -rwsr-xr-x 1 root wheel 1475396 May 21 03:51 vmware-vmdkMounterTool |
When you restart you should get the following pseudo clean output. Pseudo because apparently the two errors are not meaningful. At least, I couldn’t find anything on them and VMWare Fusion now works. I’ll probably investigate this a bit more later, and I’ll update anything in this post. If you know something, post it as a comment to help everybody.
VMware Fusion 261058: Shutting down VMware Fusion: Stopped DHCP service on vmnet1 Disabled hostonly virtual adapter on vmnet1 Stopped DHCP service on vmnet8 Stopped NAT service on vmnet8 Disabled hostonly virtual adapter on vmnet8 Stopped all configured services on all networks No matching processes were found No matching processes were found No matching processes were found No matching processes were found No matching processes were found No matching processes were found (kernel) Kext com.vmware.kext.vmcrosstalk not found for unload request. Failed to unload com.vmware.kext.vmcrosstalk - (libkern/kext) not found. (kernel) Kext com.vmware.kext.vmmon not found for unload request. Failed to unload com.vmware.kext.vmmon - (libkern/kext) not found. VMware Fusion 261058: Starting VMware Fusion: 2010-06-10 22:58:45.276 repair_packages[861:607] PackageKit: *** Missing bundle identifier: /Library/Receipts/vpn.pkg Verifying files from package 'com.vmware.fusion.application' on '/'. Finished verifying files from package 'com.vmware.fusion.application' on '/'. Started network services Verifying and re-installing files from /Library/Application Support/VMware Fusion/thnuclnt |
If you fat fingered the resetting command and also changed the vmware-vmdkMounterTool file permissions, you can reset them to shared user by using the following syntax:
sudo chmod u=rwxs,go=rx vmware-vmdkMounterTool |
As always, I hope this helps others.
VMWare Fusion NAT
This is to correct an earlier omission and provide instructions for configuring static and dynamic IP addresses for Virtual Machines runing on VMWare Fusion on Mac OS X. The benefit of static IP address is important for those installing multiple development and test instances of Oracle Databases in virtual environments.
Back in September 2008, I blogged about how to configure the Oracle Client 10g on Mac OS X. It’s been used a lot but in hindsight it could have been organized more effectively. One thing that I noticed (through somebody bringing it to my attention) is that explaining the VMWare Fusion component by itself would have been more helpful then listing the IP ranges for releases through the date of my post. Hopefully, this corrects that omission.
VMWare NAT Configuration
There are only a few steps that you must do. These are they:
- Read the subnet value from the
dhcpd.conffile. - Dynamic IP address only require you to set the guest operating system to DHCP.
- Static IP addresses require you to set the IP address, subnet, default gateway, and preferred DNS server.
- Add assigned IP address and the guest operating system
hostnameto your Mac OS X/etc/hostsfile.
The next sections gives the details of where to find all the things that you may want to experiment with. Remember if you make an error that damages these configuration files, you have to fix it or re-install VMWare Fusion.
VMWare NAT Files and Configurations
You can find the IP ranges for the Network Address Translation (NAT) here in VMWare 3:
/Library/Application Support/VMware Fusion/vmnet8/dhcpd.conf |
VMWare 4 changes the location, qualified below.
You can find the IP ranges for the Network Address Translation (NAT) here in VMWare 3:
/Library/Preferences/VMware Fusion/vmnet8/dhcpd.conf |
You can open the file for editing like this:
sudo vi "/Library/Application\ Support/VMware\ Fusion/vmnet8/dhcpd.conf" |
The file contains the subnet, which I’ve found changes with release. You can configure this file and assign fixed addresses in it. However, you don’t need to install fixed addresses in this file unless you want to reserve addresses in the dynamic range.
The dynamic range is between xxx.xxx.xxx.128 and xxx.xxx.xxx.254. The range of xxx.xxx.xxx.3 to xxx.xxx.xxx.127 is available for static IP addresses. You can set a static IP address inside the native operating system of the VM.
The dhcpd.conf file with it’s instructions, looks like this:
# Configuration file for ISC 2.0 vmnet-dhcpd operating on vmnet8. # # This file was automatically generated by the VMware configuration program. # See Instructions below if you want to modify it. # # We set domain-name-servers to make some DHCP clients happy # (dhclient as configured in SuSE, TurboLinux, etc.). # We also supply a domain name to make pump (Red Hat 6.x) happy. # ###### VMNET DHCP Configuration. Start of "DO NOT MODIFY SECTION" ##### # Modification Instructions: This section of the configuration file contains # information generated by the configuration program. Do not modify this # section. # You are free to modify everything else. Also, this section must start # on a new line # This file will get backed up with a different name in the same directory # if this section is edited and you try to configure DHCP again. # Written at: 02/18/2010 23:30:54 allow unknown-clients; default-lease-time 1800; # default is 30 minutes max-lease-time 7200; # default is 2 hours subnet 172.16.123.0 netmask 255.255.255.0 { range 172.16.123.128 172.16.123.254; option broadcast-address 172.16.123.255; option domain-name-servers 172.16.123.2; option domain-name localdomain; default-lease-time 1800; # default is 30 minutes max-lease-time 7200; # default is 2 hours option routers 172.16.123.2; } host vmnet8 { hardware ethernet 00:50:56:C0:00:08; fixed-address 172.16.123.1; option domain-name-servers 0.0.0.0; option domain-name ""; option routers 0.0.0.0; } ####### VMNET DHCP Configuration. End of "DO NOT MODIFY SECTION" ####### |
Unless you’ve changed the location of your VM repository on your Mac OS X, you can set a fixed-address for the virtual machine. You add the following lines at the bottom of the dhcpd.conf file:
host mclaughlinxp32 { hardware ethernet 00:0c:29:55:38:1b; fixed-address 172.16.123.21; } |
You pick whichever IP address you’d like to use. You also need to configure the guest opearting system in the VM with that same IP address. You can find the ethernet hardware value in the following file:
~/Documents/Virtual Machines/VMName/VMName.vmx |
You can open the file and hunt for it, or simply run this command from the directory where the file exists:
grep ethernet0.generatedAddress *.vmx |
As always, I hope this helps some folks.
