Big changes ahead

Austin skylineI’m making some big changes, both professionally and personally, that I’m very excited about. First, I’m shutting down Metaversant at the end of this month. I started the company a little over 12 years ago and I’m sad to see it go, but it is time for new challenges and opportunities.

It was exhilerating striking out on my own. I started with nothing but a laptop, a passion for technology, and a reputation for doing great work, and I created a profitable business delivering solutions for well-known organizations like NASA/Jet Propulsion Laboratory, Southwest Airlines, Red Hat Software, and Duke University.

But I’m also proud of the work I did for lesser-known clients, many of whom were active customers for six or seven years. Sure, I had a few “transactional” engagements here and there, but for several organizations I became a trusted advisor and developer for all kinds of technical endeavors for multiple years.

Many of you know me as an “Alfresco guy” and I’ve certainly benefitted tremendously from the deep knowledge I developed around that platform and from the wonderful people in the Alfresco community that I helped foster and grow. I wouldn’t trade those experiences or the relationships I built with people in all parts of the world for anything.

At the same time, some of my most exciting, rewarding, and impactful projects have been in other areas of content management and custom application development. Projects where code is just flying from my fingertips while I’m in the zone, or projects with many different systems working together in the cloud, or projects built collaboratively with talented teammates delivering solutions with millions of users. Those projects get me out of bed in the morning.

I’m someone that needs constant challenges and a lot of variety in what those challenges consist of. While starting my own company was a life-long dream, the kinds of projects that find me aren’t as exciting as they used to be. Yes, I could stop taking certain kinds of projects and put more effort behind marketing and business development for the projects I’m interested in. Or I could join a team that is awash in projects like that. I chose the latter. At the end of the month I’ll be joining Apple as a Principal Architect working in the Content Management Systems Center of Excellence.

As you can imagine, Apple has all sorts of content management challenges. A lot of those revolve around music and video so that appeals to me a lot. Regardless of the type of digital experiences their CMS technologies support, doing so at “Apple scale” really excites me.

As part of the new gig, Christy and I are moving to Austin. With its thriving live music scene it’s always been my kind of town, but as it has continued to grow as a tech hub it really became impossible to resist. And, I already have a fairly serious breakfast taco habit, so that’s one thing that won’t have to change with the relocation.

The geography change is kind of like the job change–we’ve lived in the same area for thirty years and it is definitely time to shake it up, especially with a mostly-empty nest. Staying in Texas wouldn’t necessarily be our first choice, but we both love Austin and it is close enough to Dallas that we’ll be able to visit friends and family quite frequently.

I want to thank all of the customers I’ve served over the years. We did some really great work together and we had a lot of fun doing it. I also want to thank everyone in the Alfresco community for reading and sharing my writing and my code, for sharing your knowledge and insights with me, and for encouraging me to keep going. How boring it must be for the unlucky ones who spend their days implementing solutions on platforms that don’t have such an amazing group of friends and colleagues scattered around the globe, collaborating with each other for the benefit of all.

Backpacking trip: Hoh River Trail to the Blue Glacier

I’m back from ten days in Washington State. I set the girls up in an Airbnb in Tacoma then headed into the wild with my long-time friends for a six-day backcountry adventure. We hiked 36.2 miles along the Hoh River Trail to the Blue Glacier and back, which is in the Olympic National Park. I’ve been to Seattle a bunch and have explored the San Juans by sailboat (see here and here), but this was my first trip to the Olympic National Park.

This trip had multiple milestones for me:

  • Longest total miles in a single trip. Total altitude was pretty tame, although I don’t have the specifics.
  • First time using a hammock tent. Luckily, there were plenty of trees at every campsite!
  • First time using trekking poles. Wow, total game-changer!
  • First backcountry trip where I didn’t get lost. (The time-I-got-lost-on-Mt.-Rainier story is a crowd favorite. I need to post it at some point).

We came back with the same number of folks we started with, and all reasonably healthy, but tired. I remember at the end of the trailhead telling the team I felt like I could do another week. Then, once I sat around a bit, the fatigue caught up with me and I’m still recovering.

The glacier was beautiful, though, and I really enjoyed that focused time with my friends.

If you want more details, check out:

Alfresco Developer Series Tutorials Updated for SDK 4.2/ACS 7.0

Today I spent some time updating the Alfresco Developer Series Tutorials for SDK 4.2 and Alfresco 7.0.

Most of my clients are still running 5.2 or 6.x at this point because 7.0 is still very new, but I’ve seen some questions on Stack Overflow and the Alfresco Forums asking questions about 7.0 so I figured it was time to get them upgraded.

Nothing really changed other than the reference to the newer SDK and Alfresco versions.

Creating custom Alfresco admin console panels

A common requirement for an Alfresco installation is the need to update configuration on customizations at runtime. One way to handle this is to add your own custom admin console panels to the out-of-the-box Alfresco admin console.

For example, suppose that at our company there is a system that manages data about our projects. Maybe it has a REST API that returns a list of projects. And, maybe we want to do something with that data from Alfresco.

It would be a good idea to centralize the logic that invokes the project API in a service class. The service class will need to know the URL of the project API. We could hardcode the project API URL, but then we’d have to build and deploy if it ever needs to be changed. We could put it in the alfresco-global.properties file and read it from there, which is a little better, but not great.

Alfresco already has an admin console that it uses to display and, in the case of Enterprise Edition, manage settings at runtime. This post shows how to add your own admin console panel to update settings of your custom service classes at runtime whether you use Enterprise or Community Edition.

This example uses a basic API built using Node and Express that returns a list of project names and IDs. In the real world your API won’t likely be part of the project–we use this “fake” API here as a convenient stand-in for demonstration purposes.

On the Alfresco side, we’ll create a UI action that gets the project list from the API and displays the projects in a dialog. It doesn’t really matter what we do with the data because the point of this example is to show how to make the API endpoint configurable via the admin console.

When you’re done, you’ll be able to invoke the API from Share and then change the API endpoint via the Alfresco admin console, and see that change reflected immediately on subsequent invocations from Share.

Ready? Let’s do it.

Steps

This code is available in GitHub. Each of the steps below is tagged. After you clone the repository you can switch between steps by doing git checkout step1 or git checkout step2 etc.

If you are going to follow along, clone the project:

git clone https://github.com/jpotts/alfresco-custom-admin.git

Then, checkout step0:

git checkout step0

The code now reflects an empty project created from the Alfresco SDK. At this point it is configured to use Community Edition. We’ll optionally switch over to Enterprise Edition in a while when the implementation steps become edition-specific.

The first three steps are about setting up the fake API as a Docker container, implementing a repo tier web script to fetch project data from the API, and then implementing a simple UI action that displays the project data in a Share dialog.

Once those steps are complete the path diverges: one step shows how to implement the custom admin console in Enterprise Edition and the other shows how to do it in Community Edition.

Step 1: Add a simple API to return project data

If you are following along:

git checkout step1

We want an API that returns a list of projects as JSON. A really easy way to do that is with Node.js and Express. So, we’ll add a new container to our Docker setup so that when we run Alfresco locally it will launch the fake API app.

Now we have a new Maven module called fake-projects-api that will build a Docker image that has the Node.js app. All we need to do is add it to the docker-compose.yml file that was bootstrapped when we created the project so that Docker Compose will create and run a container for the API alongside the containers for ACS, Share, and the others.

  • docker/docker-compose.yml. This is the original docker-compose.yml file provided by the Alfresco SDK, updated to include the new projects API.

If you want to test the API, run ./run.sh build_start then invoke this URL in your browser:

http://localhost:3000/projects

The API returns a list of project names and IDs as JSON.

Step 2: Add a service class and web script

If you are following along:

git checkout step2

At this point Alfresco is running and a Node.js app is running. The Node.js app represents our other enterprise API that we need to integrate with. In this step we’ll wire the two together by creating a repository tier web script that invokes the API and returns the list of projects. The web script won’t actually have the logic to call the API. Instead, we’ll put that in a service class to centralize the logic and make it easier to call from other places if needed.

I’ll create two model classes to make it easier to work with the JSON API response:

The service has the logic that actually invokes the API, and the web script calls that:

I’ll put the default value for the project service API URL in the alfresco-global.properties file. The web script Spring context can read it from there and inject it into the Project Service class.

Now you can run ./run.sh build_start from the root of the project source and after everything starts up, invoke the web script:

http://localhost:8080/alfresco/s/ecmarchitect/projects

To get a list of project names and IDs back as JSON.

[
    {
        "projectId": "A001",
        "projectName": "Some Project"
    },
    {
        "projectId": "A002",
        "projectName": "Some Other Project"
    },
    {
        "projectId": "A003",
        "projectName": "Yet Another Project"
    },
    {
        "projectId": "A004",
        "projectName": "Pilot Project"
    },
    {
        "projectId": "A005",
        "projectName": "Pet Project"
    }
]

Next, let’s add a small customization to Share that will invoke this API.

Step 3: Add a UI action that invokes the repo tier web script

If you are following along:

git checkout step3

The Share part of this example is not really important, but it is nice to have it just to verify that everything is working as we expect.

Let’s add a UI action that invokes client-side JavaScript. The client-side JavaScript will call the repo tier web script and display the results in a Share dialog.

If nothing is running, do a ./run.sh build_start to start everything up. If everything is still running from the previous step, run ./run.sh reload_share.

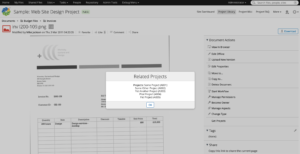
You should now be able to log in to Share, navigate to a document, and from either the document library or document details page click “Get Projects” to show the dialog with the list of project information retrieved from the API.

UI action showing API results

Enterprise Edition or Community Edition?

You now have a fake API, a repo web script that invokes it, and a Share UI action that calls the repo web script. Now it is time to add an admin console panel that can be used to configure the projects API URL at runtime.

Exactly how you do this differs between Enterprise Edition and Community Edition. It’s a bit easier with Enterprise Edition because the Enterprise Edition admin console supports JMX and it has a framework of sorts for displaying and modifying JMX-managed beans. In that case, we just add some JMX annotations to our service class and it becomes very easy to configure an admin panel that can get and set attributes on the JMX bean.

To see how that works, continue reading the next section, Step 4a.

If you are using Community Edition, it’s a bit more work because the admin console framework in Community Edition isn’t the same as the one in Enterprise Edition that relies heavily on JMX. But we can still add an admin console panel that will function just like the one in Enterprise Edition, from an end-user’s perspective.

To see how that works, skip the next section, Step 4a, and continue reading Step 4b.

Step 4a: Add the custom admin console panel to Enterprise Edition

If you are following along:

git checkout step4a

Up to this point, our project has been running Community Edition. If you are reading this section you’ve decided to move forward with Enterprise Edition, so the first change is to update the root pom.xml to change editions:

Of course you’ll need credentials for the private artifacts directory as well as quay.io for the Enterprise Docker image. I am assuming you already know where to put the credentials in your Maven and Docker authentication setup.

Next, the project service we created earlier needs some JMX annotations and the service-context.xml file needs a few additional JMX-related beans:

At this point, you could change the projects API URL at runtime using a JMX tool like JConsole or JMXTerm. But our goal is to create a custom admin panel. Admin console panels are just web scripts, so we’ll add a GET web script that renders the panel:

Be careful here. The path to the web script is important. It dictates where the panel shows up in the admin console. In this case, the important part of the path is “admin/ecmarchitect-tools”. That establishes a new section (“ecmarchitect-tools”) that we could use to group multiple panels. If we were to just use “admin” this new panel would show up in the “root” list of admin console panels, as a sibling to “System Summary”. It’s probably better to group them as I’ve done here.

Enterprise Edition comes with JMX support, and that makes it very easy to add our JMX managed beans to the admin console. Look at the web script controller. It’s just:

Admin.initModel(
    "ecmarchitect:name=Projects",
    ["ProjectsApiUrl"],
    "ecmarchitect-projects"
);

The initModel method of Admin takes care of everything for us. We just pass in three arguments:

  • The name of the bean. This value matches up with what’s in the “ecmarchitect-projects_MBeanExporter” Spring bean in service-context.xml.
  • An array of managed attributes. In this simple example there’s just one, ProjectsApiUrl, which is derived from the getter/setter method in the project service class.
  • The doc in admin-common.lib.js says this is the “ID of the current console tool” but it did not seem to matter what I put here, so I used values from my JMX bean to make a unique string, “ecmarchitect-projects”.

The freemaker view for this web script is also pretty succinct because the Enterprise Edition admin console framework does a lot of the work for us:

<#include "/org/alfresco/enterprise/repository/admin/admin-template.ftl" />
<@page title=msg("project-api-settings-console.title") readonly=false>
    <div class="column-full">
        <@section label=msg("project-api-settings-console.column") />
        <#-- Example - Retrieve keys - which are attribute names - use to index into attribute hash -->
        <#-- You can index directly by attribute name e.g. <@control attribute=attributes["Subject"] /> -->
        <#list attributes?keys as a>
            <@control attribute=attributes[a] />
        </#list>
    </div>
</@page>

This is all boilerplate with the exception of the message properties keys.

Since the last step, you’ve changed the Alfresco edition, so now you need to start fresh:

  1. Run ./run.sh purge to destroy and remove the existing containers.
  2. Run ./run.sh build_start to do a clean build and start up fresh containers.

Once everything comes up you can test your work:

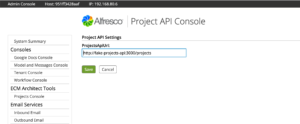
  1. Log in to the admin console and click TBD to see the new admin console panel. The projects API URL is already set because the default value
    from the alfresco-global.properties file was injected into the Project Service class.
  2. Go ahead and change the URL to a bad value, then click Save.
  3. Now go into Share and try out the UI action. It should fail.
  4. Go back into the admin console and change the URL to the correct value, which is http://fake-projects-api:3000/projects, then click Save.
  5. Now go back into Share and try the UI action again. It should display the project data successfully.

Custom admin console panel in Enterprise Edition

If you only care about Enterprise Edition, you’re done. You can make changes to the projects API URL at runtime via the admin console.

Note that if you deploy what we’ve built so far to a multi-node cluster, each node will have its own copy of the projects API URL and when you make a change to the URL on one node, it will not propagate to the other nodes. In a future blog post I’ll show to address that with a replicating cache.

If you want to see how much work Enterprise Edition saved you, or you just realized you read the wrong section, read on to see how to implement the same admin console panel in Community Edition.

Step 4b: Add the custom admin console panel to Community Edition

If you are following along:

git checkout step4b

Our Enterprise Edition friends turned the Project Service class into a JMX-managed bean, then took advantage of the pre-existing framework for admin console panels to create a panel that can get and set managed attributes. We aren’t so lucky, but it isn’t the end of the world. We can still have the exact same functionality, we just have to do a bit more work. That’s how it goes with Community Edition, right?

We’ll need a web script that establishes the admin console panel and renders a form with the current value of the projects API URL:

Assuming you skipped the Enterprise Edition section (Step 4a) I’ll reiterate what I said there about paths. The path to the web script is important. It dictates where the panel shows up in the admin console. In this case, the important part of the path is “admin/ecmarchitect-tools”. That establishes a new section (“ecmarchitect-tools”) that we could use to group multiple panels. If we were to just use “admin” this new panel would show up in the “root” list of admin console panels, as a sibling to “System Summary”.

These are the same file paths and names as the Enterprise Edition example, but the web script controller and the freemarker view are different.

The web script controller has to grab the project service bean from the Spring context so it can get the current value of the projects API URL and add it to the model:

ctxt = Packages.org.springframework.web.context.ContextLoader.getCurrentWebApplicationContext();
projectService = ctxt.getBean('project-service', Packages.com.ecmarchitect.alfresco.examples.projects.services.ProjectService);
model.projectsApiUrl = projectService.getProjectsApiUrl();

The remaining calls take advantage of the out-of-the-box Admin component:

model.tools = Admin.getConsoleTools("api-settings");
model.metadata = Admin.getServerMetaData();

The freemarker view is a bit more involved. Rather than relying on Alfresco to build the form, we’ve got to do it ourselves:

<#include "/org/alfresco/repository/admin/admin-template.ftl" />
<@page title=msg("project-api-settings-console.title") readonly=true>
    <link rel="stylesheet" type="text/css" href="${url.context}/alfresco-custom-admin/css/api-settings.css" />
    <script type="text/javascript" src="${url.context}/alfresco-custom-admin/js/api-settings.js"></script>
    <div id="message" class="message hidden">Successfully saved values.
        <a href="#"  title="Close">[X]</a>
    </div>
    <form id="api-settings-form">
        <div class="column-full">
            <h2>${msg("project-api-settings-console.column")}</h2>
            <div class="section">
            </div>
            <div class="control text">
                <span class="label">ProjectsApiUrl:</span>
                <span class="value"><input id="projectsApiUrl" name="ecmarchitect:name=Projects|ProjectsApiUrl" value="${projectsApiUrl}" maxlength="255" tabindex="0"/></span>
            </div>
        </div>
        <div class="submission buttons">
            <input type="button" value="Save" />
        </div>
    </form>
</@page>

In the call to the page macro, readonly is set to true because I don’t want Alfresco trying to create its own form–I’m going to handle it.

Next there are some references to stylesheets and a small JavaScript file which I’ll cover shortly.

Then there is a DIV that starts out as hidden. This will show itself after successfully saving the settings.

After that is a simple form. The form has an input for the projects API URL and a save button that invokes a function in the client-side JavaScript file to do the save. The client-side JavaScript file is:

We could have posted the form to a web script using the form’s action, but I thought it would be nicer to use AJAX instead. That gave me a chance to display a success message using the same style that’s used in the Enterprise Edition case, so the look-and-feel is a lot closer.

Note that in Community Edition, the out-of-the-box Admin object actually has a request method, but it does not set the content-type header properly when it makes the request, which breaks the automatic JSON handling in the POST web script. To fix this, I copied the request function into api-settings.js and set the header properly.

As mentioned earlier, the save button invokes a client-side function called ECMArchAdmin.saveSettings. The function POSTs JSON to a web script, which is responsible for actually saving the settings. Here’s the web script:

Similar to the GET web script, the POST web script controller gets the project service from the Spring context, then grabs the projects API URL from the JSON that was POSTed, and invokes the project service setter.

var obj = JSON.parse(json.toString());
var projectsApiUrl = obj.projectsApiUrl;

ctxt = Packages.org.springframework.web.context.ContextLoader.getCurrentWebApplicationContext();
projectService = ctxt.getBean('project-service', Packages.com.ecmarchitect.alfresco.examples.projects.services.ProjectService);
projectService.setProjectsApiUrl(projectsApiUrl);

model.projectsApiUrl = projectsApiUrl;

If you came to this step from Step 3 and everything is still running, you can do ./run.sh reload_acs to rebuild and restart the ACS container. Otherwise, run ./run.sh build_start to start everything up.

Once everything is up-and-running, you can test your work:

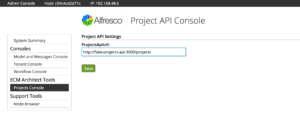
  1. log in to the admin console and click TBD to see the new admin console panel. The projects API URL is already set because the default value
    from the alfresco-global.properties file was injected into the Project Service class.
  2. Go ahead and change the URL to a bad value, then click Save.
  3. Now go into Share and try out the UI action. It should fail.
  4. Go back into the admin console and change the URL to the correct value, which is http://fake-projects-api:3000/projects, then click Save.
  5. Now go back into Share and try the UI action again. It should display the project data successfully.

Custom admin console panel in community edition

There you have it. You now know how to create your own custom admin console panels so that you can change properties on your Alfresco customizations at runtime. You saw that if you are using Enterprise Edition, it’s a little bit easier, because you can take advantage of JMX, whereas with Community Edition you have to render the form yourself and then write your own POST web script to call setters on your service class with updated data.

If you need to do more elaborate work on the admin console, take a look at the Order of the Bee Support Tools Add-On for further examples. It was really helpful to me when working on the Community Edition version of this example. And, if you are running Community Edition, you really ought to install that Add-On and maybe even get involved in helping maintain that project.

Photo credit: Data Center, Cushing Memorial Library, CC BY-NC-ND 2.0

Display a chart in Alfresco Share: Part Two

In Part One, you saw how to create an Alfresco Share dashlet that uses out-of-the-box Aikau widgets to chart data. In that example, the data came from a repository tier web script.

In this blog post, Part Two, you’ll see how to fetch the data from an external API called from the Share tier. The external API could be anything, but for this example we’ll implement it with Spring Boot. We’ll add a Docker module to the project so that the Spring Boot application will run in a container alongside the Alfresco and Share containers that are part of all Alfresco SDK projects. Finally, we’ll secure the external API so that only authenticated Alfresco users can invoke it.

Steps

This code is available in GitHub. Just like Part One, each of the steps below is tagged. After you clone the repository you can switch between steps by doing git checkout step4 or git checkout step5 etc. I’m starting with “Step 4” because Part One covered steps 1 – 3.

If you are going to follow along, and you haven’t already, clone the project:

git clone https://github.com/jpotts/alfresco-share-chart-example.git

Step 4: Add an external REST API with Spring Boot

If you are following along:

git checkout step4

The existing code invokes a web script in the repository tier that returns sales data. A more likely case is that the sales data comes from a REST API running external to Alfresco. In this step we’ll build a small Spring Boot application that simulates the external sales data API. To make things simple, we’ll add the new application as an additional module to the alfresco-share-chart-example project.

Switch to the root of the alfresco-share-chart-example project and create a new directory named alfresco-chart-example-api.

Within that, add a new pom.xml file that pulls in the Spring Boot dependency:

There are many ways to organize a Spring Boot app. I like to create separate files for my application, model, controllers, and services:

We’ll set the application port to 8000 in the application.properties file:

Test by switching into alfresco-chart-example-api and running mvn clean install. Then, run java -jar target/alfresco-chart-example-api-1.0-SNAPSHOT.jar. Once the app comes up you should be able to invoke:

http://localhost:8000/api/salesData

And see the JSON response.

Use ctl+c to stop the application.

Step 5: Create a Docker module for the example API

If you are following along:

git checkout step5

The Alfresco SDK uses Docker to run Alfresco and Alfresco Share, so we’ll do the same. To do that, create a new module directory called alfresco-chart-example-api-docker.

Within that, add a new pom.xml file. This pom.xml pulls in the application created in the previous step as a dependency so that it can be easily copied to the Docker image.

Now add a Dockerfile that builds the image. There are a lot of ways you can deploy Spring Boot apps with Docker. In this example, we’ll just use an Alpine Linux image with the JDK, and launch the Spring Boot app directly from the JAR, just like you did when you tested the app in the previous step.

When we start Alfresco with the run.sh script that is included with the SDK it builds the Alfresco containers, starts them up, and networks them together using Docker Compose. Our container should be included in that, so we’ll update the Docker Compose file that already exists off the root of the project source code and add corresponding tasks to the run scripts:

Finally, make sure to add the two new module directories to the root pom.xml:

Test by changing to the alfresco-chart-example-api-docker directory and running mvn clean install. Then, switch to the root of the project source and run ./run.sh reload_api or run.bat reload_api. This should cause a Docker container to start up with the Spring Boot application running. Again, you should be able to invoke:

http://localhost:8000/api/salesData

And see the JSON response.

Run ./run.sh stop or run.bat stop to stop the container.

At this point you should be able to do ./run.sh build_start or run.bat build_start to start up Alfresco, Alfresco Share, and the Spring Boot Example API, all at once.

Step 6: Update Share to fetch data from the API

If you are following along:

git checkout step6

Now Alfresco, Share, and the API are running, but the Share chart dashlet is still pulling its data from the repository tier web script. It’s time to update the dashlet to instead pull its data from the Spring Boot example API.

First, create a web script that the chart dashlet will call to get its data. This is similar to the one we created in the repository tier in Part One, but this one is going into the Share tier. You could run this in the repository tier, but putting it in the Share tier saves us one hop.

The web script calls the external API and returns the data in the format that the dashlet is expecting. To make that call, we’re using a built-in root-scoped object called “remote” that is able to call external REST APIs:

var connector = remote.connect("example-api");
var dataString = connector.get("/api/salesData?ticket=" + ticket);

That connector ID, “example-api”, refers to Share configuration that includes the actual host that is being connected to:

In this example, the API is running as a Docker container, so the endpoint-url refers to the Docker Compose service name:

<endpoint-url>http://alfresco-chart-example-api:8000</endpoint-url>

Finally, the CustomReportService we created in Part One is still referring to the repository tier web script. It needs to be updated to instead call the new Share tier web script:

You’ve made changes to Alfresco Share, so do ./run.sh reload_share or run.bat reload_share to rebuild and run the Share container. When it comes back up, go to Share at http://localhost:8180/share, log in, and go to the test site that has your chart dashlet.

The chart dashlet should now display data coming from the Spring Boot API.

Step 7: Secure the API to only allow requests from authenticated Alfresco users

If you are following along:

git checkout step7

The Alfresco Share sales summary dashlet is now pulling data from an external REST API. If you don’t mind that anyone can fetch that data from the REST API at any time, there is no need to go any further. In this example, let’s assume that only authenticated Alfresco users should be allowed to retrieve data from the REST API. How can we modify the API and the web script that calls it to meet that requirement?

First, let’s add a new service to alfresco-chart-example-api that knows how to validate Alfresco tickets:

The service uses the Alfresco 5.2 public REST API to ask Alfresco if the ticket is valid.

With that in place, the SalesDataController can be updated to validate the ticket before returning a response:

If you do a run.sh reload_api or run.bat reload_api at this point and try to invoke http://localhost:8000/api/salesData you should see a 401 returned, which is exactly what we want–if you don’t have a valid ticket you cannot invoke the sales data API.

To test a successful call, use curl to grab a ticket:

jpotts@Metaversant alfresco-share-chart-example % curl -X POST -H 'content-type: application/json' http://localhost:8080/alfresco/s/api/login -d'{"username":"admin", "password":"admin"}'
{
    "data":
    {
        "ticket":"TICKET_01b44089022f98740c3eb27009f49e787f9fb213"
    }
}

And then pass the ticket to the sales data API and the response should be successful:

jpotts@Metaversant alfresco-share-chart-example % curl "http://localhost:8000/api/salesData?ticket=TICKET_01b44089022f98740c3eb27009f49e787f9fb213"
[{"region":"North","amount":125},{"region":"South","amount":125},{"region":"East","amount":125},{"region":"West","amount":125}]

So far, so good.

The last step is to modify the Share tier web script that fetches the sales data from the API to pass along the ticket. One gotcha here is that Share does not have direct access to the ticket, so we’ll first add a tiny repository tier web script that returns the ticket:

And then we can modify the Share tier web script to fetch the ticket from the repository tier and pass it along to the sales data API:

The controller uses the same “remote” root-scoped object it used previously, but it relies on the default connector, which is the Alfresco repository web script connector, to fetch the ticket:

// Need to get the user's ticket from the repo
var ticketString = remote.call("/custom/ticket");
var ticketResponse = jsonUtils.toObject(ticketString);
var ticket = ticketResponse.ticket;

// Get the sales data from the API
var connector = remote.connect("example-api");
var dataString = connector.get("/api/salesData?ticket=" + ticket);

You’ve now made changes to both the repository tier and the share tier. Either reload each one with ./run.sh reload_acs and ./run.sh reload_share or do a ./run.sh stop to stop all the running containers followed by a ./run.sh build_start to start everything back up.

That’s it. You’ve now got an external API that returns data only to authenticated Alfresco users and a Share dashlet that displays that data in a pie chart.

Display a chart in Alfresco Share: Part One

The other day a customer asked how much trouble it would be to chart some data in an Alfresco Share dashlet. The data comes from a non-Alfresco REST API.

The answer is that it is relatively easy to do. That’s because Alfresco Share ships with some basic out-of-the-box chart widgets called BarChart, DonutChart, and PieChart. You may have seen examples of dashlets that use PieChart if you’ve ever added the Site Content Breakdown or Site Contributor Breakdown dashlets to your Share dashboard.

In this blog post, I’ll show you how to make your own chart dashlets by shamelessly stealing Erik Winlöf’s code that implements the Site Content Breakdown dashlet and modifying it for our own purposes to show sales data, by region, in a dashlet. In part one, the data is fetched from a repository tier web script. In part two, the data comes from a Spring Boot app.

Steps

This code is available in GitHub. Each of the steps below is tagged. After you clone the repository you can switch between steps by doing git checkout step1 or git checkout step2 etc.

If you are going to follow along, clone the project:

git clone https://github.com/jpotts/alfresco-share-chart-example.git

Then, checkout step0:

git checkout step0

And startup the project using Docker and Docker Compose:

./run.sh build_start

This will start up Alfresco using Docker with no customizations made at this point.

Step 1: Add a simple API to return the data to chart

If you are following along:

git checkout step1

If Alfresco is already running:

./run.sh reload_acs

We want to build a dashlet that can chart data fetched from an API source. So, to start, we’ll add a repository tier web script that returns data as JSON. Once the chart is working we can swap that out to an external data source.

The files that make up the web script are:

With the web script in place, invoking http://localhost:8080/alfresco/s/custom/data will return a JSON response with sales broken down by region, like this:

     {
         "resultset": [
           [
                 "West", 125
             ],
             [
                 "North", 75
             ],
             [
                 "East", 250
             ],
             [
                 "South", 150
             ]
         ],
         "metadata": [
             {
                 "colIndex": 0,
                 "colType": "String",
                 "colName": "name"
             },
             {
                 "colIndex": 1,
                 "colType": "Numeric",
                 "colName": "sum"
             }
         ]
     }

The format of the JSON is what the chart component expects–it includes a resultset property, with a list of data values, and a metadata property, which describes the data types found in the result set.

If you need exact steps on how to create a web script, see my webscripts tutorial.

Step 2: Add a dashlet

If you are following along:

git checkout step2

If Alfresco is already running:

./run.sh reload_share

In this step, add a dashlet. Share supports the old “Surf” way to add dashlets as well as the newer “Aikau” way to add a dashlet. Because we’re going to use an Aikau widget for the chart, we’ll use the Aikau approach for the dashlet.

Dashlets are implemented using web scripts, so we’ll need a descriptor, controller, and view template:

This is an Aikau dashlet, so in addition to the dashlet web script, we need an Aikau widget, implemented in client-side JavaScript, that sets up the dashlet:

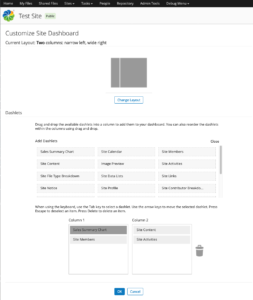
Now log in to Share at http://localhost:8180/share, create a test site, and customize the site’s dashboard to add the newly-created dashlet.

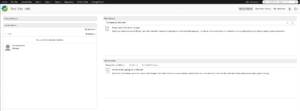
Customize dashlet page

It doesn’t have anything in it yet because we need to define a service to fetch the data and a widget to display it. That’s the next step.

An empty dashlet

Step 3: Add a widget and a service

If you are following along:

git checkout step3

If Alfresco is already running:

./run.sh reload_share

The last step is to add an Aikau service to fetch the data and an Aikau widget to display the data fetched by the service. The widget will use the out-of-the-box pie chart widget to display the chart.

First, we write an Aikau service to fetch the data from the API and publish it to a topic:

Then, we write an Aikau widget that subscribes to the topic and renders the chart using the PieChart widget:

The dashlet controller we implemented earlier needs to be updated to refer to the new service:

And the Aikau dashlet code needs to be updated to point to the new widget:

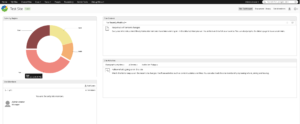
Now when the dashlet renders, it fetches the data from the repository tier web script and presents it in a pie chart.

Hovering over each slice in the pie chart produces and overlay with the detailed data.

Share dashlet with a pie chart that pulls data from a REST API

Part Two Preview

In Part Two, we’ll create a little Spring Boot application that the dashlet will call to fetch its data instead of fetching it from the repository tier. The Spring Boot app will authenticate the request using the authenticated Alfresco user’s ticket, so that only authenticated Alfresco users can fetch the data from the API.

Q & A with OpenText’s James McGourlay

Photo of a big question markI had the opportunity to ask James McGourlay, OpenText Executive Vice President, Operations, a few questions about this week’s announcement that OpenText would begin offering support for Alfresco Content Services.

What follows is a list of questions I submitted to James followed by his answers, which I unfortunately received after the deadline we had agreed to for the publication of my blog post on the subject.

Jeff Potts: OpenText has many large ECM platforms and products in its portfolio. Alfresco is as complex as many of those. What can you point to that establishes your ability to support mission-critical workloads on such a complex platform, especially given that no one associates “OpenText” with “Alfresco”?

James McGourlay: OpenText knows ECM and Content Services. We specialize in supporting and maintaining enterprise software for mission critical systems at many of the largest organizations in the world. As such, we also have the global infrastructure and systems to provide enterprise-class services for docker installs/containerization, global call-intake, service level targets, etc.

Jeff Potts: The press release says that, “OpenText has put in place a dedicated team to manage and contribute to the Alfresco open source community”. How big is that team? What types of roles do you have on that team? e.g., First-level support? Engineers? Are there any community managers on the team? Will the team be developing new features? Or is the focus exclusively on bug fixes?

James McGourlay: We developed this service to help customers – including joint OpenText and Alfresco customers – protect their investment and get the most out of their Content Services. Level one support is not our focus. Our offering starts at level 2 support, with seasoned, experienced professionals that know how to set up environments and do detailed service. Our support professionals have been doing sustaining maintenance for enterprise software for 20 years or more in many cases. They are expert on trouble shooting, patching, enhancing, and releasing patches and fixes to provide support through level 3.

Jeff Potts: The OpenText fact sheet says: “All open source fixes are submitted to the community for consideration in the next release. OpenText will maintain the fixes it submits until they are confirmed in an Alfresco Community Edition release.” What does “fixes are submitted to the community for consideration” mean? How will that happen? Where will the fixes be maintained? In a publicly accessible repository? Will this be run as a public open source project? Has OpenText ever submitted any fixes/changes to Alfresco? Do you anticipate any hurdles given that Alfresco Software, Inc. employs 100% of the Alfresco committers?

James McGourlay: Any code we develop that is derivative work of Alfresco Community Edition we will submit through the Alfresco community committer program. It will be up to the Alfresco community to act on this work or not. However, we will maintain all our fixes in the OpenText OpenSource Edition for Alfresco, that will be available to our customers that subscribe to the OpenText OpenSource Support for Alfresco program. It will not be publicly available.

We have not yet submitted fixes, as we are just launching this service this week. Any bugs we identify we will report via the issue tracker and we will submit our proposed fixes to the community. We are also looking to complete fixes as requested by our customers. We hope that Alfresco will treat the fixes we submit as any other community submission and it will be up to the community to determine if they also believe there is value there.

Jeff Potts: Will OpenText provide any features to the community that are currently only available to Alfresco Software’s enterprise edition subscribers?

James McGourlay: Our intention is to enhance the community edition based on the needs of our customers that subscribe to the OpenText OpenSource Support for Alfresco program. So, our customer needs will be the driver of all changes and enhancements we make.

Jeff Potts: Will OpenText make its branded edition of Alfresco Content Services freely available under an OSI-approved license? Or will it only be available to paying OpenText customers?

James McGourlay: As mentioned previously, while we’ll submit fixes and enhancements to the community, our OpenText OpenSource Edition will only be available to customers that subscribe to the OpenText OpenSource Support for Alfresco program.

There you have it

So, although OpenText got these answers to me nearly a day past the deadline, at least they did eventually respond to every question posed, which I really appreciate.

For the community, we now know for sure this is a private fork, but it is good to see that OpenText will contribute fixes via Alfresco Jira. That could be a good thing.

Their plan to offer support sounds dubious, but the mention of “joint” OpenText and Alfresco customers is sensical…if they have customers who have both products, why not offer to support both. I’m still skeptical that an Alfresco-only customer would ever consider it, but we’ll see.
Photo credit: Big Question Mark, by Benjamin Reay

OpenText offers to support Alfresco customers

Barn with dubious sales pitchOpenText announced this week that it would begin offering support for Alfresco Content Services. The announcement comes about a month after Hyland Software announced their intention to acquire Alfresco Software, Inc. (see my blog post).

UPDATE: After the original publication of this post, OpenText got back to me with answers to my questions. I’ve updated the post to reflect that, and I’ve posted the Q&A verbatim, here.

Alfresco sells services and support for their software, Alfresco Content Services (ACS), which includes a handful of features available only to those who purchase a license. In addition, Alfresco Software distributes a “community” edition of ACS freely-available to everyone under the Apache License.

Both Enterprise & Community Edition

Based on the announcement, OpenText will provide paid support to both enterprise and community edition customers. But if someone is already paying for support for enterprise edition from Alfresco Software, why would they pay an additional maintenance fee to OpenText, a competitor, for support of that same software? It’s hard to imagine how a customer would be able to justify that.

Providing support for community edition makes more sense. Alfresco does not offer any kind of support for community edition beyond what customers can get by reading forums and blog posts, and Alfresco actually forbids its partners from selling support and services around community edition. OpenText will try to fill that gap.

There is already a large community of non-partner service providers who have built businesses providing professional services to both enterprise edition and community edition customers (Disclosure: I am one). The challenge for OpenText is that they have yet to establish any credibility regarding their ability to provide support for Alfresco. They are trying to convince customers that they can basically walk into the room cold and throw enough resources at any problem to resolve it successfully.

The press release hints at how they will do this, saying, “OpenText has put in place a dedicated team to manage and contribute to the Alfresco open source community”. How big that team is, who it is comprised of, and what exactly they’ll be doing is not discussed in the announcement. So I reached out to James McGourlay, OpenText Executive Vice President, Operations, and that Q&A can be found here. The short answer is that the goal of the team is to provide level 2 support by leveraging OpenText’s experience in other ECM platforms to address Alfresco issues.

How will they collaborate with the community?

OpenText’s announcement may sound like they want to participate in the community, but when one of the community’s leaders asks to hear more about their plans, they aren’t forthcoming. So, we can only judge them by their actions. An Alfresco employee with visibility into the company’s issue tracking system confirmed earlier this week that OpenText has never filed a single issue, which is the generally accepted mechanism one would use to contribute fixes to any open source code base. I’ve never seen them at an Alfresco conference, in a chat room, or in the forums. That does not sound like a company that is ready to engage the community.

I reached out to OpenText to ask them how their community contributions are going to work. You can read the full Q&A here. OpenText says they have not yet filed any issues because they have only just launched the service. They plan to contribute fixes back to Alfresco via the Community Contributor Program.

Their own Alfresco distribution will not be public

If OpenText plans on “contributing to the Alfresco open source community” exactly how they plan to do that is important for the community to understand. OpenText says they are offering their customers a branded release of community edition. Branding is easy enough to add, but is it a fork? If you read the fact sheet that OpenText provides, it sheds a little more light:

“All open source fixes are submitted to the community for consideration in the next release. OpenText will maintain the fixes it submits until they are confirmed in an Alfresco Community Edition release.” –OpenText

This sure sounds like OpenText will maintain their own fork of Alfresco and that they will contribute changes to Alfresco for inclusion, upstream. It will then be up to Alfresco Software, Inc., for whom 100% of the ACS committers work, to decide whether or not to merge those fixes.

The key question for the Alfresco community is whether the OpenText fork will be a private fork or a public fork that they will run as a true open source project? If it is a private fork, then this isn’t really about open source or the community at all–this is instead about OpenText taking a marketing jab at Hyland and Alfresco. If it is going to be a public fork, well that would be huge news. Alfresco has always kept its community at arms-length when it comes to commitorship. But I highly doubt that OpenText, a proprietary behemoth who has existed on a steady diet of other proprietary ECM vendors (Documentum, Interwoven, Hummingbird, RedDot, Vignette…), is looking to start and invest in an open, collaborative ecosystem based on one of their competitor’s products.

After publication of this post, OpenText confirmed that they will maintain a private fork of Alfresco, distributed to their paying customers, so there will be no opportunity for the community at large to collaborate. However, the community might ultimately benefit from the contributions OpenText makes.

So is this all just snake oil?

At Alfresco DevCon, an online conference that took place online in August, John Newton, Alfresco’s founder and CTO, made an off-hand comment about going after OpenText and how great it would be to take them down, especially after they “captured” Documentum, a company he also founded. I could be wrong, but this announcement from OpenText just smacks of marketing chicanery aimed at throwing FUD into the market surrounding the Hyland acquisition, and basically telling John, “If you want some, come get some”.

Photo Credit: Snake Oil, by Eddie McHugh

Hyland is acquiring Alfresco

I saw the news this morning that Hyland is acquiring Alfresco in a deal to be finalized in the fourth quarter of 2020.

Hyland cites Alfresco’s global reach and their open source core as the primary drivers behind the move.

An acquisition of this sort is not unexpected–back in February of 2018 Alfresco announced they were being acquired by a private equity firm (blog post). Subsequent management changes and layoffs were likely aimed, at least in part, at making Alfresco a more attractive acquisition target. In hindsight, perhaps the acquisition earlier this year of one of Alfresco’s key professional services partners, TSG, was also part of that strategy (blog post).

I don’t know much about Hyland so I don’t have much to say about the strategic, technical, or cultural fit of the two companies. I have had recent inquiries from prospects looking to move off of Hyland OnBase and onto other technologies primarily to reduce software license and maintenance costs, but that is completely anecdotal.

My advice to my customers is the same I would give in any acquisition scenario: Don’t panic. It can take a significant amount of time for acquisitions to impact customers in any real way.

Should you re-evaluate your investment in Alfresco? I think you should do that every year or three with all of your vendors. Make them continue to earn your business with a great product that fits the way you want to do business. Don’t let them take that license and/or maintenance revenue for granted.

We’ll have a better idea for how this is going to playout next year.

Adding actions to the Alfresco Share Selected Items menu

In a typical Alfresco implementation it is quite common to develop one or more custom actions to encapsulate a set of operations that need to be performed against a folder or document. Custom actions can be called from folder rules, added to the user interface, or called programmatically from web scripts. To learn more about developing custom actions, check out my tutorial on custom actions.

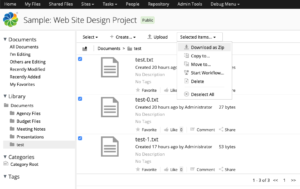
When actions are added to the Share document library or document details page they operate against a single folder or document. But the Share document library also lets users select multiple objects and then run actions against them. Out-of-the-box examples are things like “Download as Zip”, “Copy”, “Move”, “Start Workflow”, and “Delete” as shown in the screenshot below.

Alfresco Share out-of-the-box selected items menu

This blog post explains how you can add your own custom actions to the “Selected Items” menu in Alfresco Share.

First, I’m going to assume that you already have a custom action that works when invoked from a rule or from the UI and you just need it to work from the Selected Items menu. I’ll call mine “Example Action”. It doesn’t do anything exciting except log the node reference of the object the action is run against. Here it is sitting in the list of document actions on the document details page:

Custom action displayed in the Alfresco Share document details actions list

Now the goal is to add Example Action to the “Selected Items” menu so that the action will run against each object the user has selected. If you want to skip right to the working project on GitHub that’s fine, otherwise, read on for a step-by-step…

Step 1: Extend the multi-select configuration

I used a Share extension to add some custom configuration to get Example Action to show up in the document library browse list and the document details page. I’ll add additional config to extend the out-of-the-box “multi-select” list of action links:

<config evaluator="string-compare" condition="DocumentLibrary">
    <multi-select>
        <action type="action-link" id="onExampleAction" label="actions.example-action"></action>
    </multi-select>
</config>

The action label is a property bundle key that has the text I want to appear in the menu. The action ID, onExampleAction, is the name of a client-side JavaScript function to be called when the user selects the menu item.

I’ll implement the onExampleAction function in a file named custom-actions.js. I need to get Share to include that file as a dependency, so I add an additional config block:

<config evaluator="string-compare" condition="DocLibCustom">
    <dependencies>
        <js src="resources/multi-select-demo-share/custom-actions.js"></js>
    </dependencies>
</config>

That’s all I need to change in my Share extension XML file. See the full file on GitHub.

Now let’s look at the client-side JavaScript.

Step 2: Implement the client-side JavaScript

In the previous step I configured Share to add an action to the “Selected Items” menu that invokes the onExampleAction function when clicked and I told it where to find the function. Now I need to implement the function. To do that, I use YUI to fire a “registerAction” event, passing in an object with two properties: one is the name of my action and the other is a function to execute:

(function() {
      YAHOO.Bubbling.fire("registerAction",
          {
              actionName: "onExampleAction",
              fn: function custom_DLTB_onExampleAction(assets) {
                  // Function logic goes here
              }
          });
})();

Note that “onExampleAction” matches whatever I specified as the action ID in the multi-select config. It has nothing to do with the name of the Java class that implements the back-end action executer.

Within that function body you could do whatever you want. Maybe you need to capture some additional data from the user, so you present a modal. Maybe you want to display a progress bar. It’s up to you.

In my case, I just need to send the selected nodes to the back-end. Remember that I already have a working action. Mine is a Java class named ExampleAction that writes a log message with the node reference of the node the action is running against.

It would be nice if I could just somehow call that action and hand it my list of selected node references, but the execute method in the ActionExecuter interface only accepts a single node. Plus, we’re currently sitting in client-side JavaScript delivered by Share that needs to invoke an action in the Alfresco back-end–a completely separate web application. I need a way to asynchronously make an HTTP call to the Alfresco back-end from here.

The solution is to call a custom repository-tier web script with the list of selected node references, and use the web script controller to invoke the action for each of the node references in the list.

Alfresco provides a utility for making asynchronous posts and a constant that has the Share proxy URI. (The Share proxy avoids making the call from the browser all the way back to the Alfresco back-end, which could be running on a different host.) All I have to do is provide the path to the web script and the list of assets:

Alfresco.util.Ajax.jsonPost(
    {
        url: Alfresco.constants.PROXY_URI + "ecmarchitect/example-action-multi",
        responseContentType: "application/json",
        dataObj: assets,
        successMessage: this.msg("message.example-action.success"),
        failureMessage: this.msg("message.example-action.failure"),
        successCallback:
            {
                fn: function exampleSuccess() {
                    console.log("Success");
                },
                scope: this
            },
        failureCallback:
            {
                fn: function exampleFailure() {
                    console.log("Failure");
                },
                scope: this
            }
});

In the above JSON POST I am also setting a success message and a failure message so that the Share user sees feedback after the web script is invoked. Just to show you how it works, I’m also including success and failure callback functions. Mine just write a message to the browser developer console, but you could do whatever you need to, such as display data that came back in the web script response.

You can review the full source of custom-action.js or go on to the next step, which is to implement the web script.

Step 3: Implement the web script

I need a web script that will accept the list of selected nodes and invoke the action for each one. Webscript controllers can be written in either JavaScript or Java (tutorial) but I almost always write them in Java these days.

You can see the full source of ExampleActionMulti.java on GitHub–I am just going to include the relevant snippet here:

Action exampleAction = actionService.createAction("example-action");
JSONArray dataObj = (JSONArray) content;
for (int i = 0; i < dataObj.length(); i++) {
    JSONObject obj = (JSONObject) dataObj.get(i);
    NodeRef nodeRef = new NodeRef((String) obj.get("nodeRef"));
    if (nodeService.exists(nodeRef)) {
        actionService.executeAction(exampleAction, nodeRef);
    }
}

Alfresco Share handed my client-side JavaScript function an array of node objects which I then post to this web script. So the web script iterates over that array and grabs the node reference string to construct an actual NodeRef object. I use the node service to make sure that node ref actually exists, then I execute the action against it.

Other parts of the web script that I’m not showing here are the web script descriptor, the web script view template, and the Spring bean that injects the node service and action service dependencies into my controller.

Step 4: Test

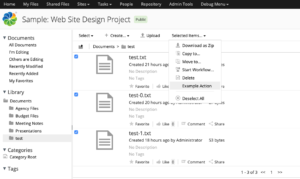
With everything in place, I’m ready to test. My project was bootstrapped with the Alfresco SDK, version 4.1.0, so it uses Alfresco Community Edition 6.2.0 by default and runs locally using Docker. After running run.sh build_start I can log in to Share, go to a site’s document library, selected multiple objects, and see this in the Selected Items menu (click to enlarge):

Alfresco Share selected items menu showing the custom action

And I can see this in the log:

Log output showing that the action worked

That’s it. Now you know how to add your own custom actions to the Selected Items menu in Alfresco Share.