This tutorial shows you how to install the Diggz Xenon Build on Kodi 21 and Kodi 20. The instructions outlined here apply to all Kodi-supported devices, including the Amazon FireStick, Android TV box, smart TVs, Windows PC, Mac, Android mobile, and iOS smartphone.
What is Xenon Build?
Diggz Xenon is one of the skins that come with Diggz AIO Debrid or Free build pack. Apart from Xenon, this pack includes skins like:
- Diggz Xenon 2
- ArcticFlix
- Fentastic
- Eminence
- DiggzFlix
- FenFlix
- SerenFlix
- UmbrellaFlix
- Phenomenal
- Diggz Kids
Diggz Xenon features mouse and touch-screen support, making it ideal for all Kodi devices.
You can install popular addons with Xenon, like POV, Fen Light, Seren, Umbrella, and Coalition.
Xenon contains sections like Xenon Plus, Movies, TV Shows, Trakt, TV Guide, Sports, Music, Arcade, Favourites, and Add-ons.
Overall, Xenon is a solid and reliable build for devices with low and mid specs, making it eligible to enter our list of best Kodi builds.
Attention Kodi Users!
Governments and ISPs across the world monitor your online activities. If you use third-party Kodi addons, you should always use a good Kodi VPN and hide your identity so your streaming experience doesn’t take a bad turn. Currently, your IP is visible to everyone.
I use ExpressVPN, the fastest and most secure VPN in the industry. It is very easy to install on any device, including Amazon Fire TV Stick, PC, Mac, and Smartphones. Also, it comes with a 30-day money-back guarantee. If you don't like their service, you can always ask for a refund. ExpressVPN also has a special deal where you can get 4 months free and save 61% on the 2-year plan.
Read: How to Install and Use Best VPN for Kodi
Features of Diggz Xenon Kodi Build
Diggz Xenon is known for the following features:
- Lets you change the look & feel with its one-of-a-kind flavor menu
- Contains multiple useful utilities like maintenance, download wallpapers, speed tests, etc.
- Neat & easy-to-browse sections for different content categories
- Lightweight build as it doesn’t have preinstalled addons
Is Xenon Build Safe & Legal?
Xenon is available via an unofficial repo, Diggz Repository. Therefore, its safety and legality status are unknown.
The build is made by a third-party developer. As these hobbyists aren’t official Kodi service developers, we can’t claim their builds are 100% safe for your device.
We encourage you to do your due diligence before installing a third-party Kodi build like Xenon.
To keep our streaming devices safe, we always check the repository file of build hosts on VirusTotal. In this scenario, we ran a scan of the Diggz Repository zip file, and fortunately, no issues were found.

You won’t violate any laws if you use the Xenon Kodi build to modify the appearance of your app and add a few utilities. However, watching pirated content is illegal.
At FireStickTricks.com, we do not condone piracy in any form. We only create Kodi tutorials for educational purposes and to show how cord-cutters can stream content that’s already publicly available.
However, if you still want to experiment with and test the boundaries of the Xenon Kodi build, we recommend pairing it with a trusted VPN for added privacy.
Get ExpressVPN ↗️to stream safely with Xenon Build.
How to Install Diggz Xenon Kodi Build
Here’s a quick rundown of what it takes to install Diggz Xenon Kodi build
- Enable Unknown Sources from Kodi Settings
- Install Diggz Repository
- Load Chefs Wizard Addon
- Install Diggz AIO with Xenon Skin
Now, let’s start with the step-by-step instructions to install Diggz Xenon on your Kodi app:
Legal Disclaimer: This tutorial is purely educational. FireStickTricks.com doesn’t own, host, operate, resell, or distribute any streaming apps, addons, websites, IPTV or services. The page contains some unverified services, and we are not certain whether they hold legal licenses to distribute the content. FireStickTricks.com does not verify the legality of each app/service in all regions. Do your due diligence if you use any of the unverified apps/services, and stream only content that is available in the public domain. The end-user shall be solely responsible for the media accessed.
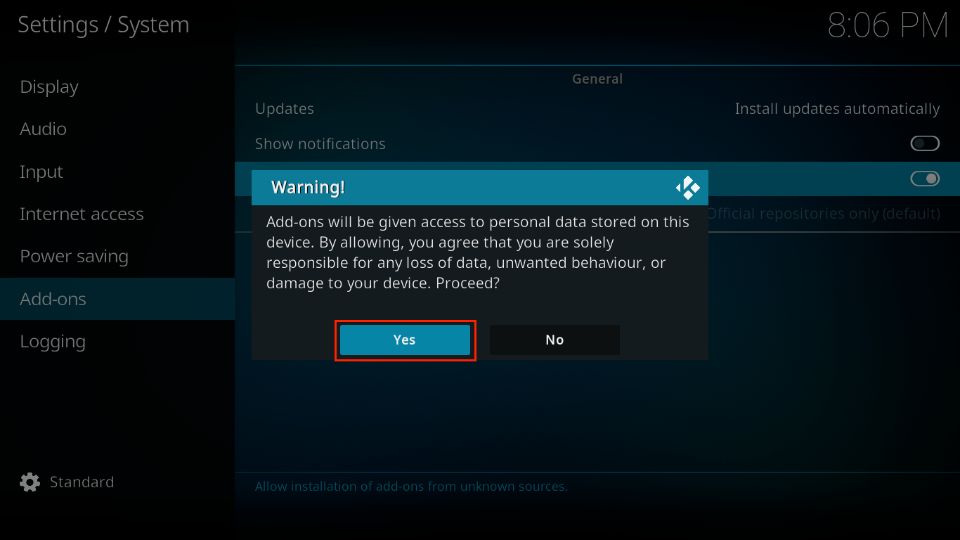
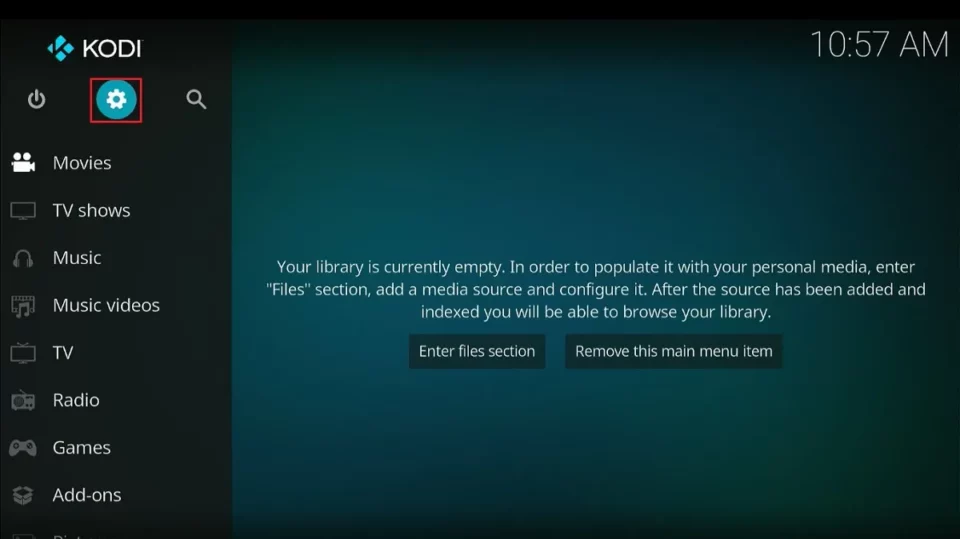
1. Select Settings Cog on the Kodi home screen.

2. Click the System icon.
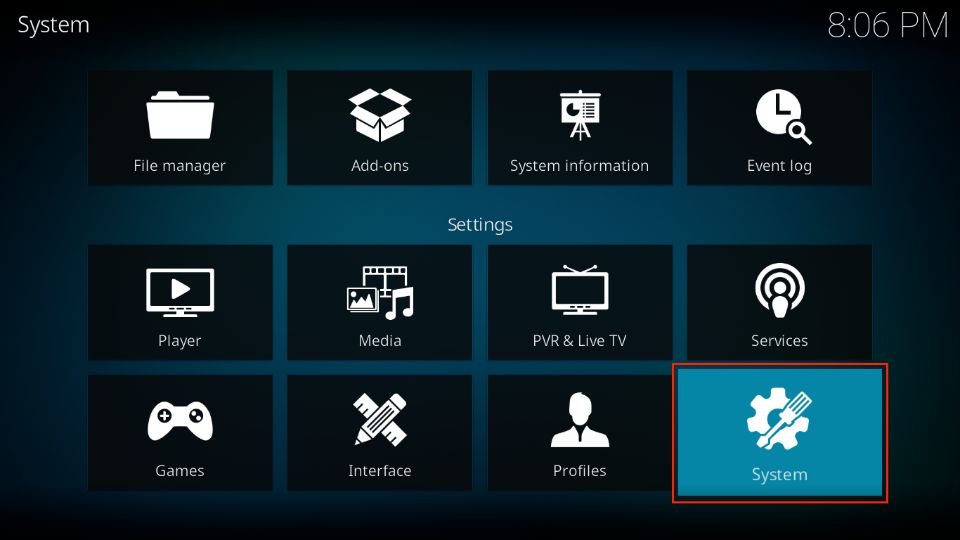
3. Scroll down to Add-ons.
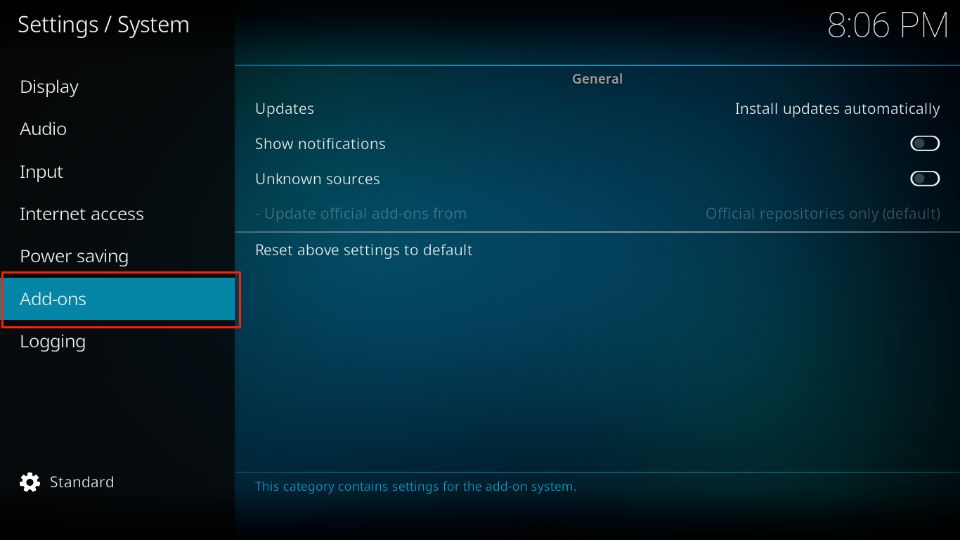
4. Enable Unknown sources under General on your right side.
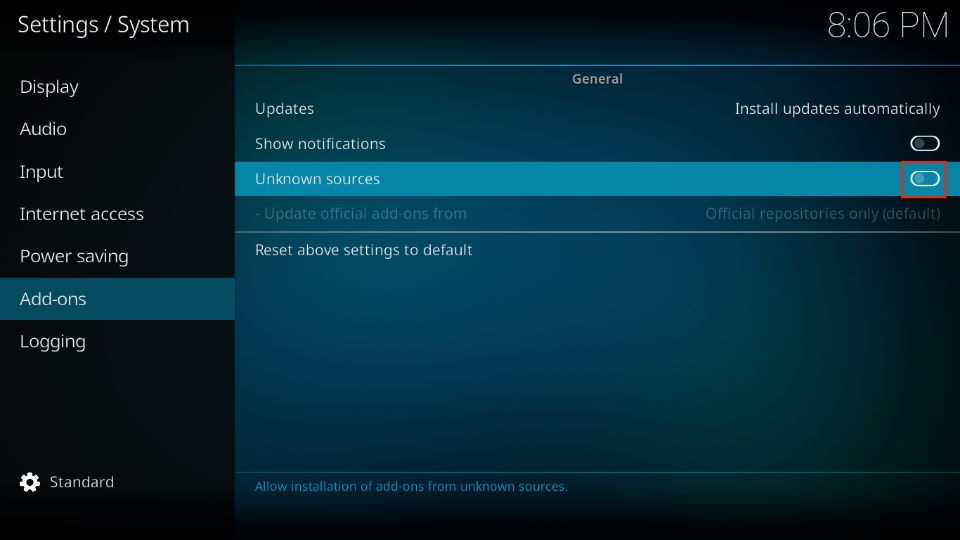
5. Ignore the Warning message by Kodi and click Yes.
You can now install anything from any unknown source – here are the steps to install Diggz Repository:
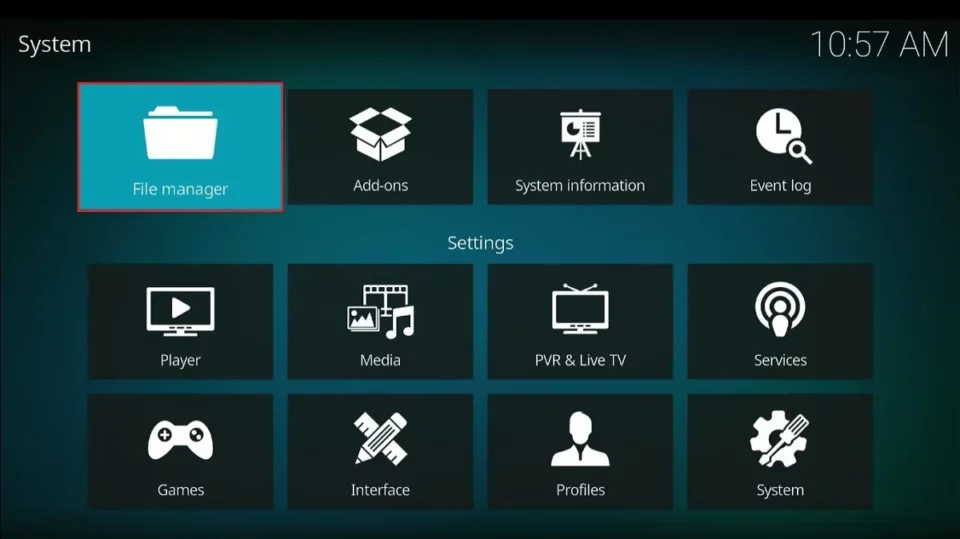
6. Open Kodi Settings once again.
7. Launch File manager.
8. Click the Add source option.
Note: You can select the Add source option on either side.

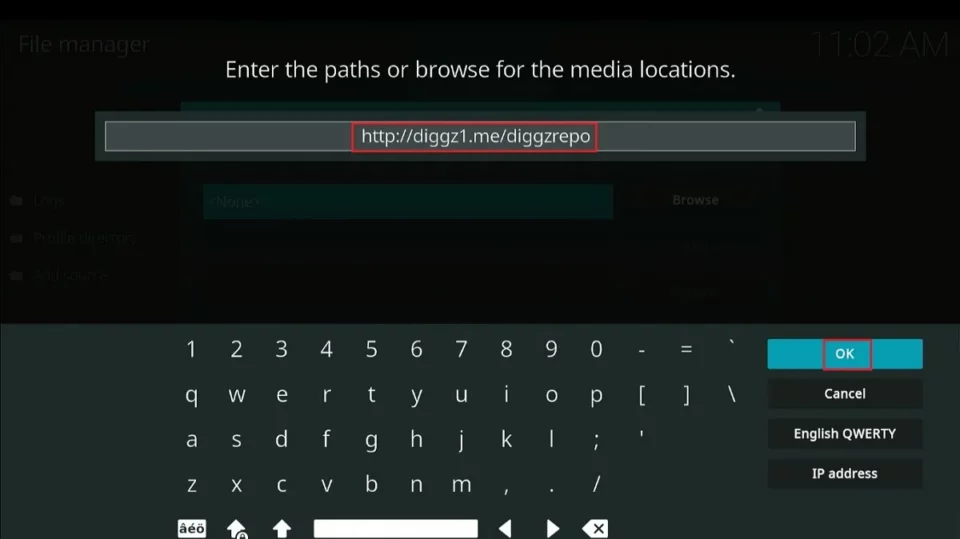
9. Click <None> when the Add file source window appears.
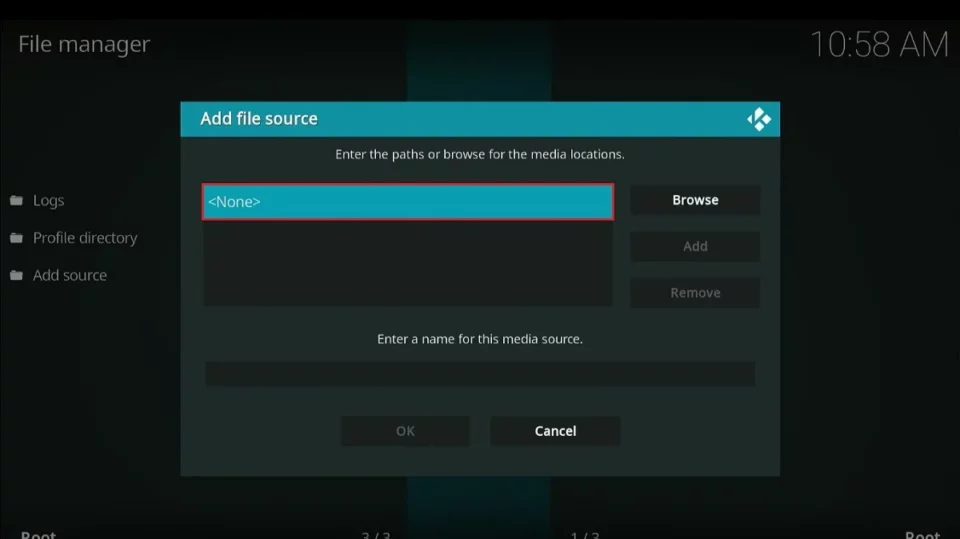
10. Enter the following URL of the Diggz Repository: http://diggz1.me/diggzrepo
Note: We don’t host or own the Diggz Repository URL. It’s the sole property of Diggz Repository developers.
⏳ DON'T MISS THIS LIMITED-TIME DEAL
![]()
Protect your privacy with ExpressVPN
DEAL OF THE DAY
61% DISCOUNT ON ExpressVPN and 4 EXTRA MONTHS
Risk-free with 30-day money-back guarantee
🔒 GET ExpressVPN↗️
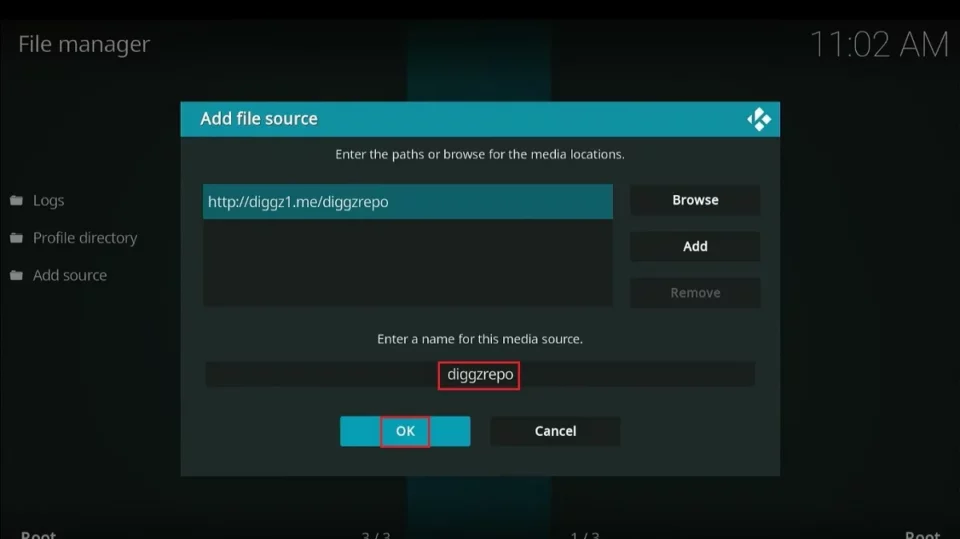
11. The URL name is auto-filled with diggzrepo as an alias; feel free to change it by clicking it. Once you’ve done so, click OK to save the repo.
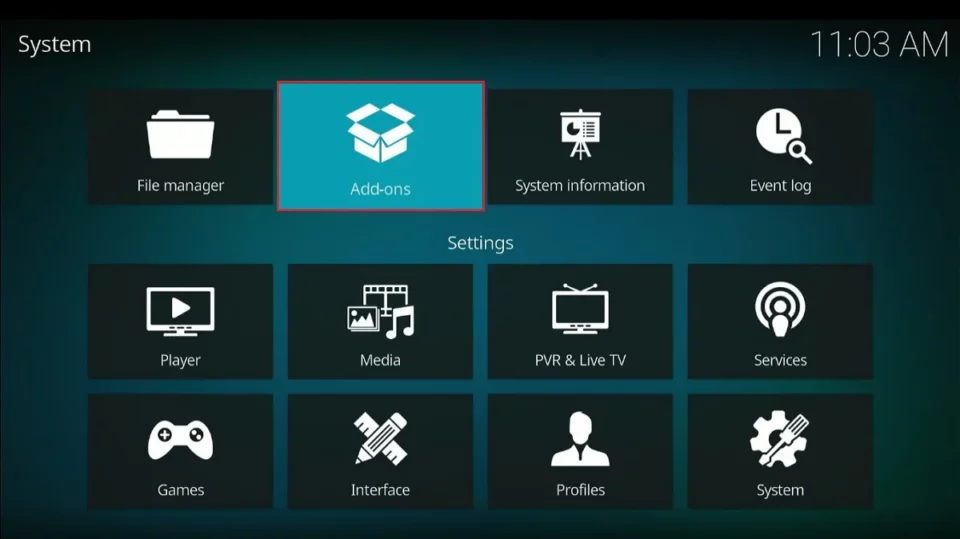
12. Go to the Kodi Settings page and open Add-ons.
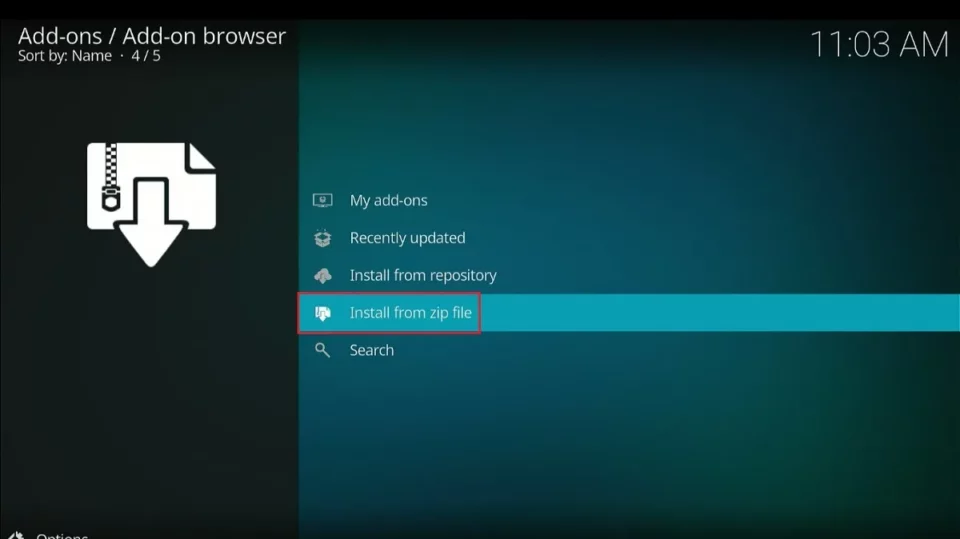
13. Open Install from zip file.
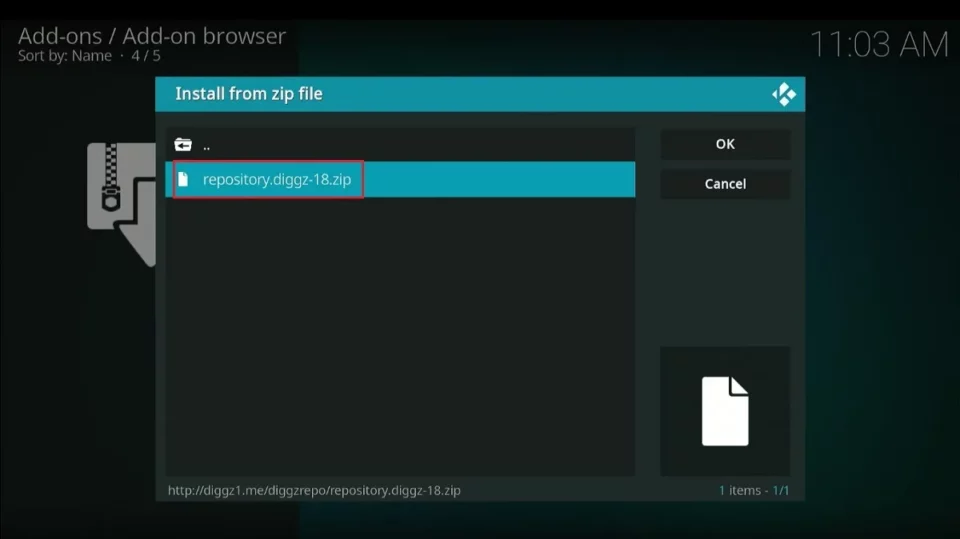
14. Find and select the repo name you saved. For me, it’s the default one: diggzrepo.

15. Click the zip file – repository.diggz-X.zip.
Note: X refers to the version number of the Diggz Repository zip file.
16. Wait for the notification confirming the Diggz Repository Add-on installed.
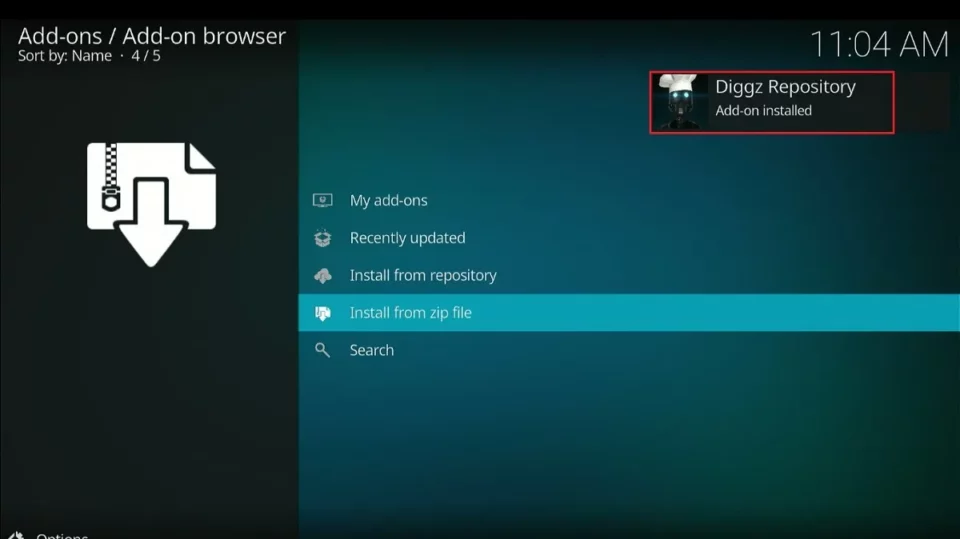
We’ll install the Chefs Wizard, available via the Diggz Repository.
17. Now click Install from repository.
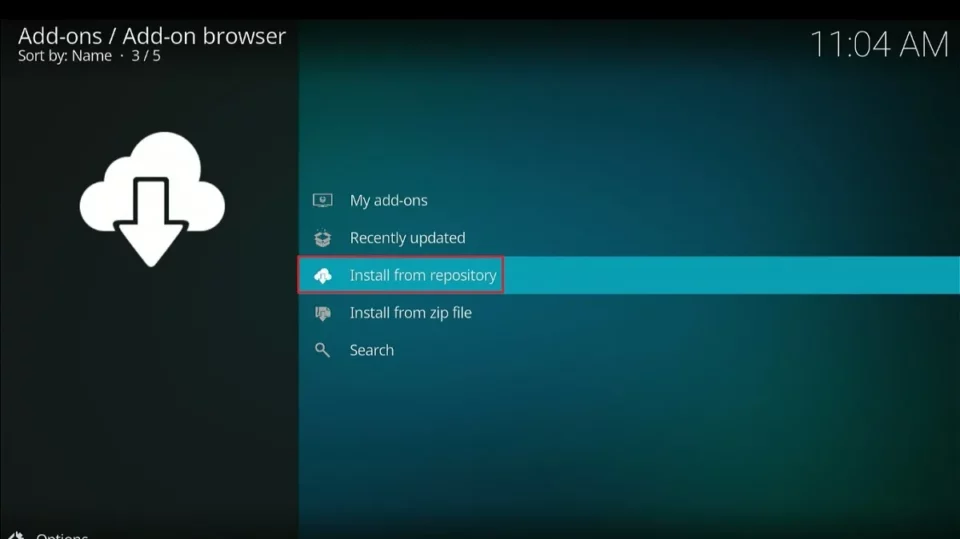
18. Open Diggz Repository.
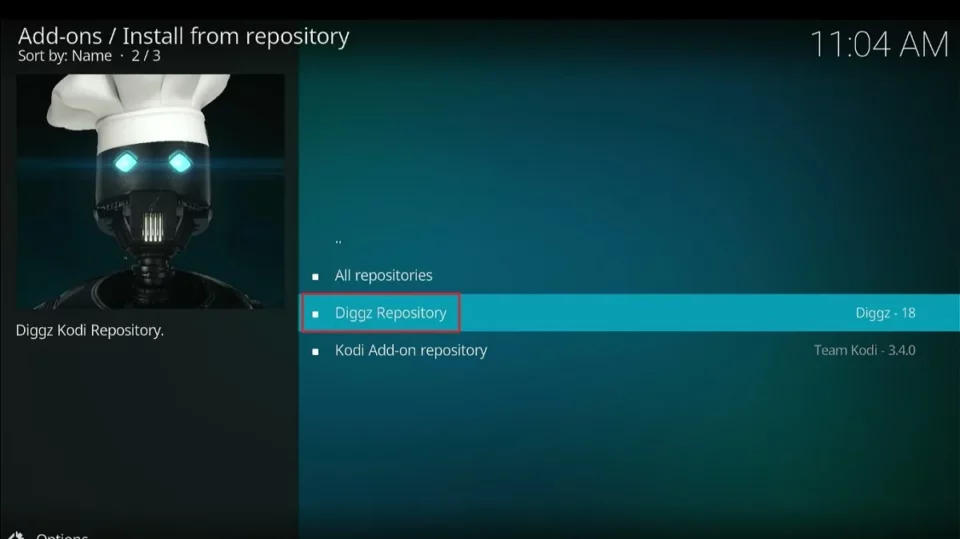
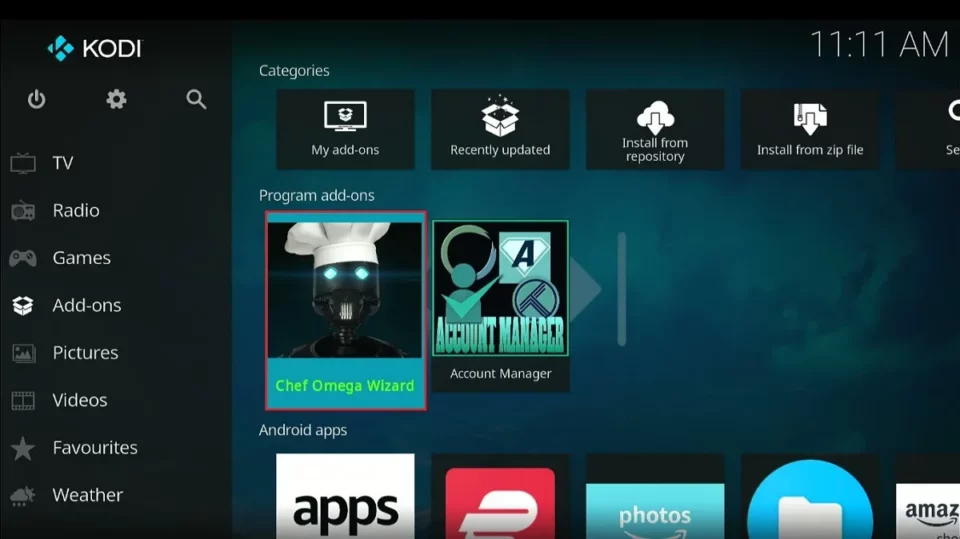
19. Click Program add-ons.
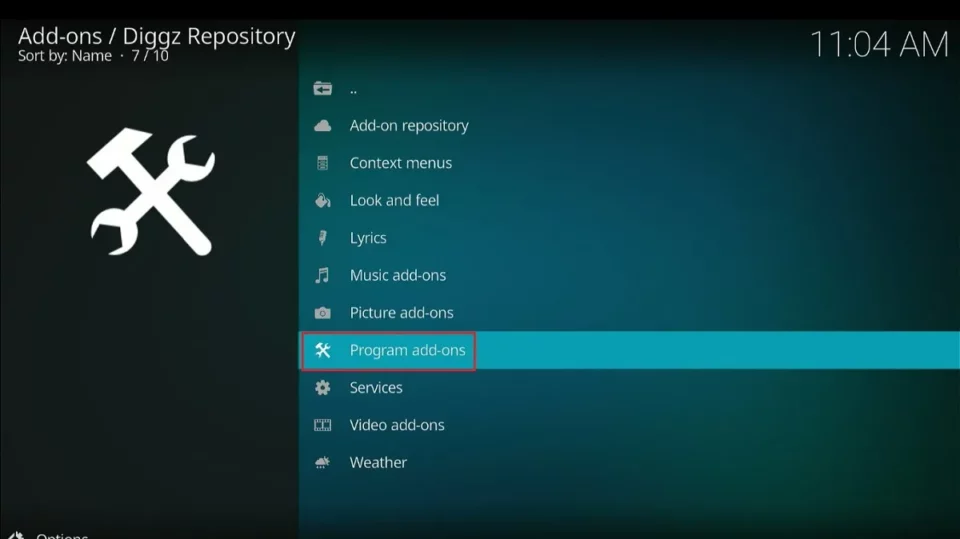
20. Click Chef Omega Wizard.
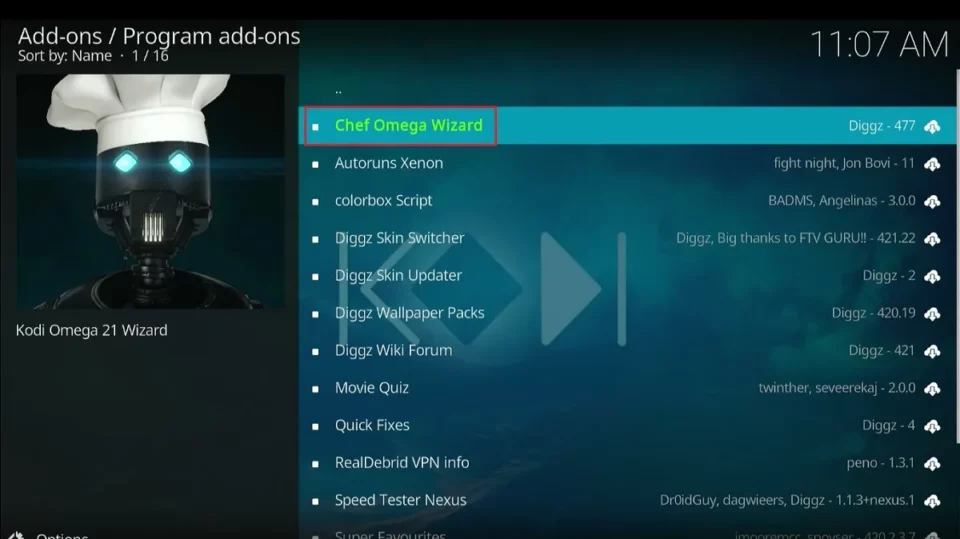
21. Click Install on the next screen.
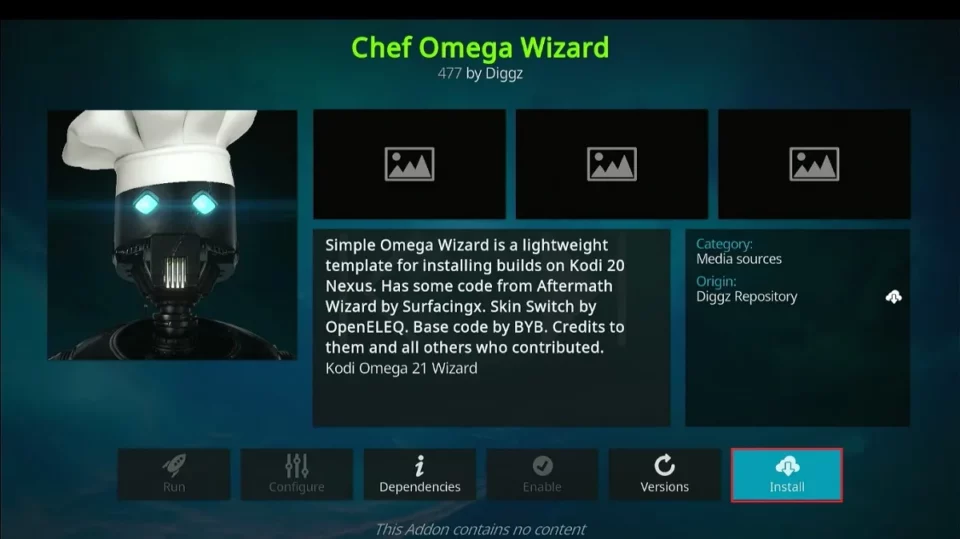
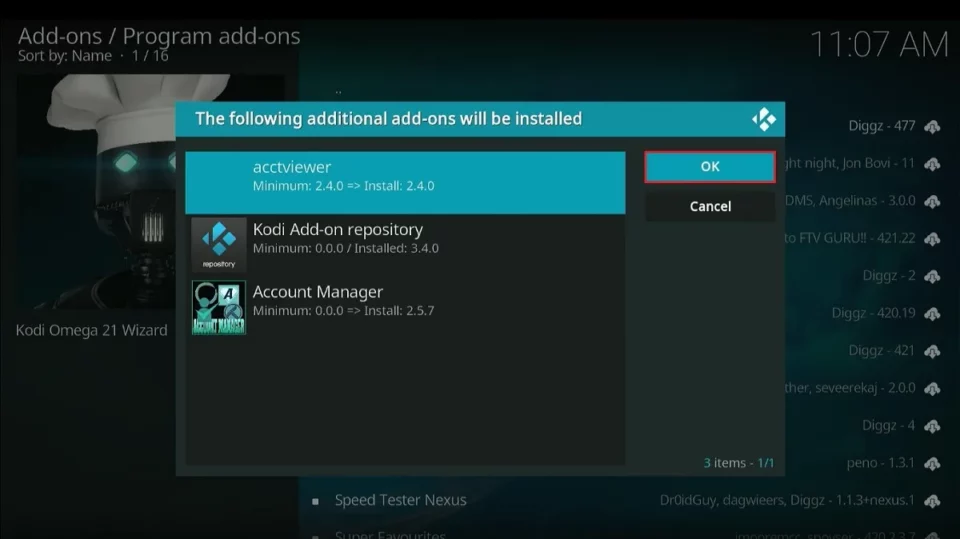
22. Click OK to confirm the installation of dependent addons (this prompt may not appear on some devices).
23. Wait for the installation of the Chef Omega Wizard to complete. It may take 2-3 minutes, so be patient.
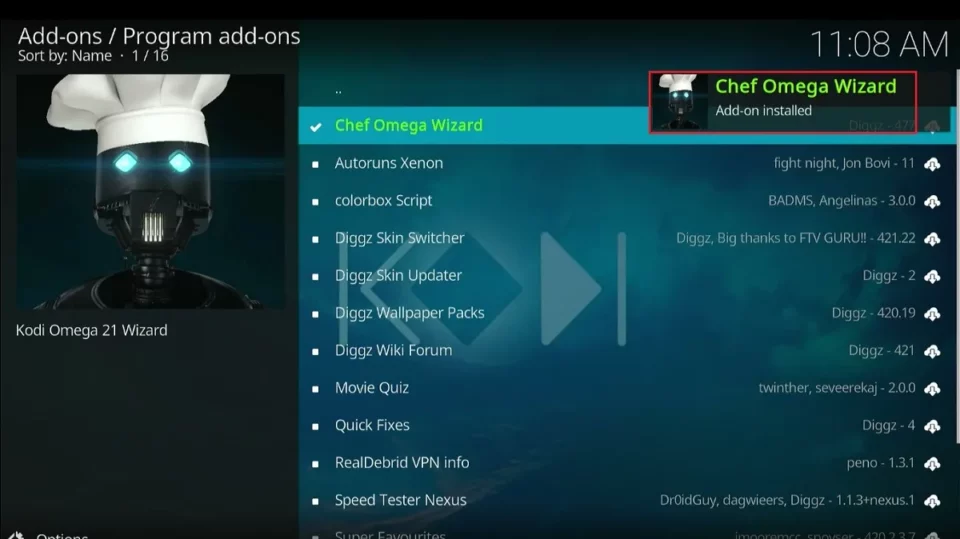
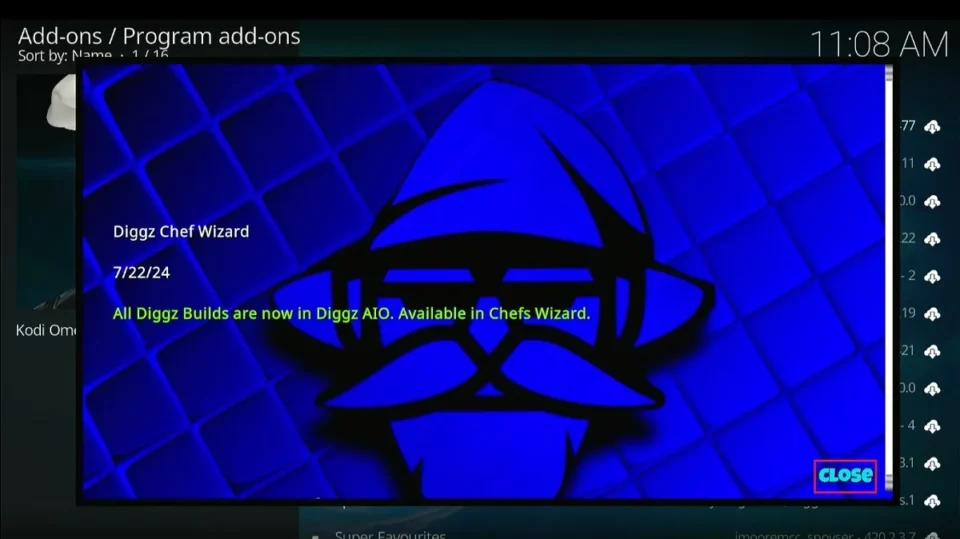
24. Click Close.
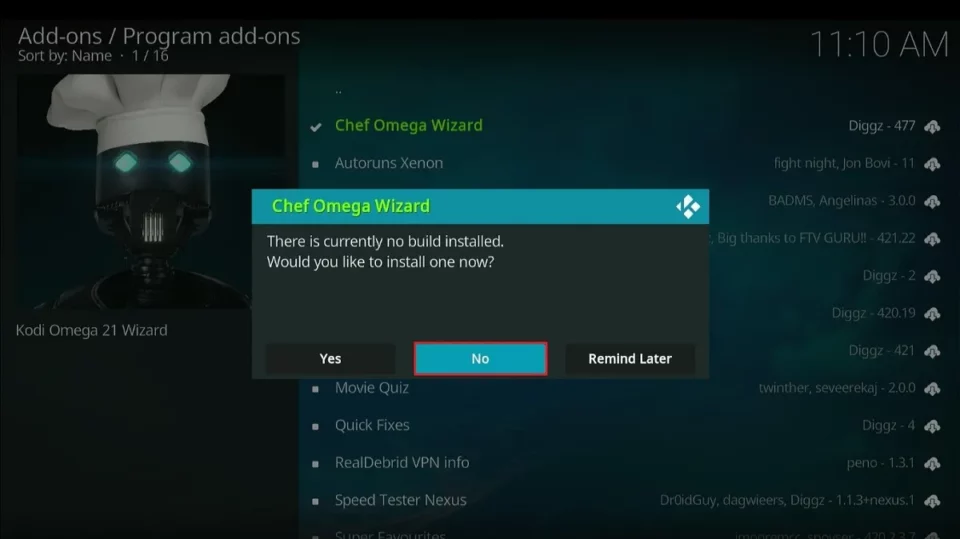
25. Click No. We will install the build later.
26. Return to the Kodi home screen again and click Add-ons.
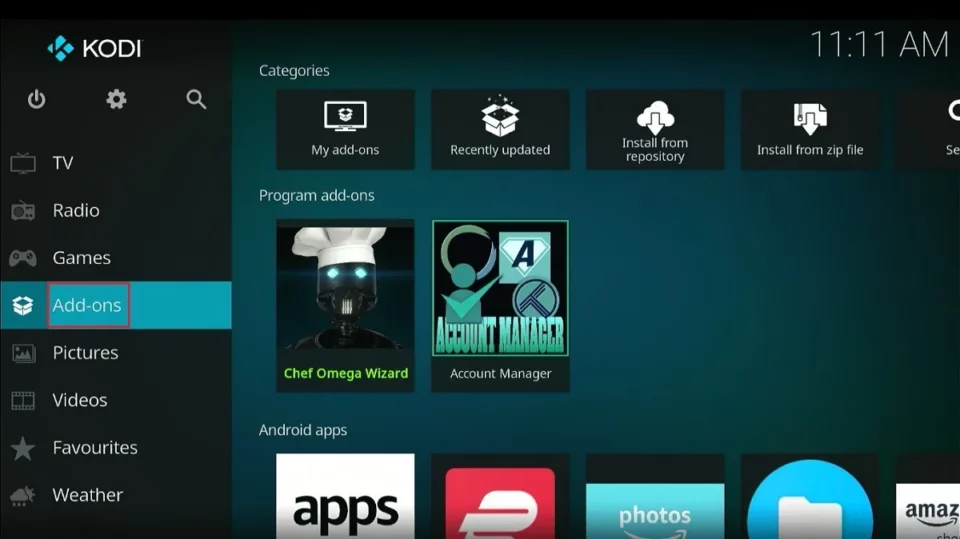
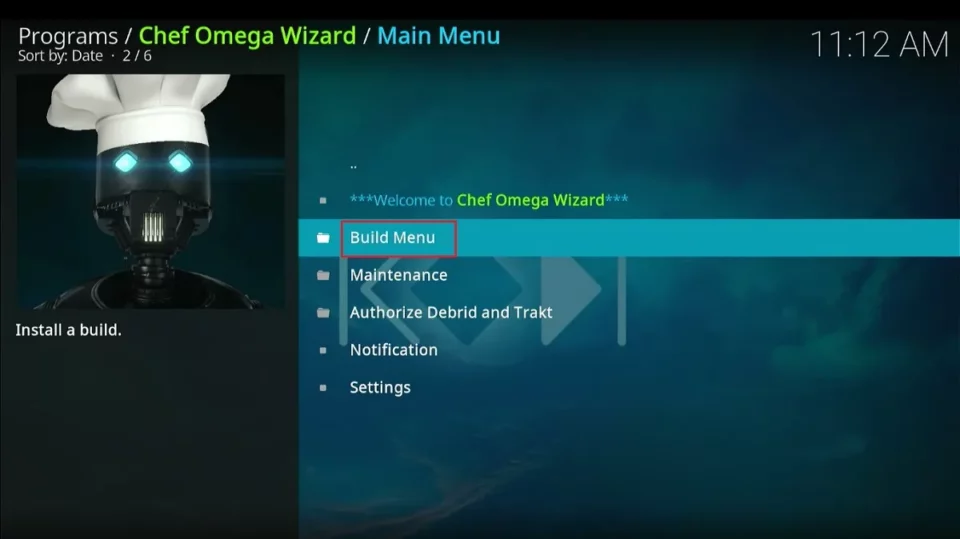
27. Select Program Add-ons and click on Chef Omega Wizard.
28. Click Build Menu.
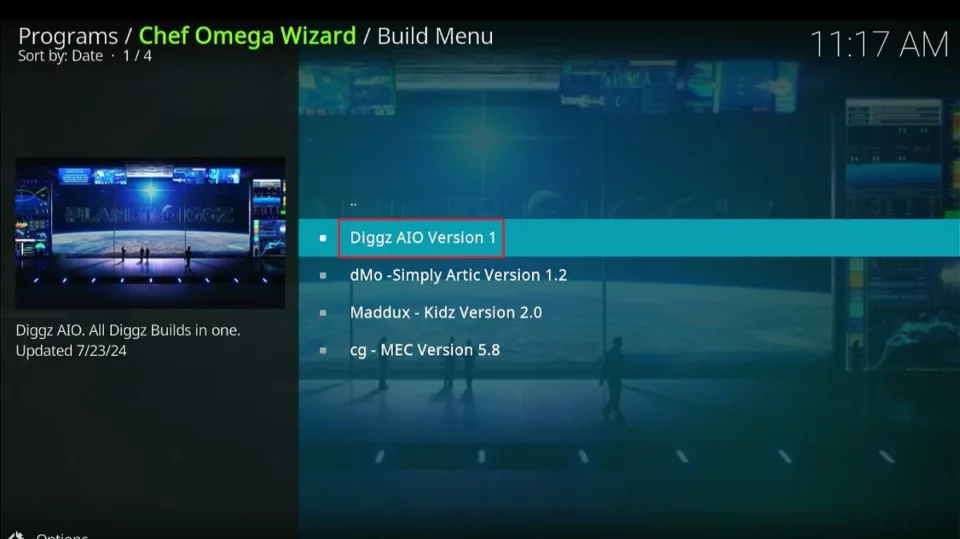
29. Click the Diggz AIO Version option.
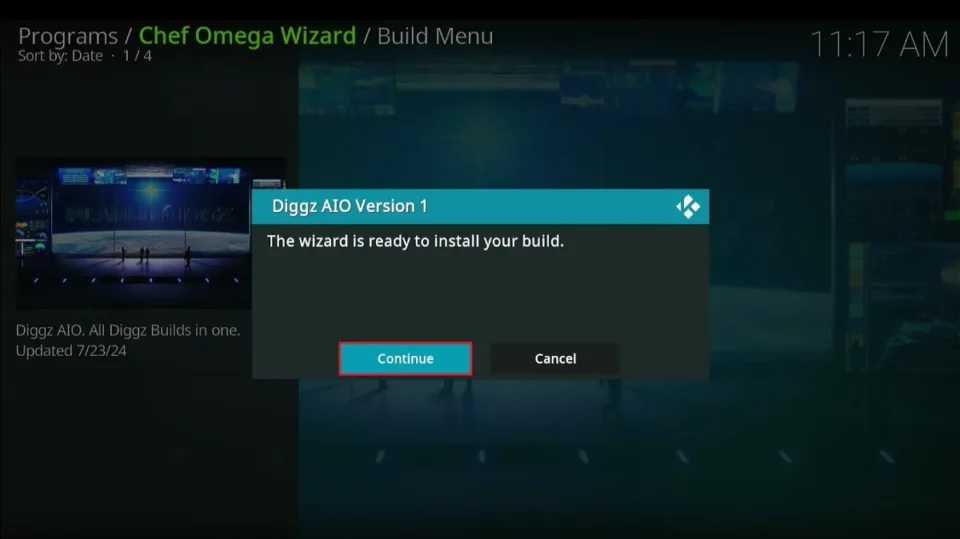
30. Next, click Continue.
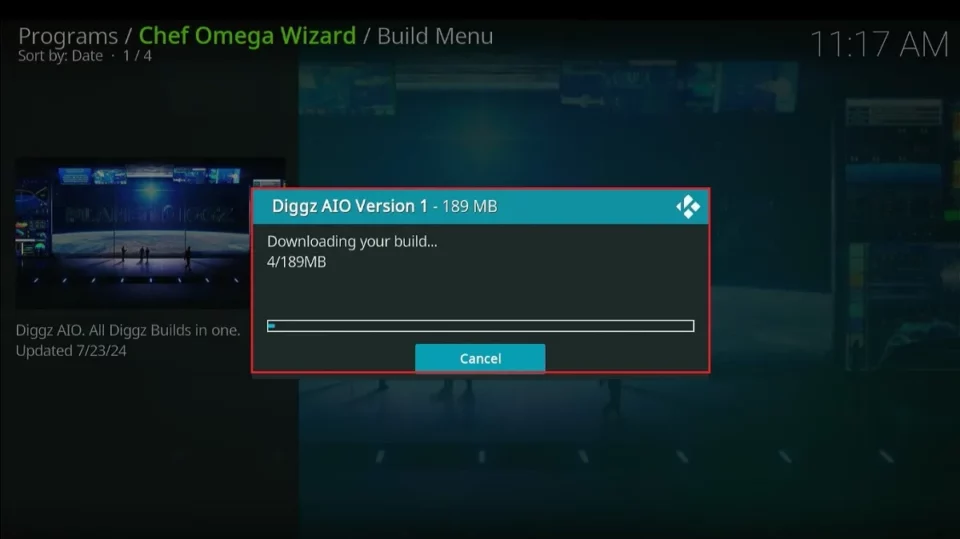
31. Let the download to complete.
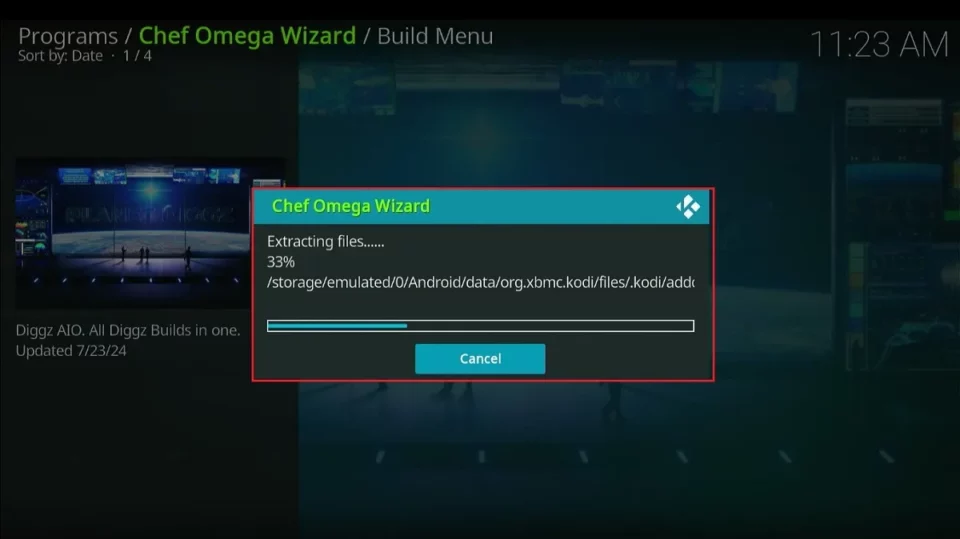
32. Allow the build to install.
33. Click OK when the prompt is displayed after installation.
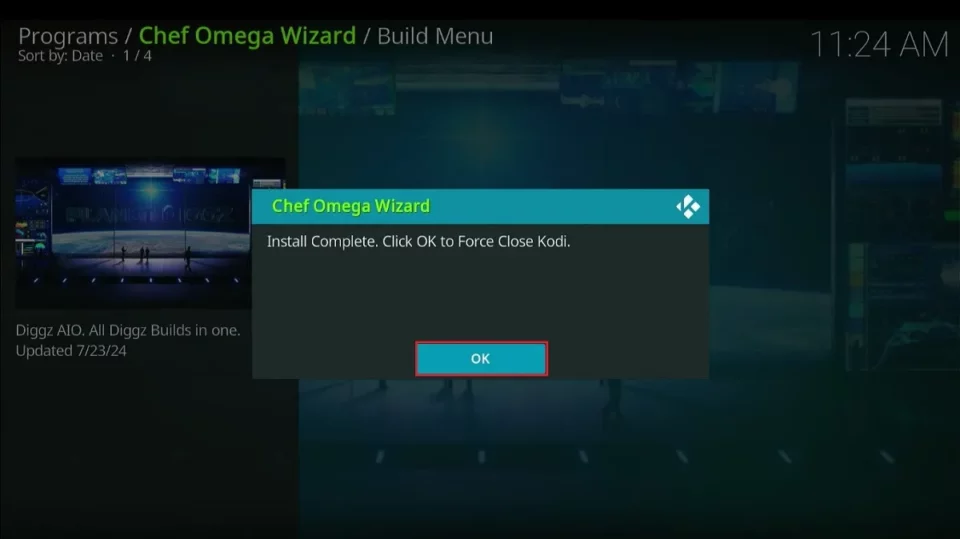
You have successfully installed the Diggz Xenon Build on Kodi.
Before you start streaming with Kodi Addons or Builds, I would like to warn you that everything you stream on Kodi is visible to your ISP and Government. This means, streaming copyrighted content (free movies, TV shows, live TV, and Sports) might get you into legal trouble.
Thankfully, there is a foolproof way to keep all your streaming activities hidden from your ISP and the Government. All you need is a good VPN for Kodi. A VPN will mask your original IP which is and will help you bypass Online Surveillance, ISP throttling, and content geo-restrictions.
I personally use and recommend ExpressVPN, which is the fastest and most secure VPN. It is compatible with all kinds of streaming apps and devices.
NOTE: We do not encourage the violation of copyright laws. But, what if you end up streaming content from an illegitimate source unintentionally? It is not always easy to tell the difference between a legit and illegal source.
So, before you start streaming on Kodi, here's how to get VPN protection in 3 simple steps.
Step 1: Get the ExpressVPN subscription HERE. It comes with a 30-day money-back guarantee. Meaning, you can use it free for the first 30-days and if you are not satisfied with the performance (which is highly unlikely), you can ask for a full refund.
Step 2: Click HERE to download and install the ExpressVPN app on your streaming device. If you are using a FireStick, I have given the exact steps starting with Step 4 below.
Step 3: Click the Power icon to connect to a VPN server. That's all. Your connection is now secure with the fastest and best VPN for Kodi.

The following are the steps to install Kodi VPN on your Fire TV devices. If you have other streaming devices, follow Step 1-3 above.
Step 4: Subscribe to ExpressVPN HERE (if not subscribed already).
Step 5: Go to Fire TV Stick home screen. Click Find followed by Search option (see image below).

Step 6: Type Expressvpn in the search bar and select when it shows up.

Step 7: Click Download.

Step 8: Open the ExpressVPN app and Sign in using the email ID and password that you created while buying the ExpressVPN subscription.

Step 9: Click the Power icon to connect to a VPN server. That’s all. Your FireStick is now secured with the fastest VPN.

How to Use Kodi Diggz Xenon Kodi Build
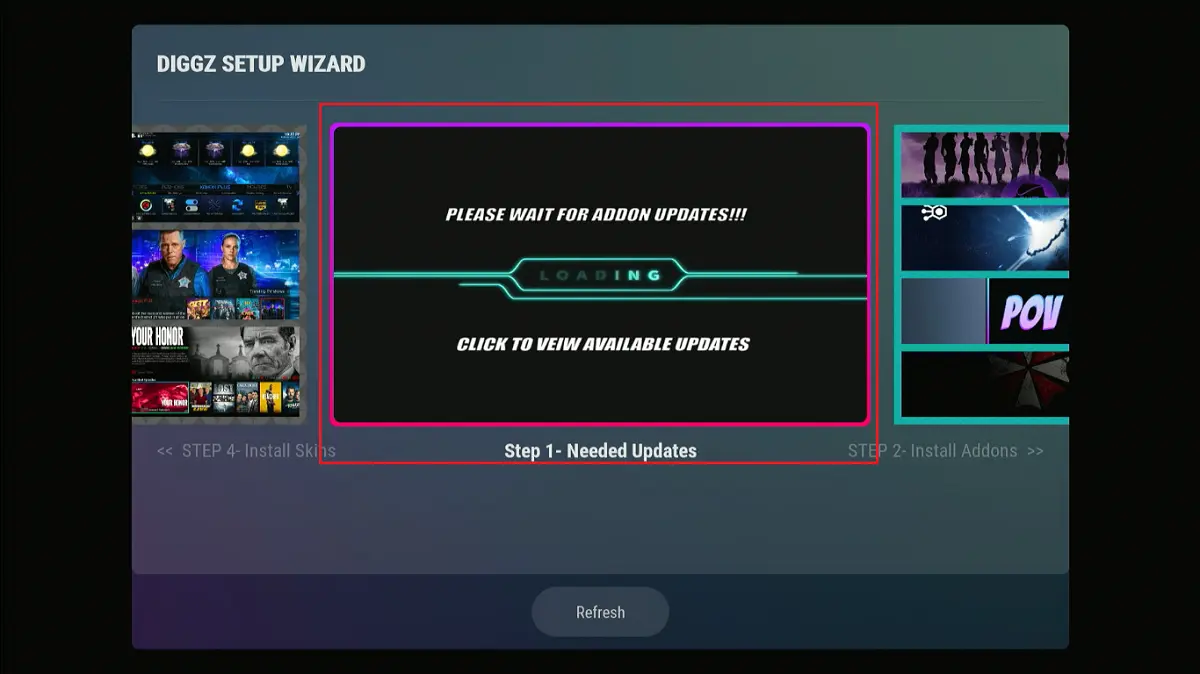
Kodi will prompt you to force-stop it for the new build to take effect. Upon reopening the application, you’ll see the following welcome screen.
The new Diggz Xenon build provides a step-by-step process for setting it up and getting started. Click Step 1-Needed Updates to install available updates.
Click Install All Updates on the next page.
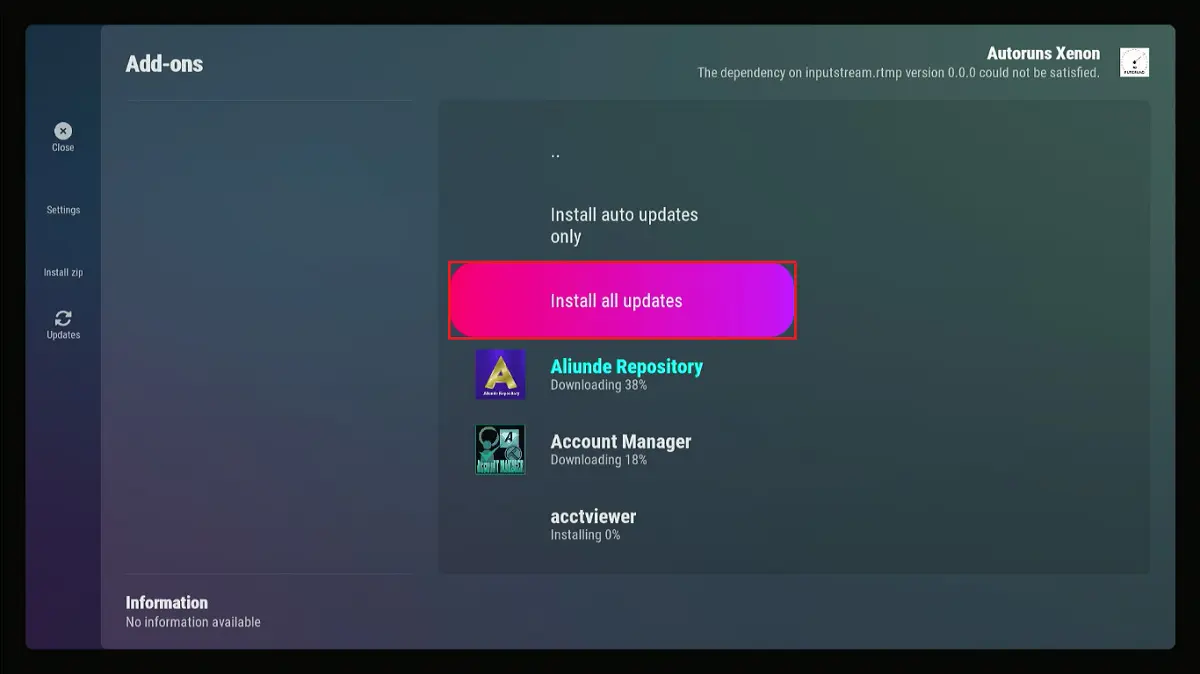
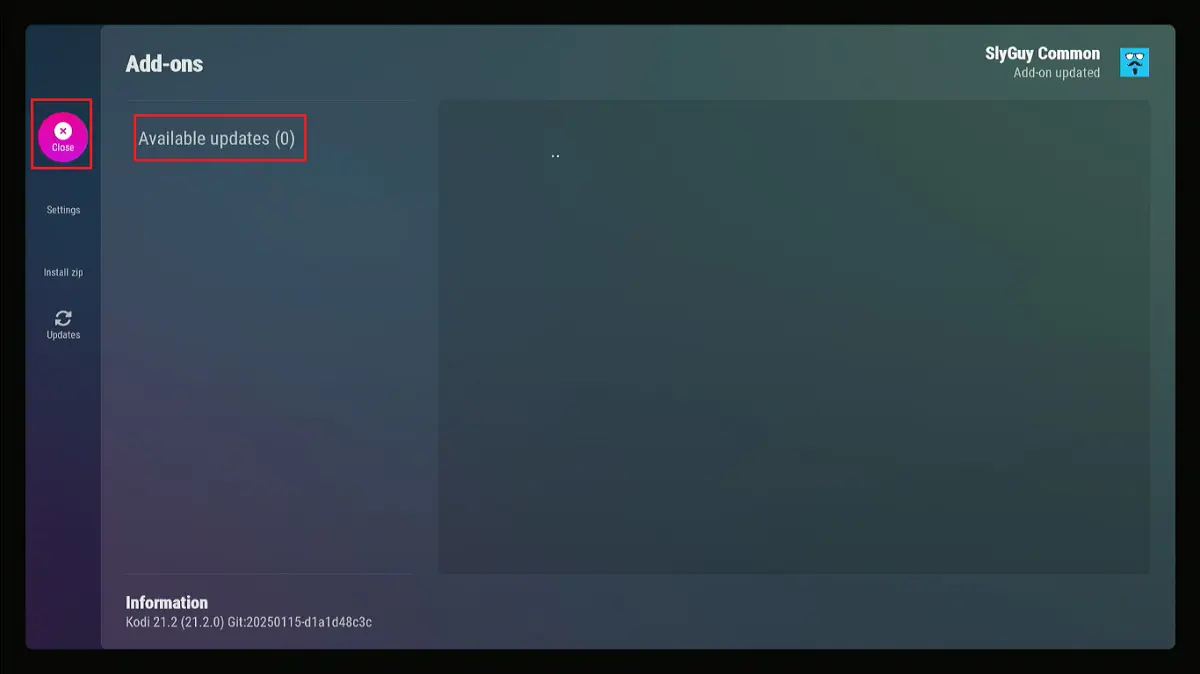
Wait for all updates to complete. You should see Available Updates (0) once all updates are complete. When the updates are done, click Close to leave that page.
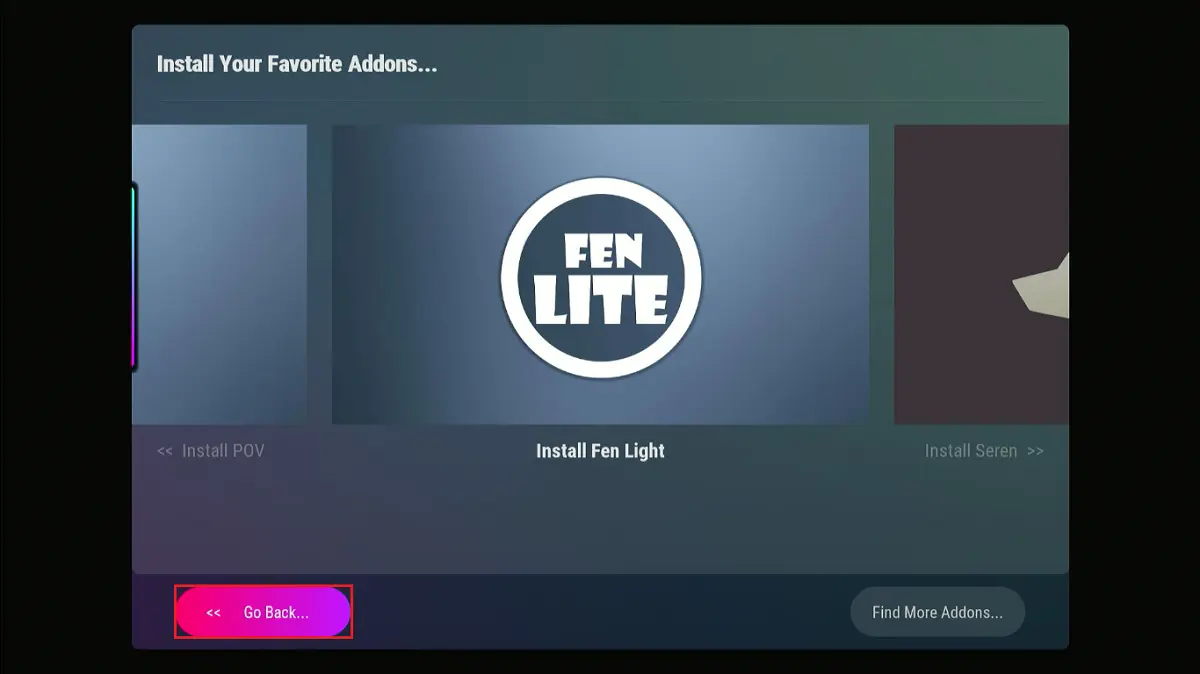
Click Step 2-Install Addons.
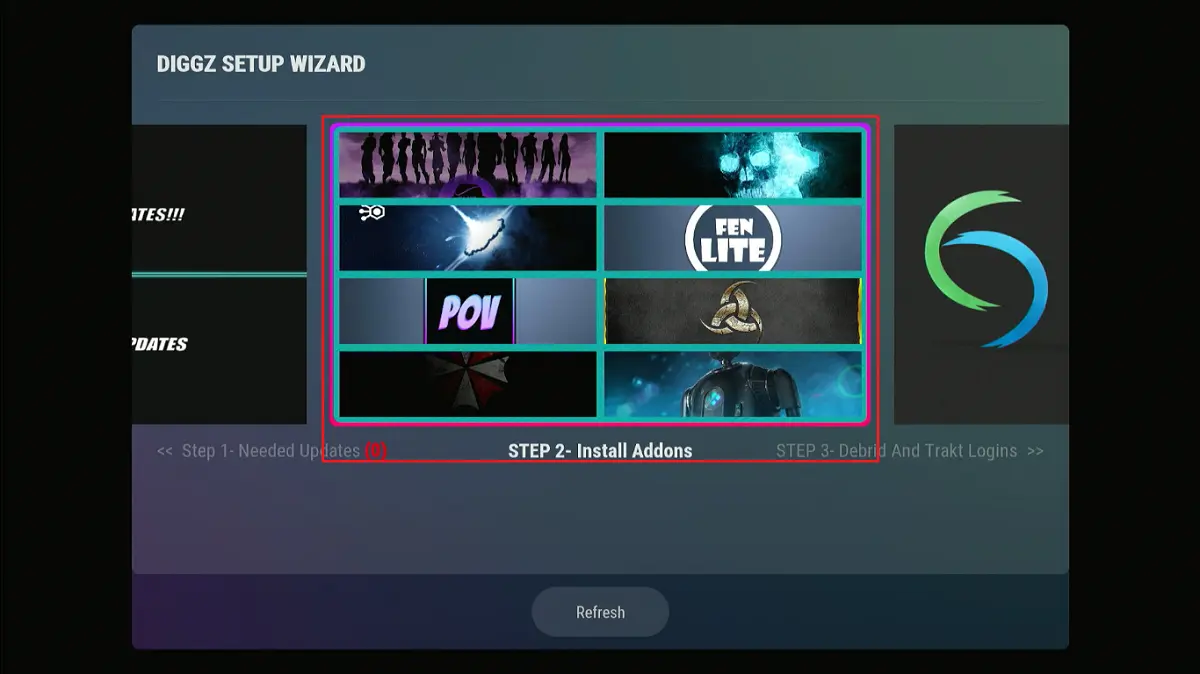
You’ll see the various Addons in this build. Click Install X Addon and follow the on-screen steps to install your preferred addons. For instance, I selected Install FEN Lite.

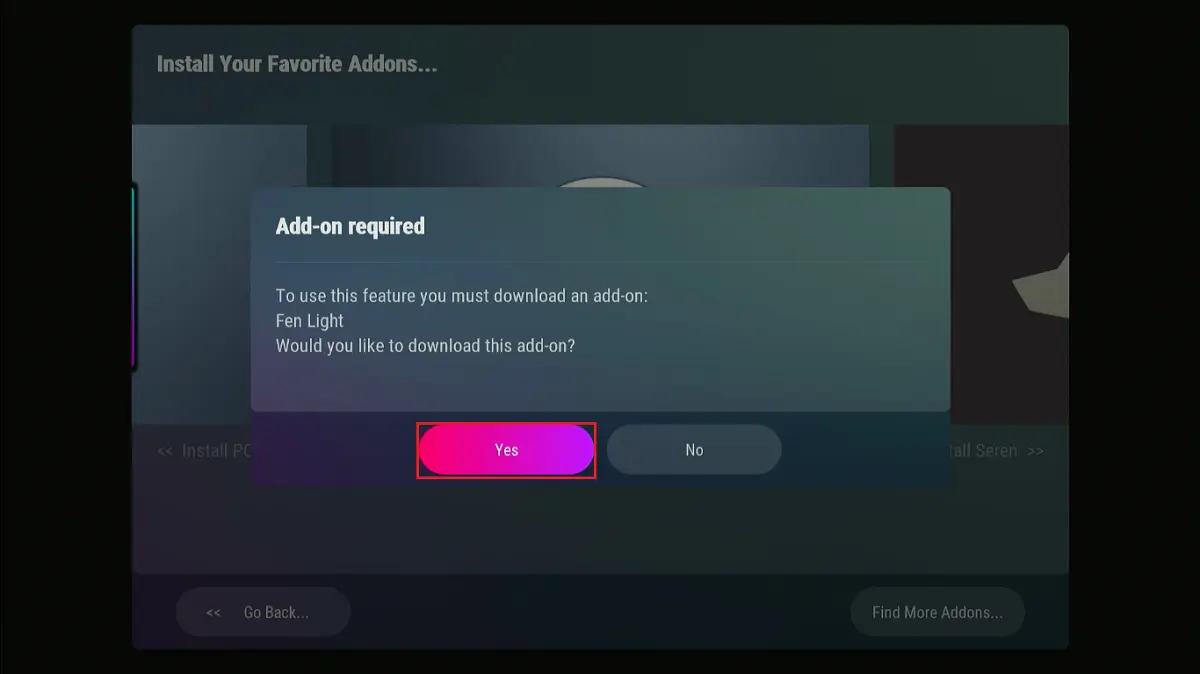
Choose Yes when prompted to install the addon.
Repeat the same process for the other addons until you have installed all of them.
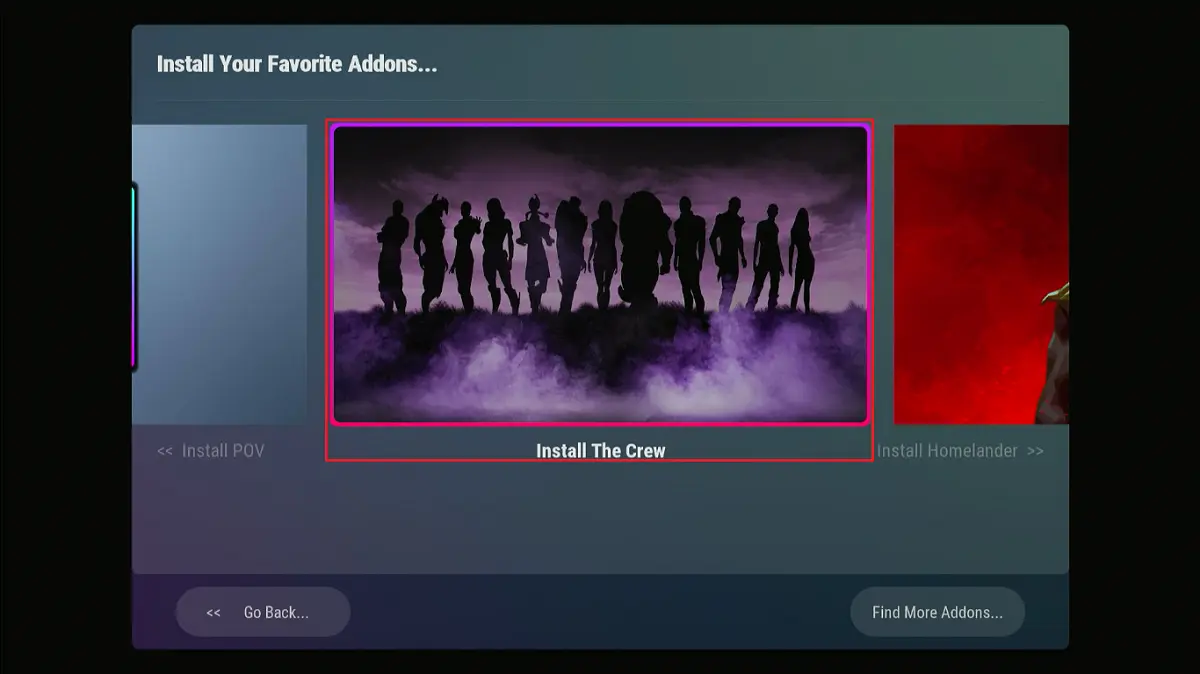
Click Go Back.
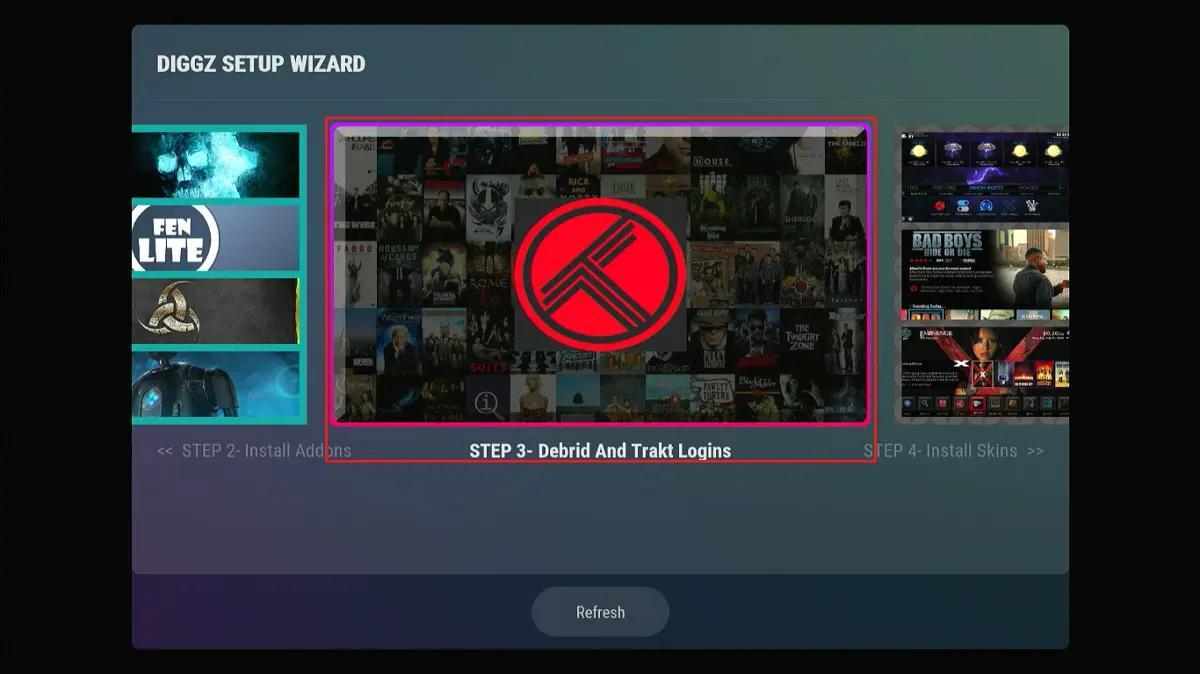
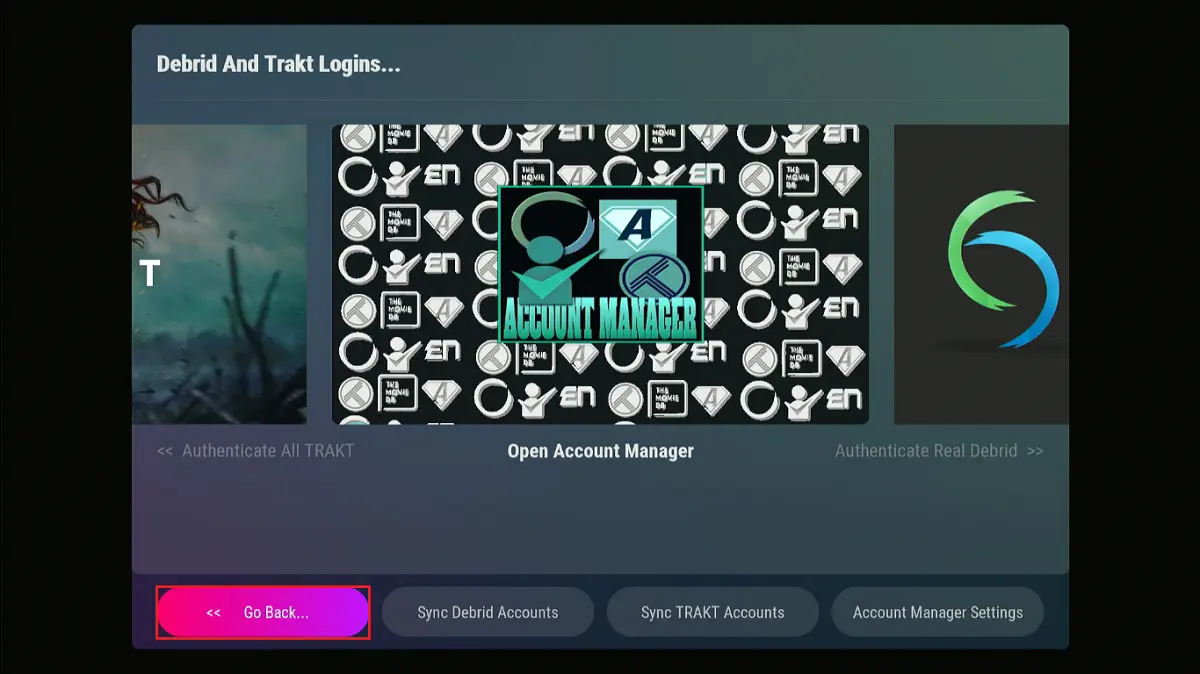
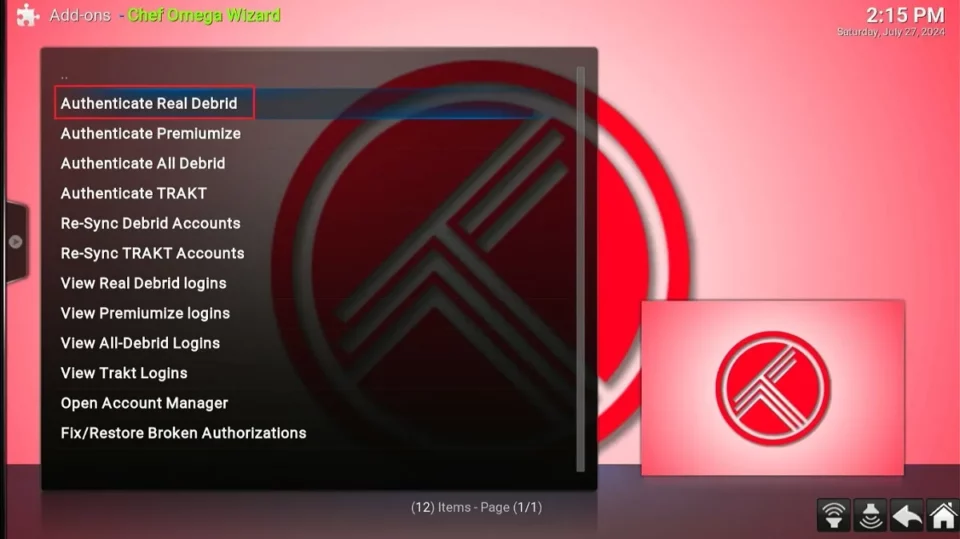
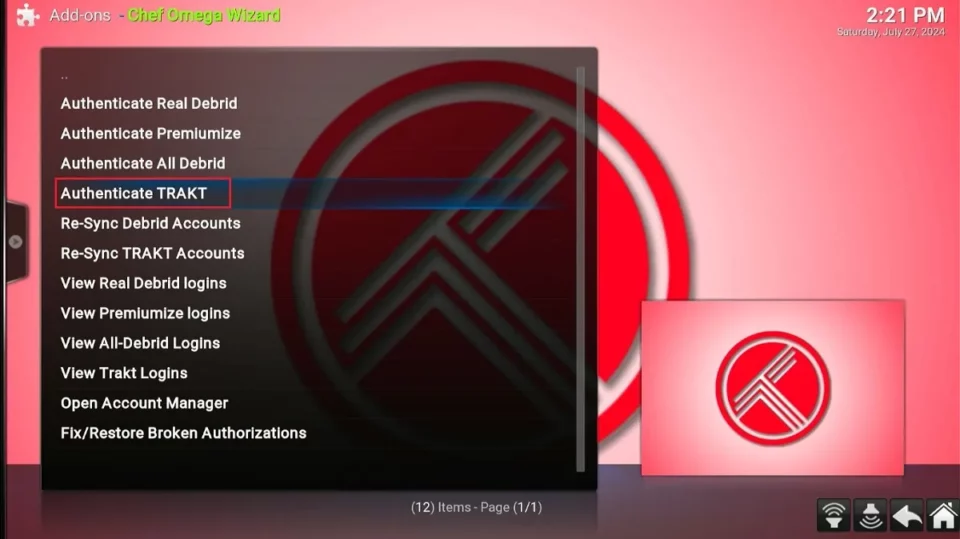
We need to set up Debrid and Trakt for the addons to work seamlessly. Select Step 3- Debrid and Trakt Logins.
Select Authenticate Real Debrid.
Tip: If you’re using a different Debrid service, say Premiumize or AllDebrid, authenticate the respective service.

Click Authenticate All TRAKT.
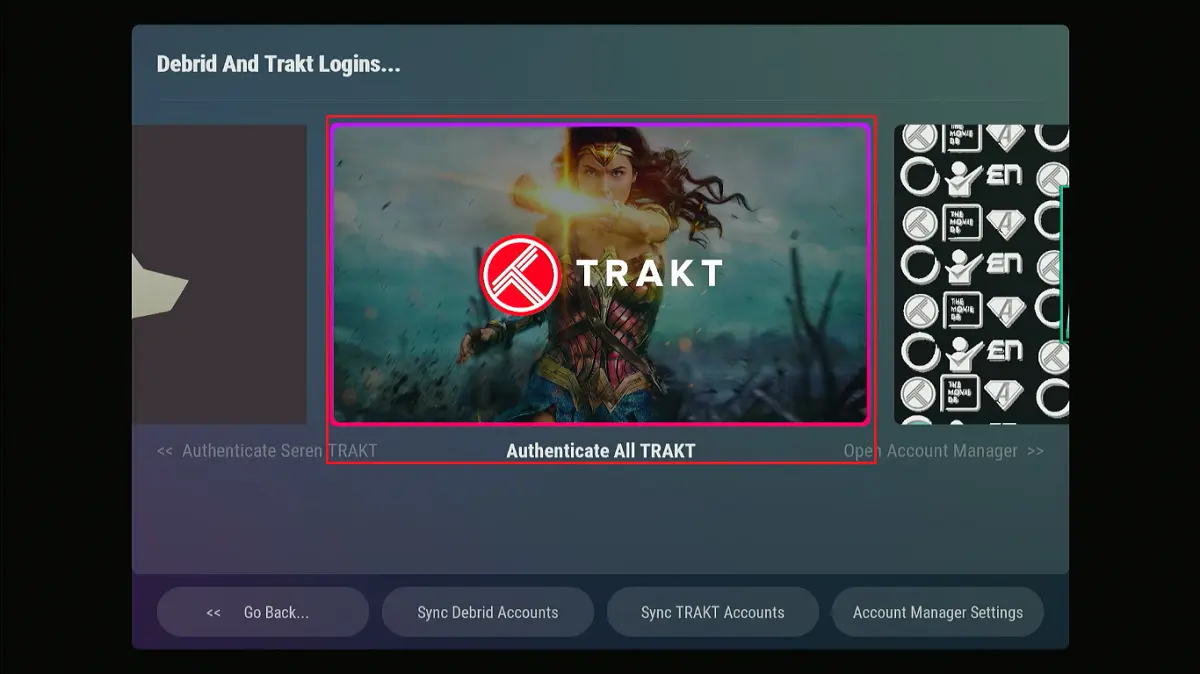
When done setting up these services, click Go Back.
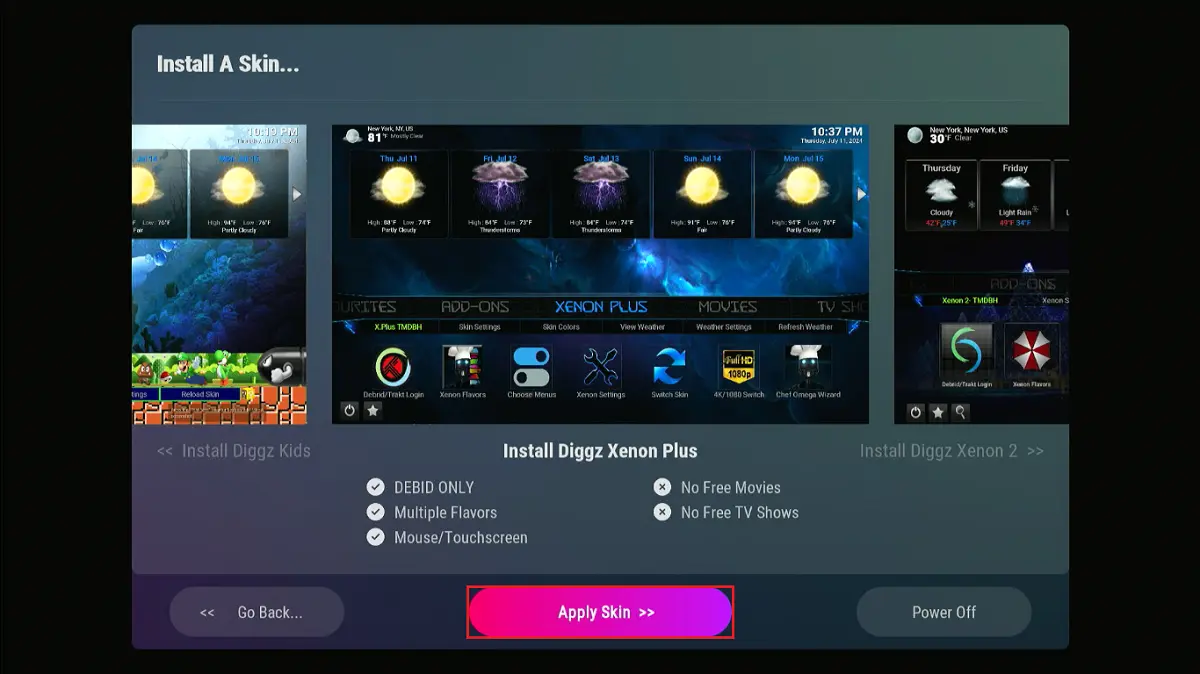
The last step in setting up the Diggz Xenon build is choosing your preferred skin to visually improve the Kodi theme. Select Step 4- Install Skins.
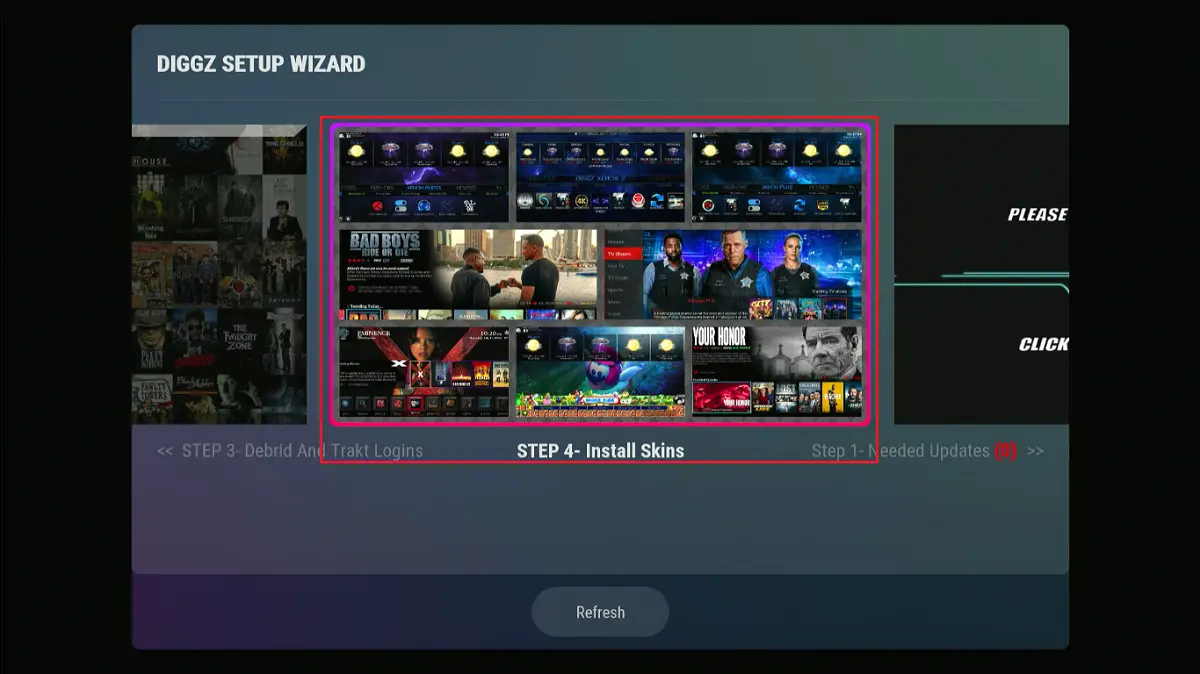
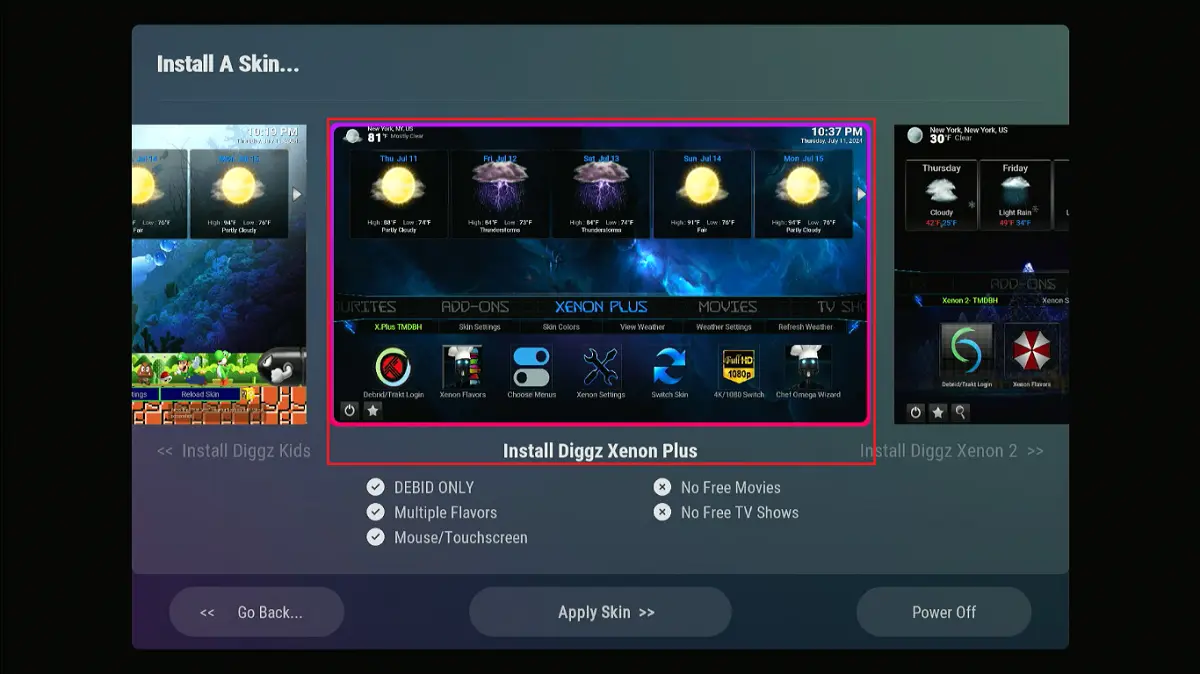
Choose your favorite skin and click Install. I chose Diggz Xenon Plus.
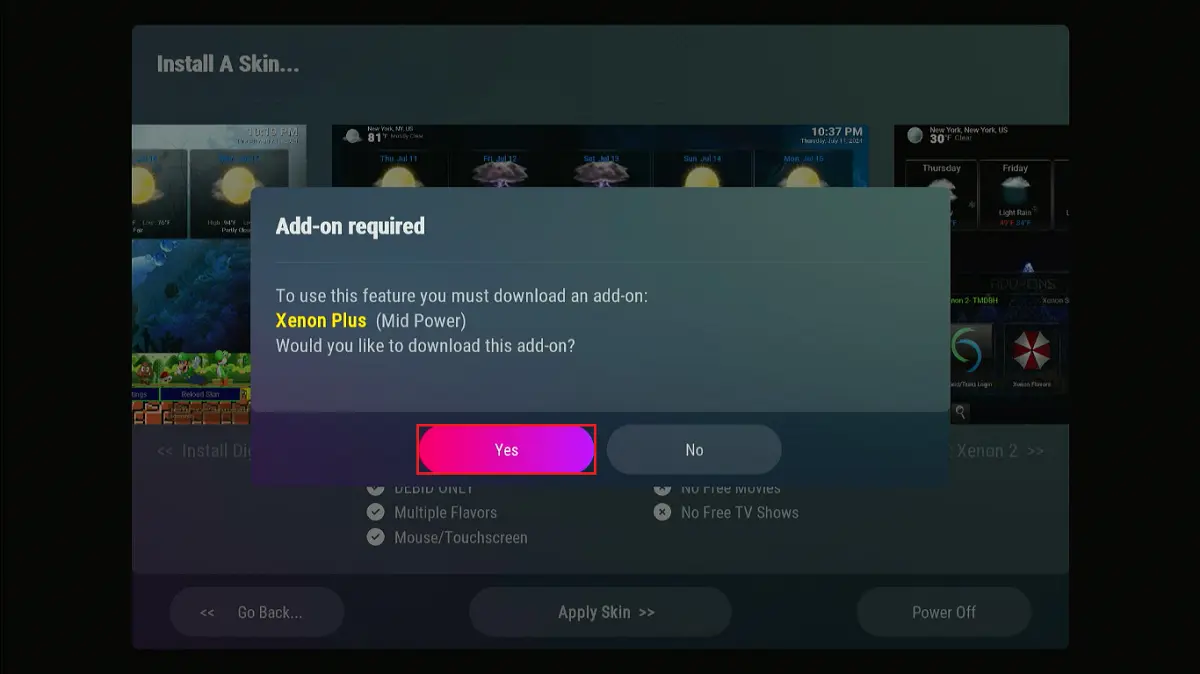
Select Yes when prompted to install the skin.
Click Apply Skin.
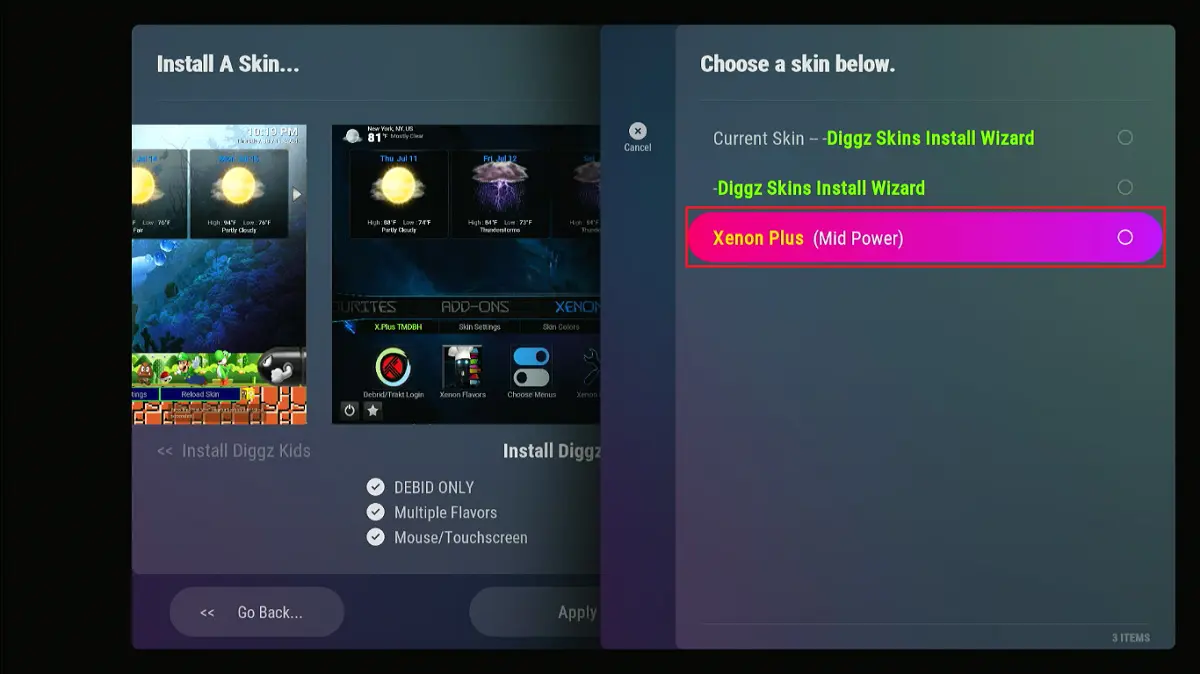
Select the skin you want to apply. In my case, it is Xenon Plus (Mid Power).
That’s all. You have successfully installed and set up the Diggz Xenon build. This is how the home page looks like when everything is installed and set up. It may look different depending on the skin you choose. Click Xenon Plus.
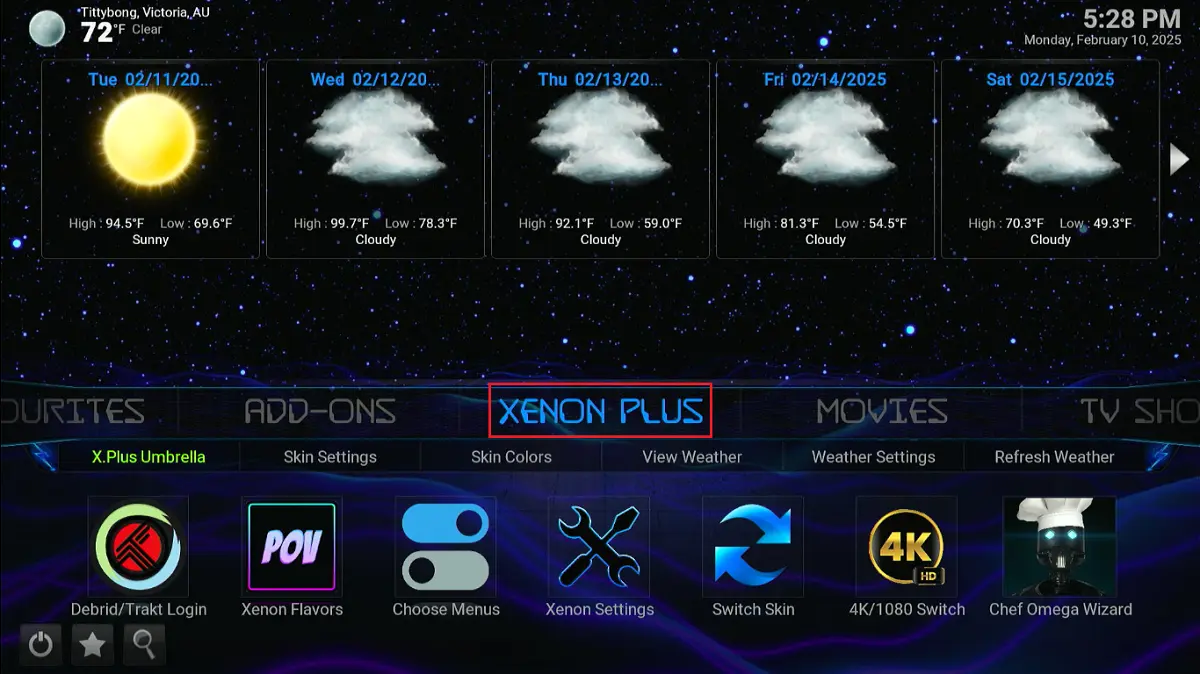
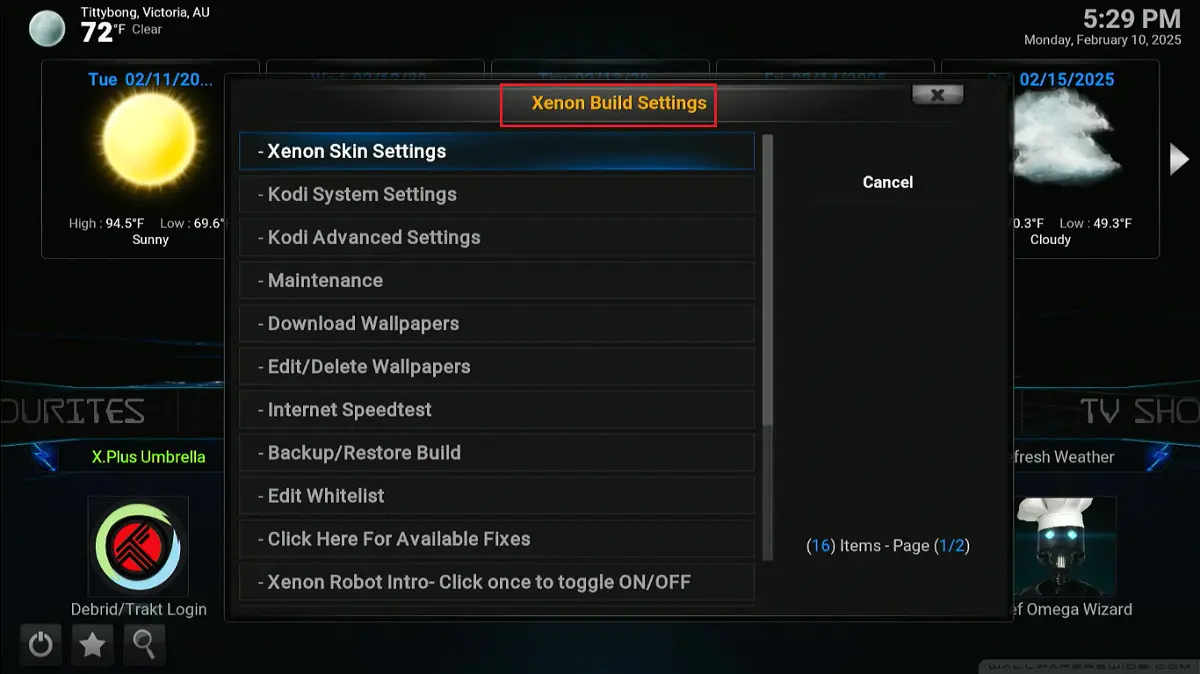
The Xenon Skin Settings menu for the build will launch. The menu allows you to customize the skin settings, such as the background, widgets, clock display, font, and background playback.
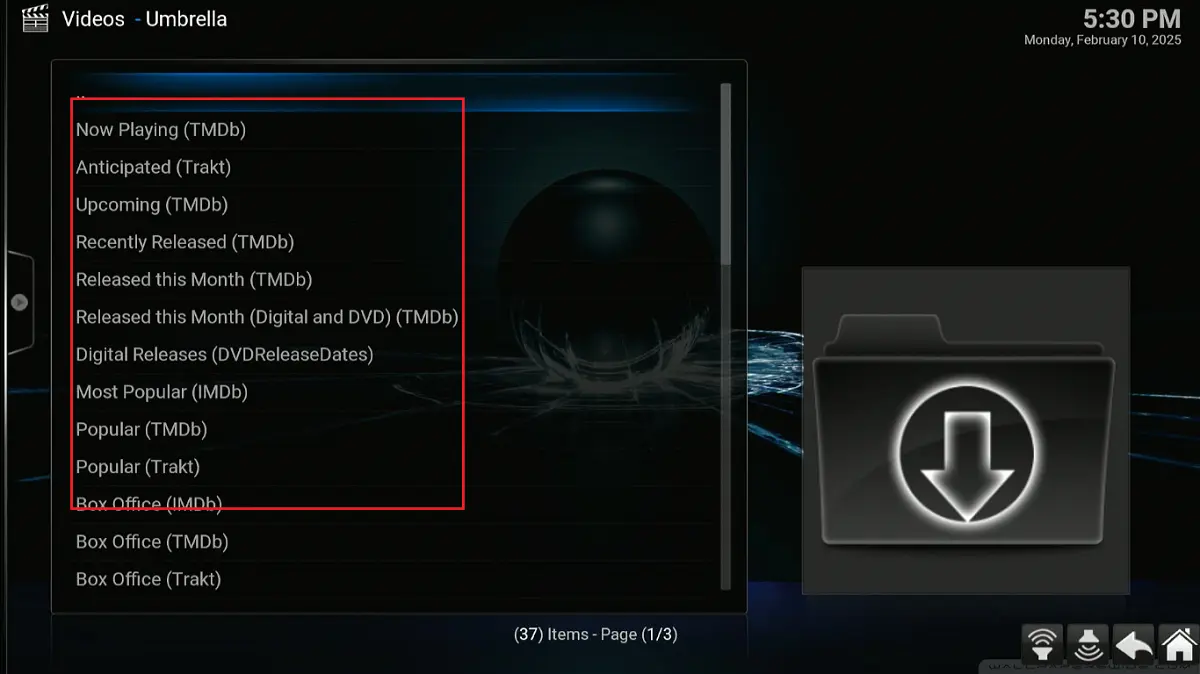
Return to the home page and select the Movies tab.
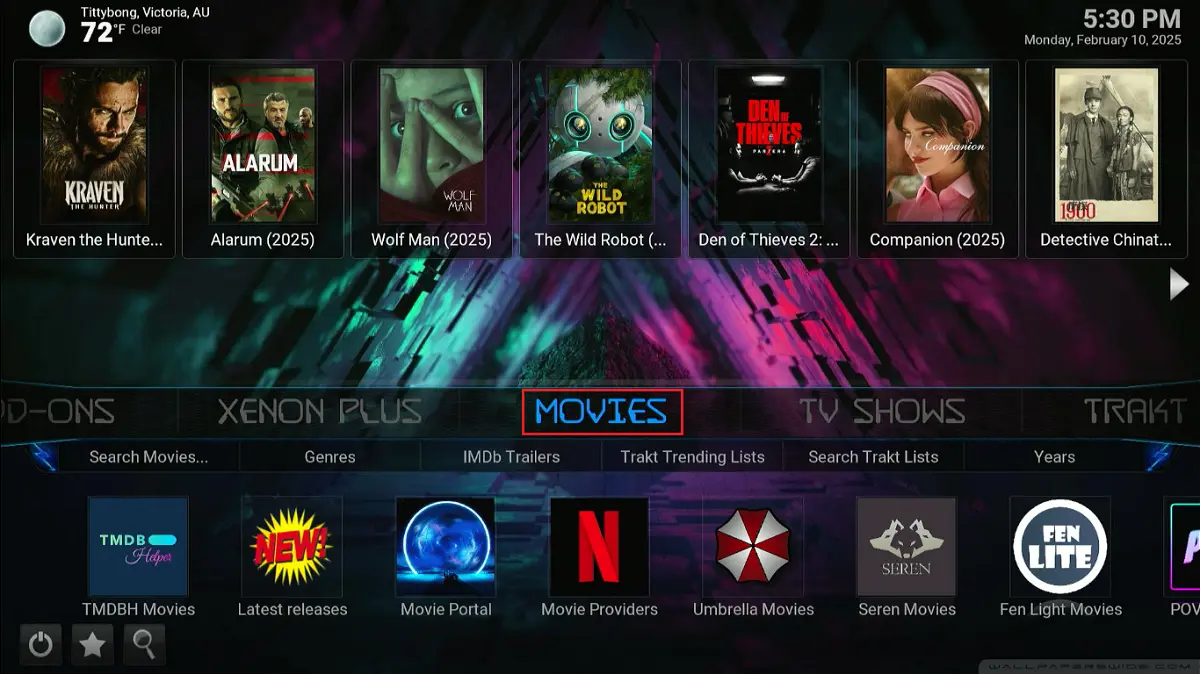
This section lets you explore and access the movie library. The library is organized into sections like Recently released, Digital releases, Most Popular, and Box Office IMDb.
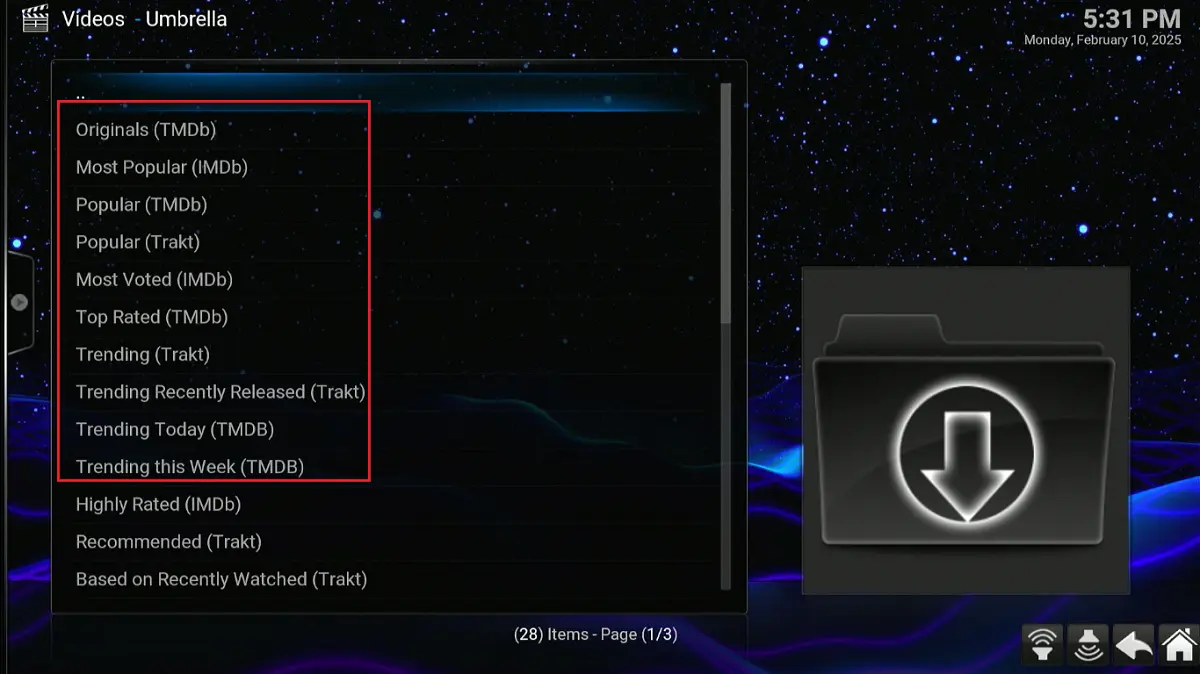
The next tab is the TV Shows section.
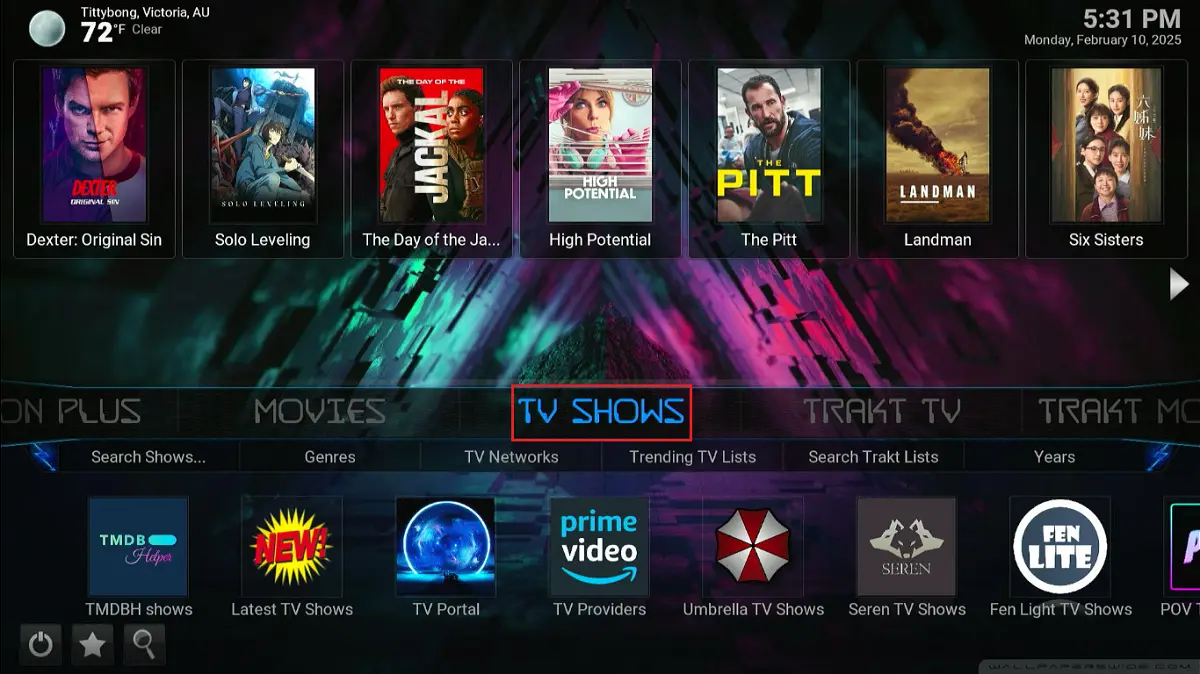
This section is the TV show library. It features various sections that help you explore your favorite TV shows. The sections include Originals, Most Popular, Top Rated, Trending, and Recommended.
The following menu item is Trakt TV. Once you’ve watched a few shows, Trakt will organize your watchlist here.
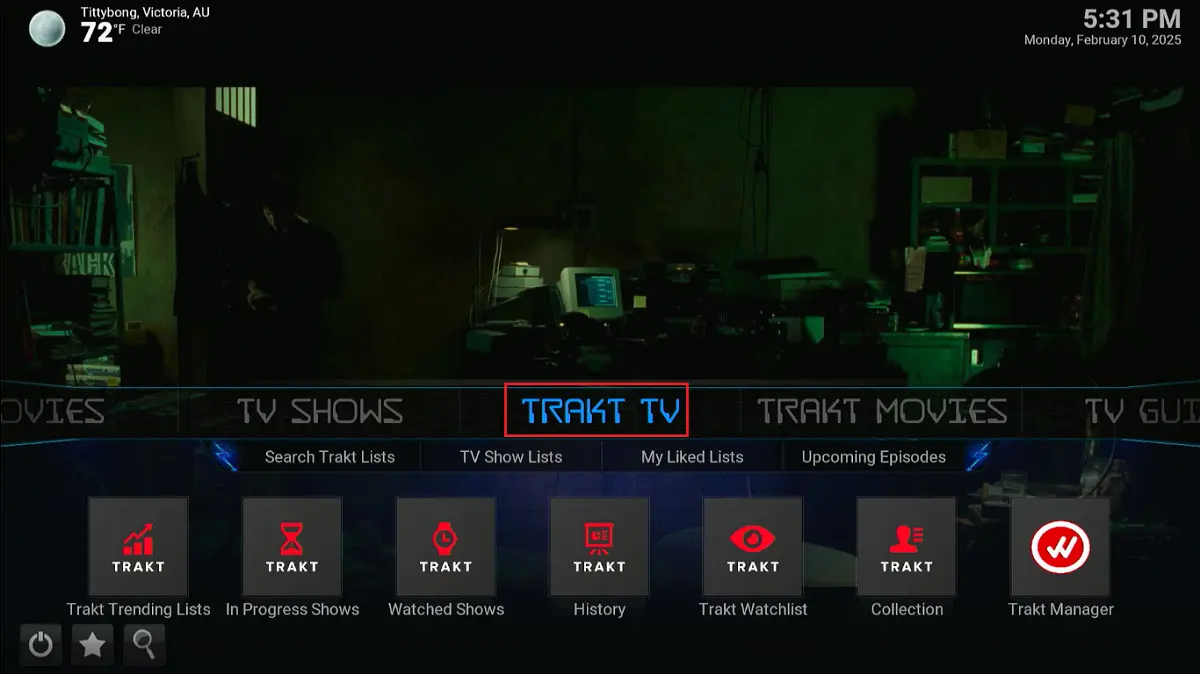
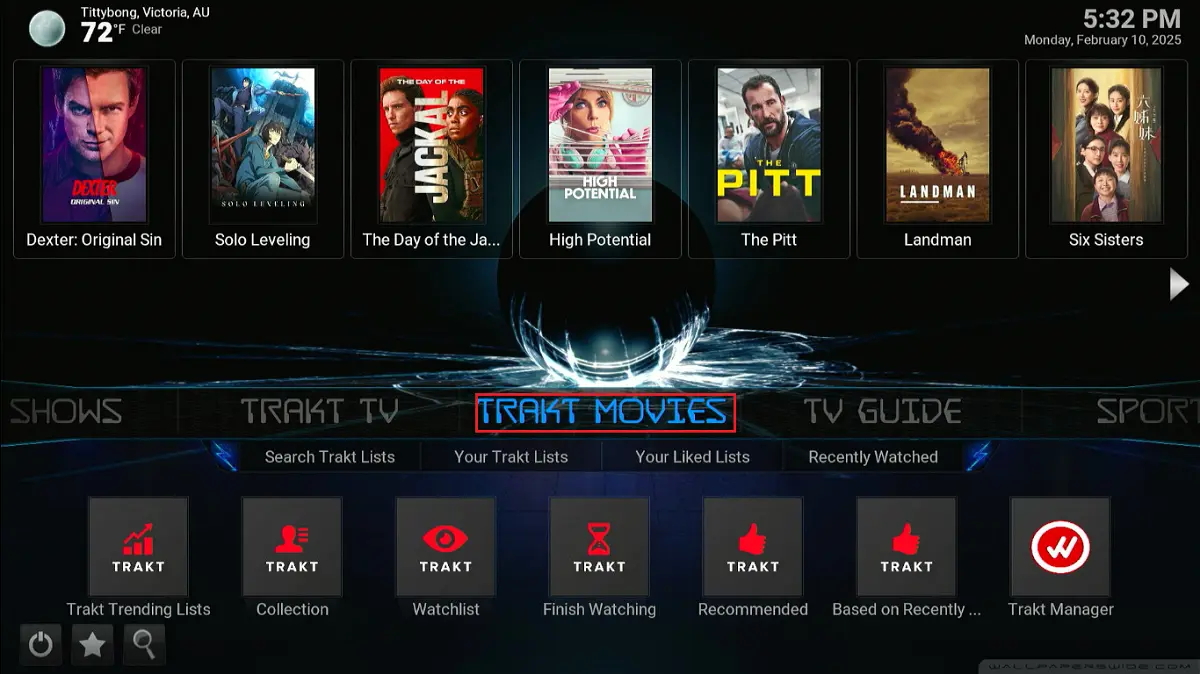
The same applies to Trakt Movies. This section contains all the movies you have watched, including completed and uncompleted ones.
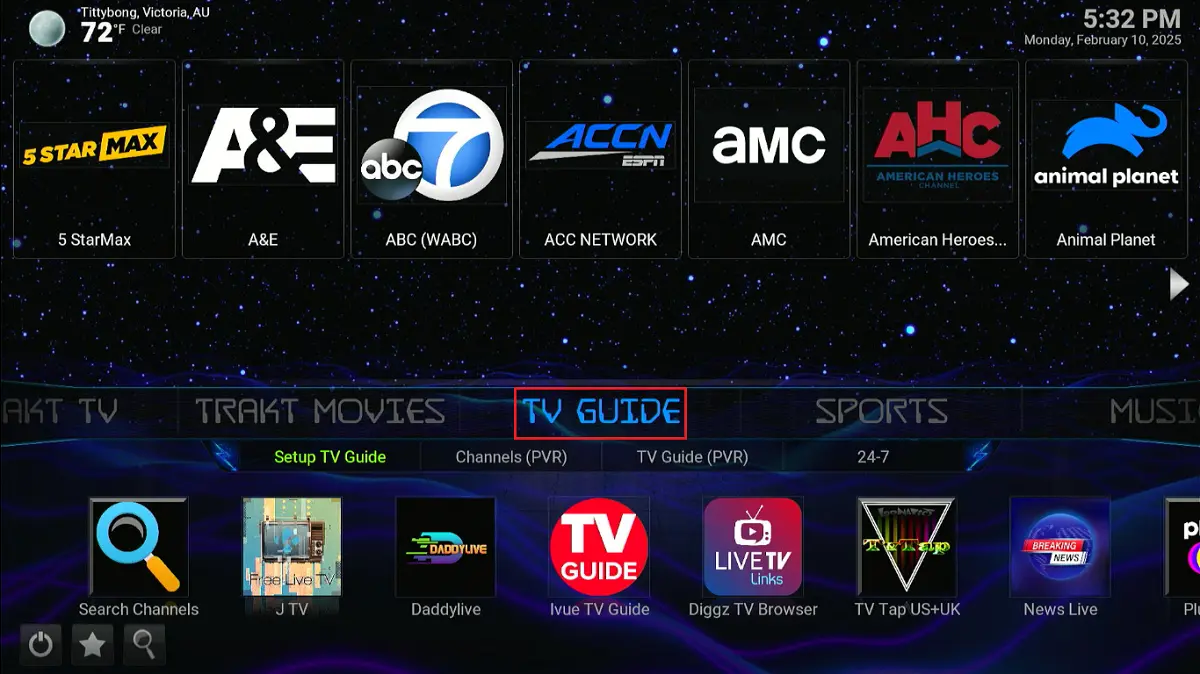
Next on the menu is the TV Guide. This guide shows the available live TV channels depending on the installed live TV addons.
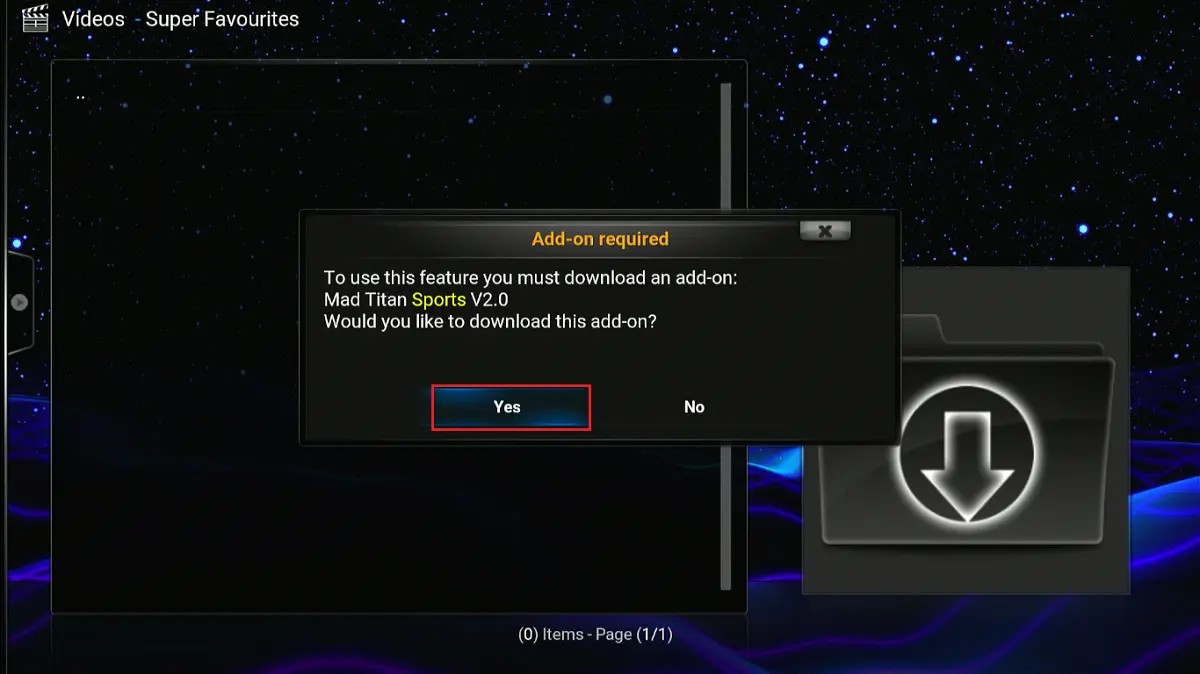
Click on the Sports tab to access the sports content on Diggz Xenon. It includes popular leagues and many sports-related addons.
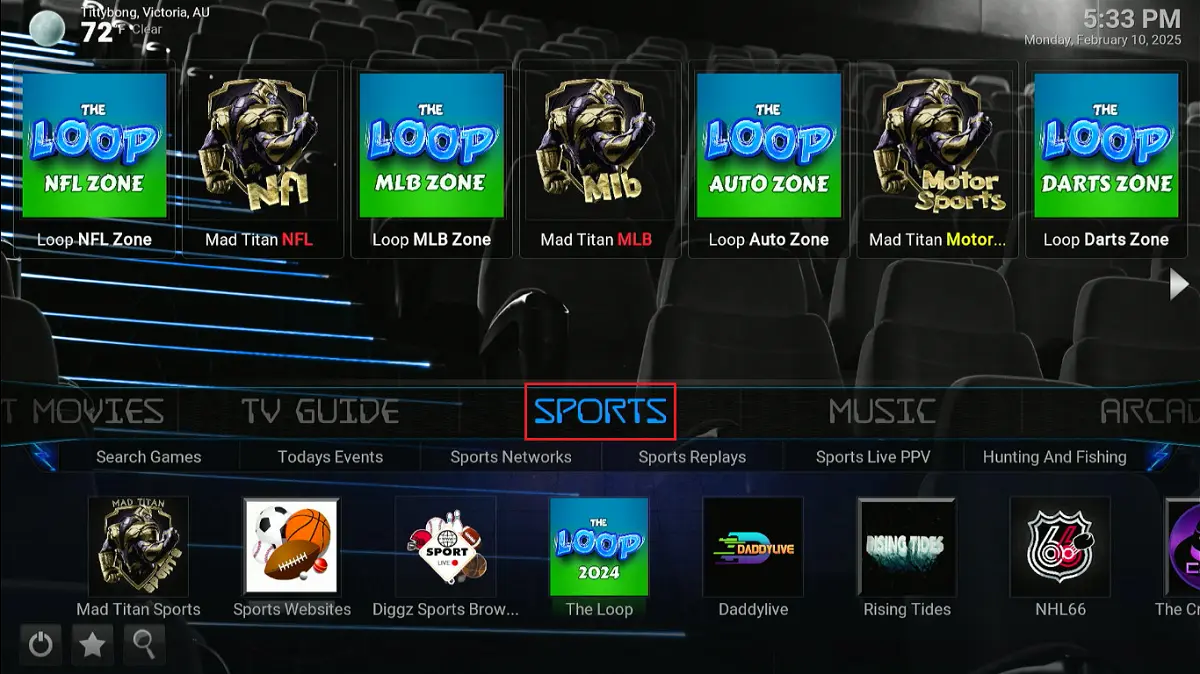
If you haven’t downloaded Sports addons, you’ll be prompted to install some. Click Yes.
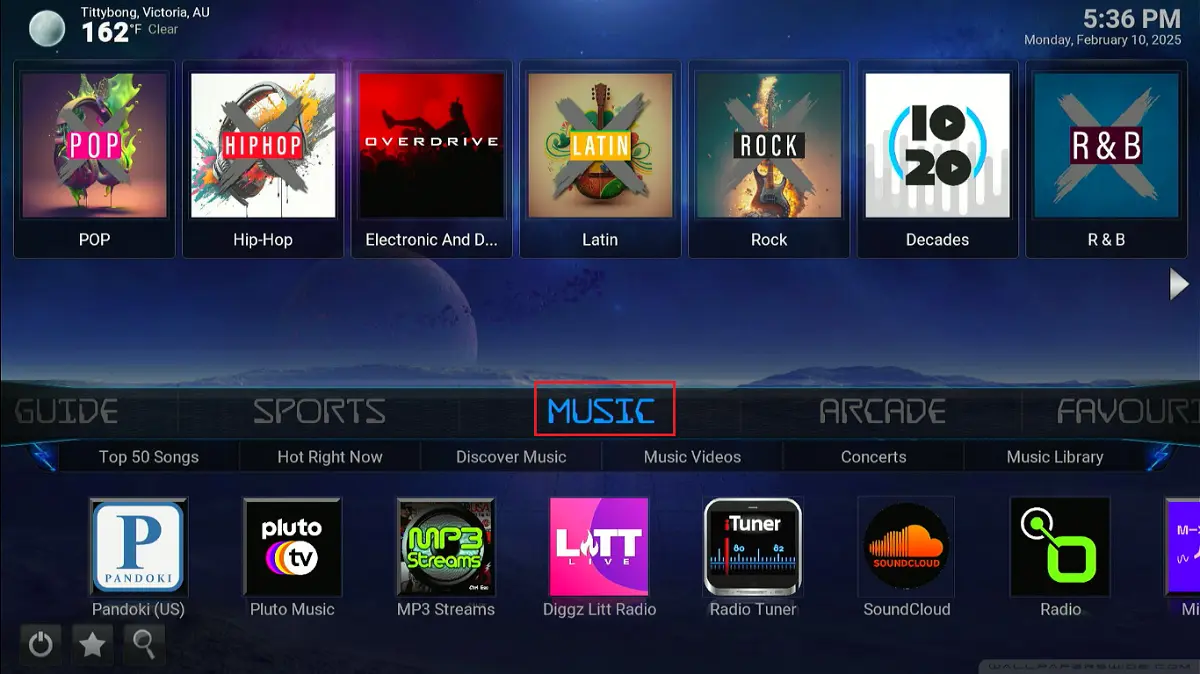
Now, navigate to the Music menu to see all the available musical content.
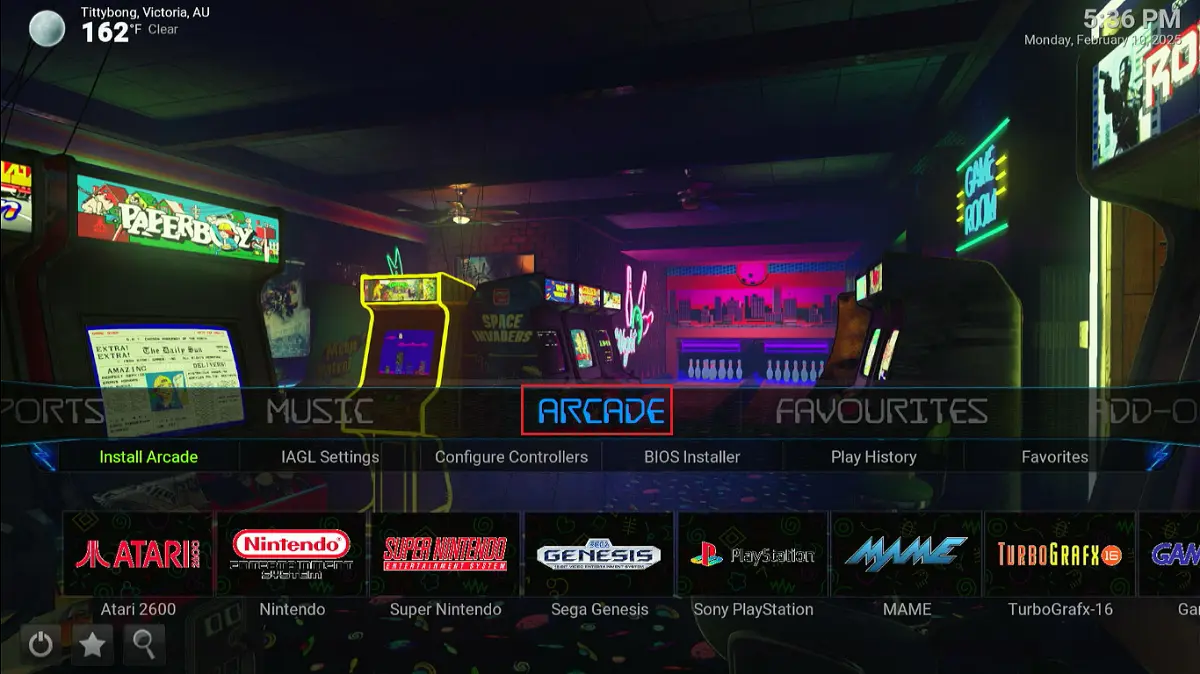
The following section is titled Arcade. It lets you access various Arcade games via Diggz Xenon.
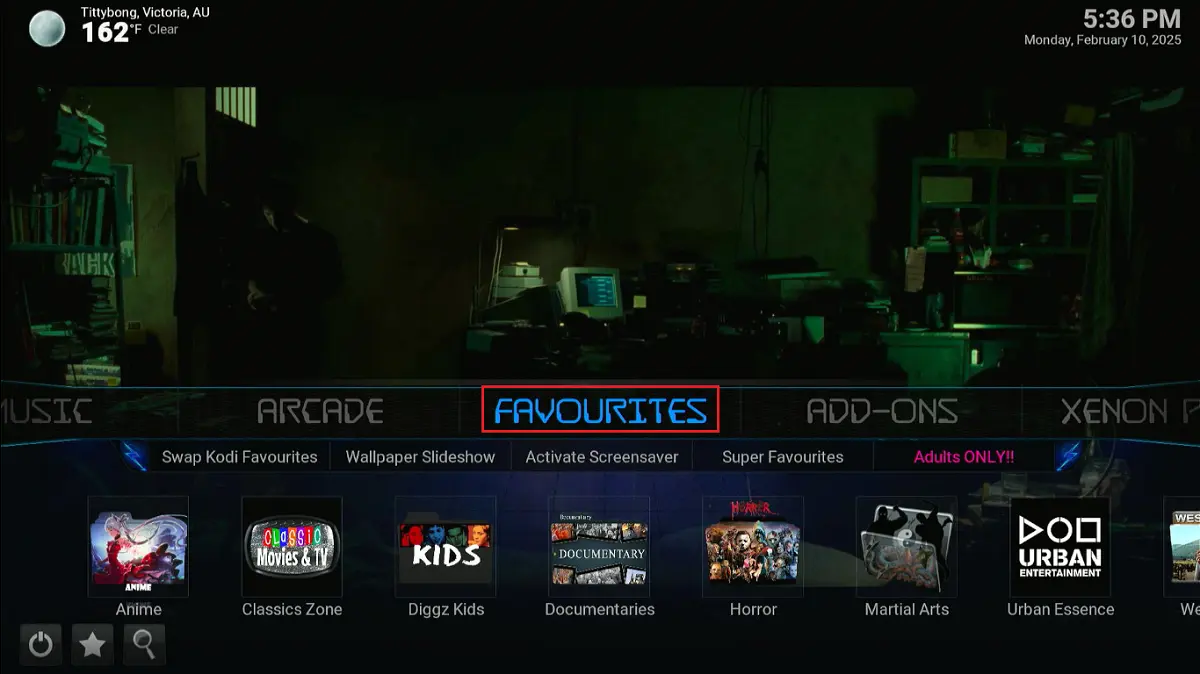
Next is the Favourites tab. This menu lets you access favorite videos, such as Anime, Classics, Documentaries, and Adult-Only content.
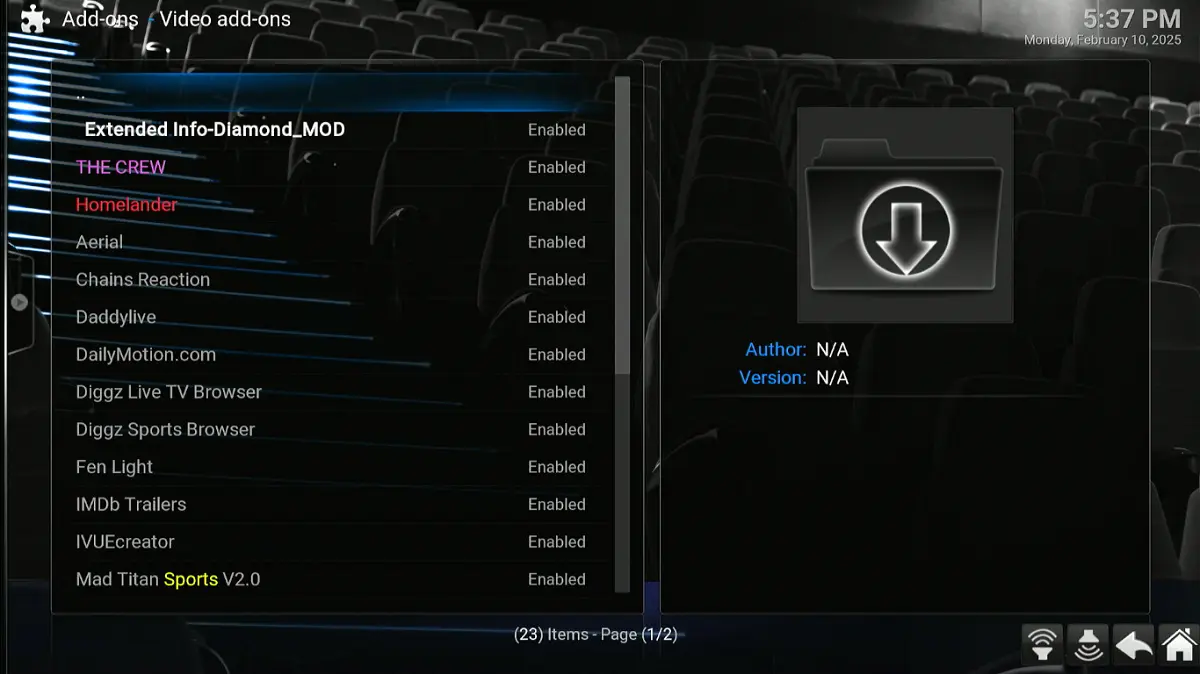
Lastly, select the Addons menu to view all the available addons.
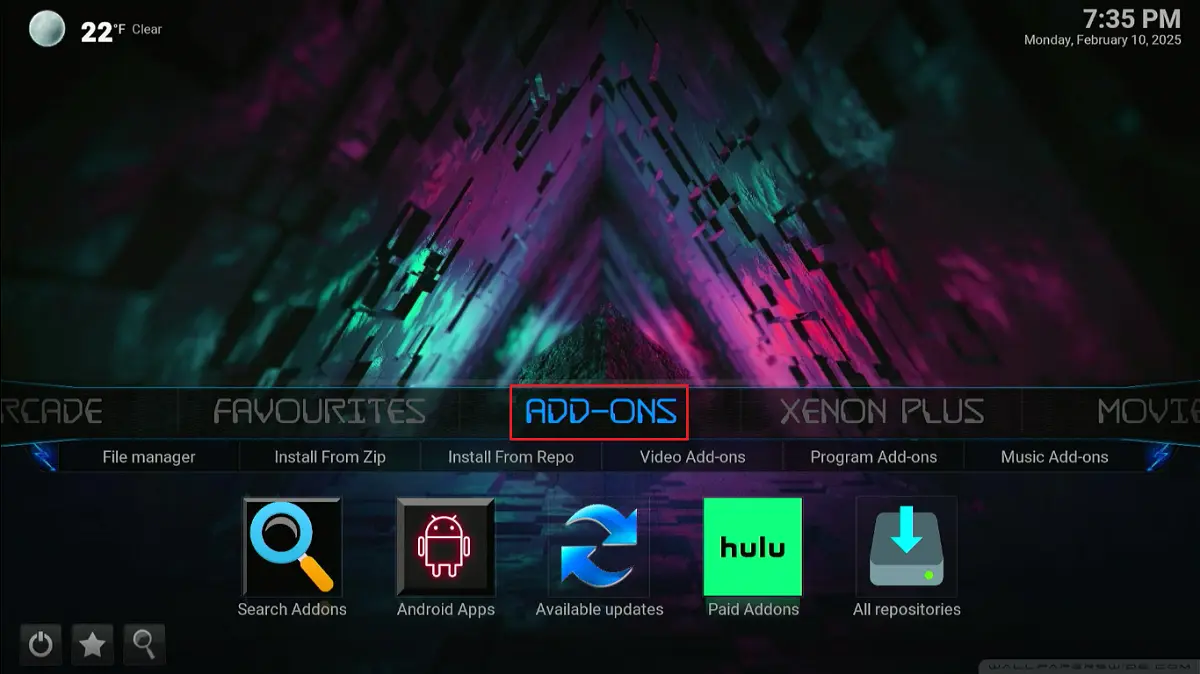
Go to My Addons> Video addons to see all the video add-ons preloaded with the Diggz Xenon Build. All the installed addons’ status is indicated as Enabled.
Connect Real Debrid with Diggz Xenon
You can connect Real Debrid with the Xenon build to get better streaming links. Please follow these steps:
1. From the Diggz Xenon home page, click on the Debrid/Trakt Login option.
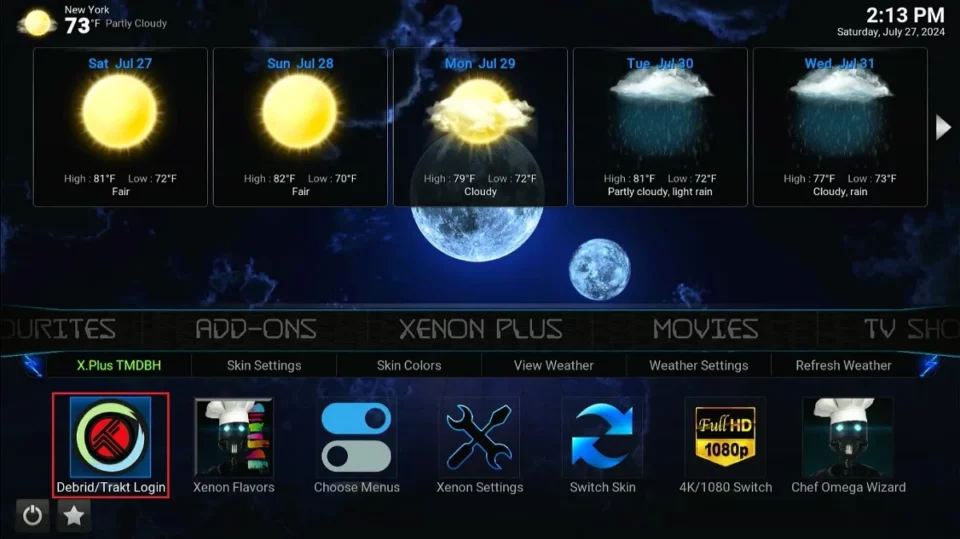
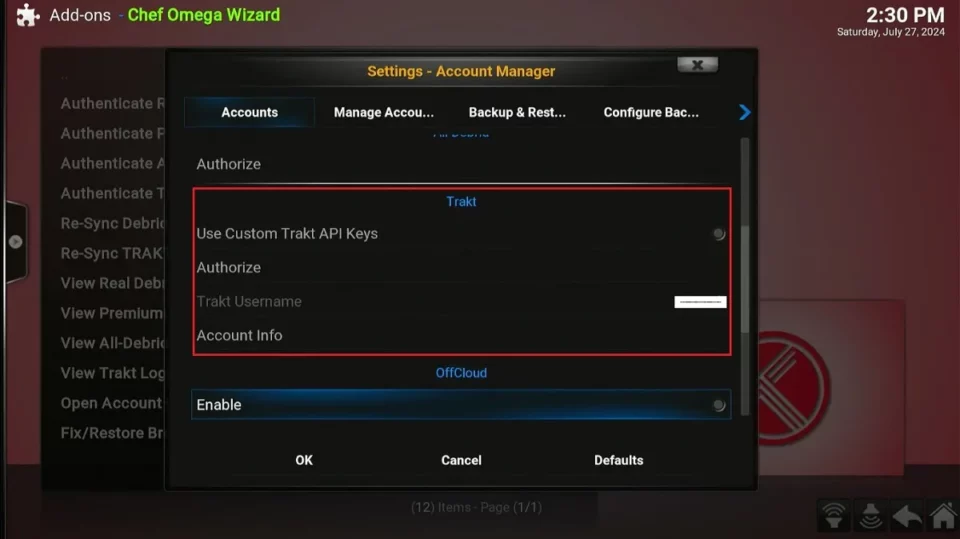
2. On the following page, select Trakt And Debrid Account Manager.
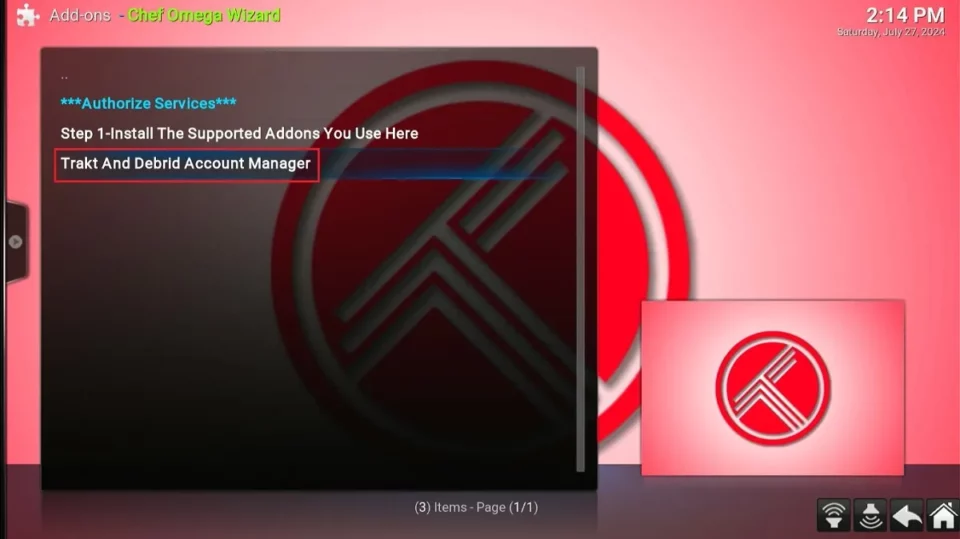
3. Click Authenticate Real Debrid.
4. A small Real Debrid Authentication menu will appear. It contains a website link and a code.
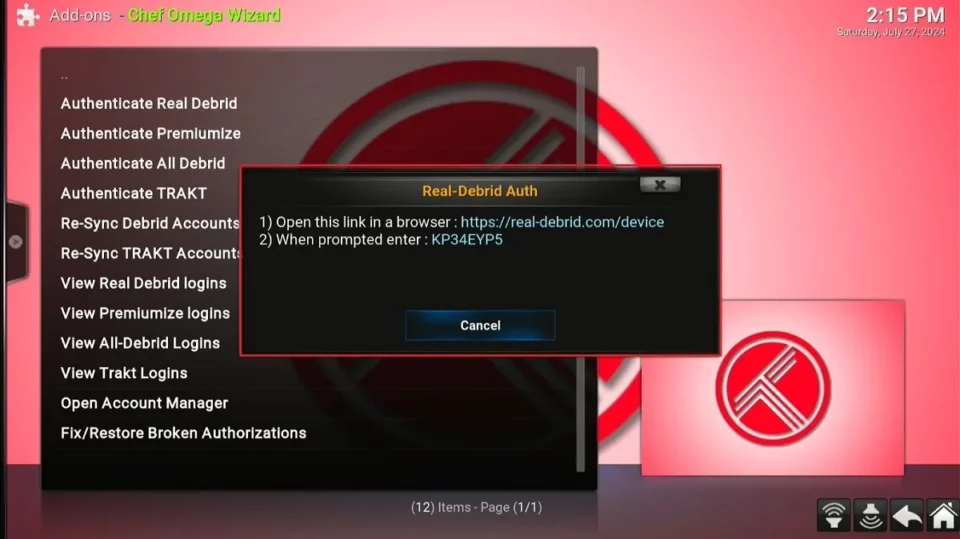
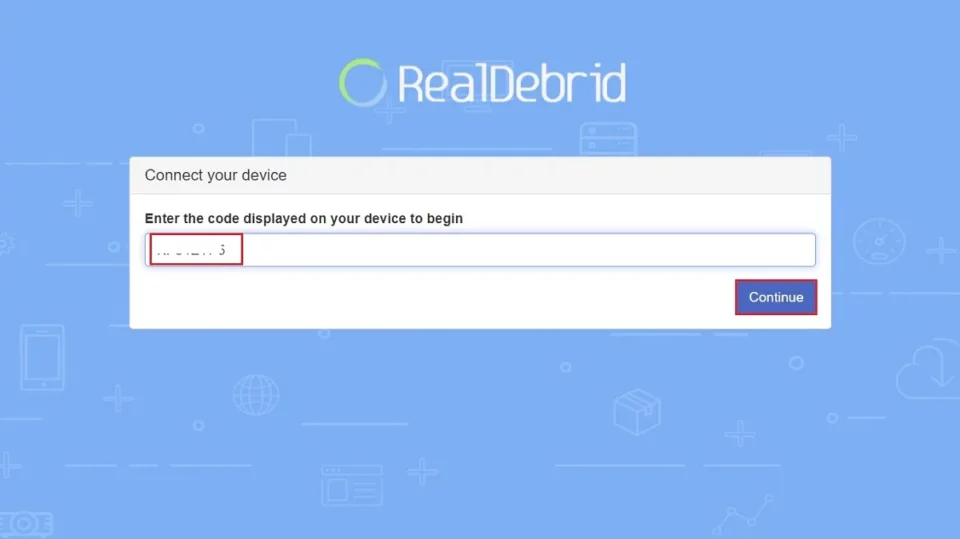
5. Visit real-debrid.com/device via a web browser. Then, enter the Code displayed and click Continue.
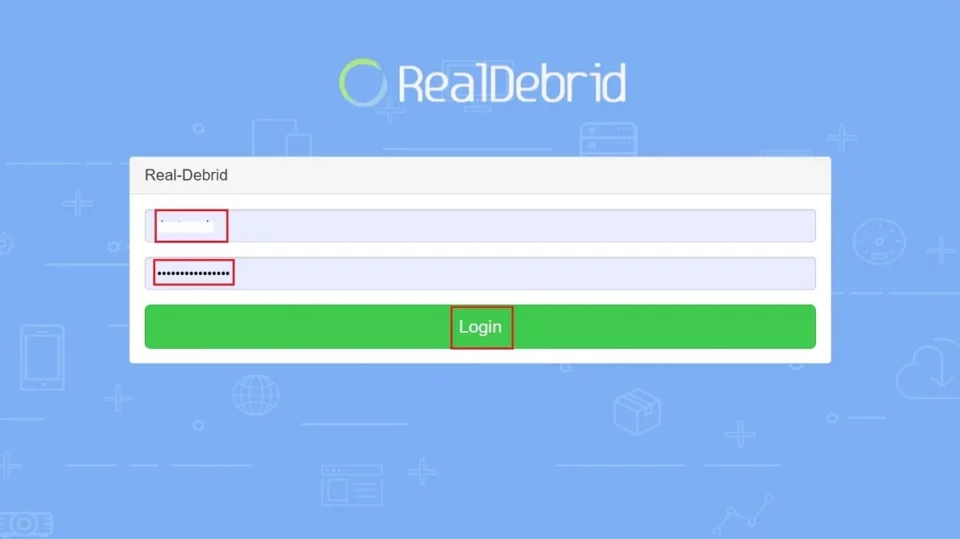
6. Enter your Real Debrid account details and click Login.
7. Set a name for your device and select Set That Name.
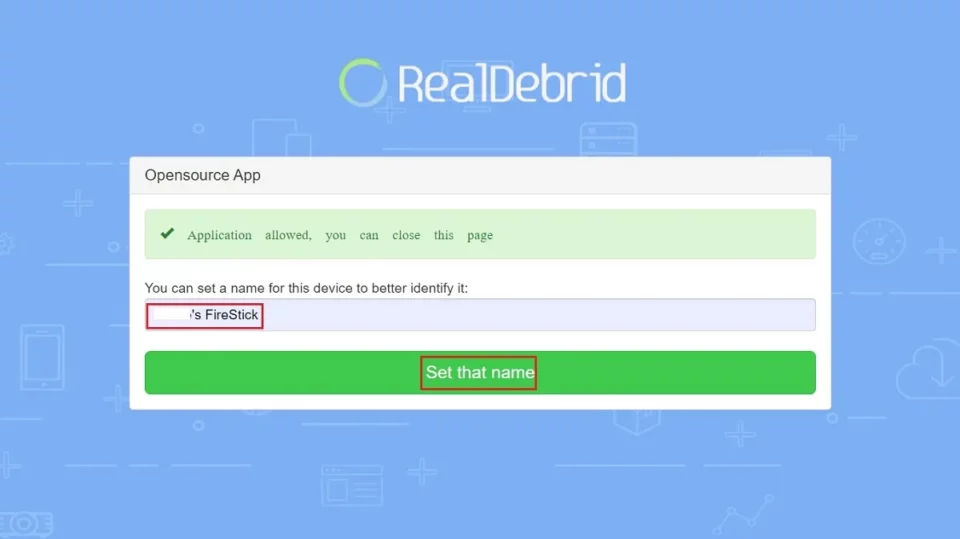
8. That’s it. You have successfully authenticated and connected your Real Debrid account with Diggz Xenon.

Connect Trakt with Diggz Xenon
You can connect Trakt with Diggz Xenon to sync your media library across devices. Moreover, Trakt also improves your streaming experience on the build. Follow these steps:
1. In the Trakt And Debrid Account Manager menu, select Authenticate TRAKT.
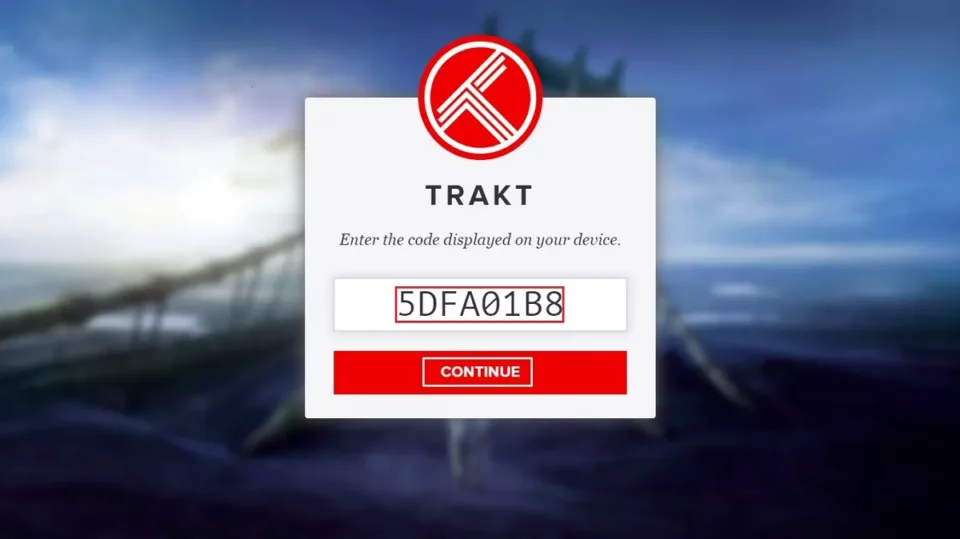
2. A small popup menu containing a website link and unique code will appear.
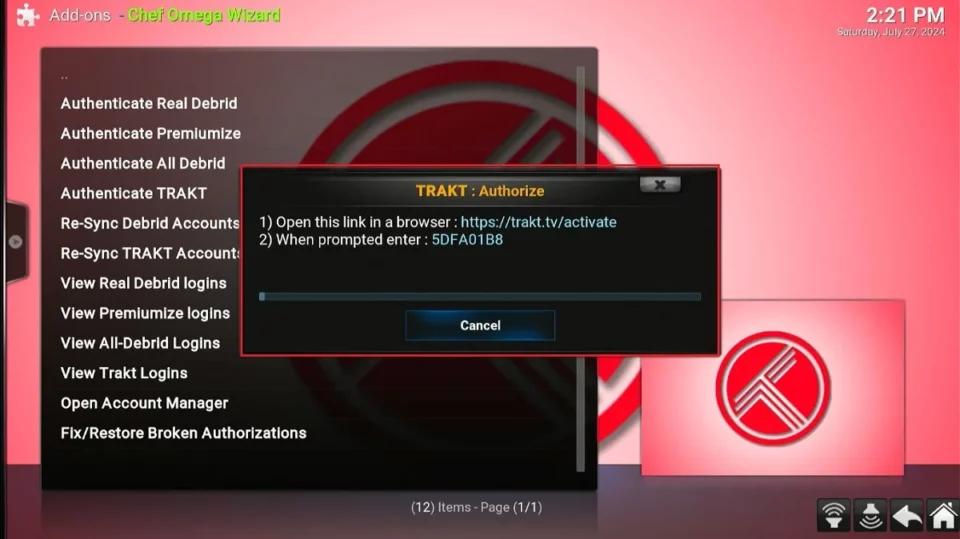
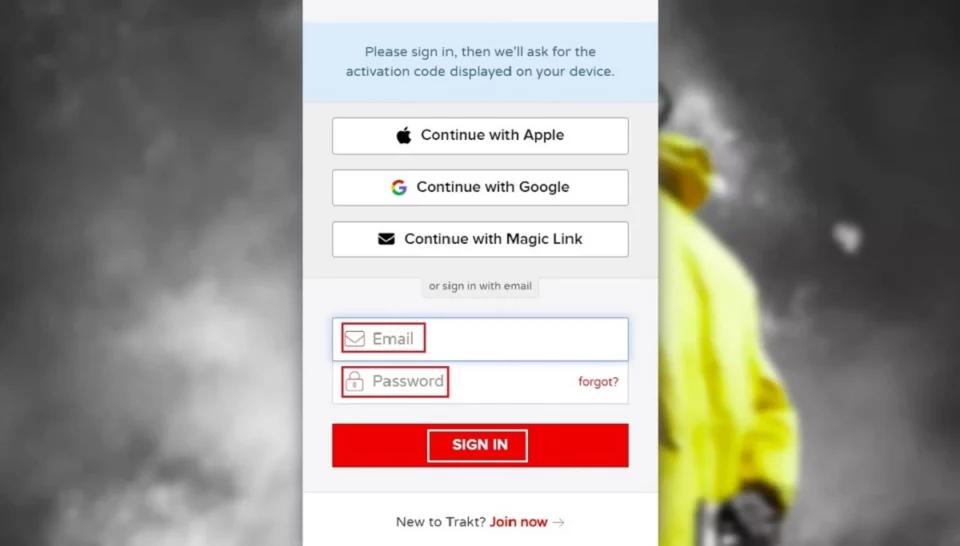
3. Visit https://trakt.tv/activate and sign in with your Trakt account details.
4. Click Continue after you enter the code displayed on your device.
5. Allow the account manager to use your account by clicking Yes.
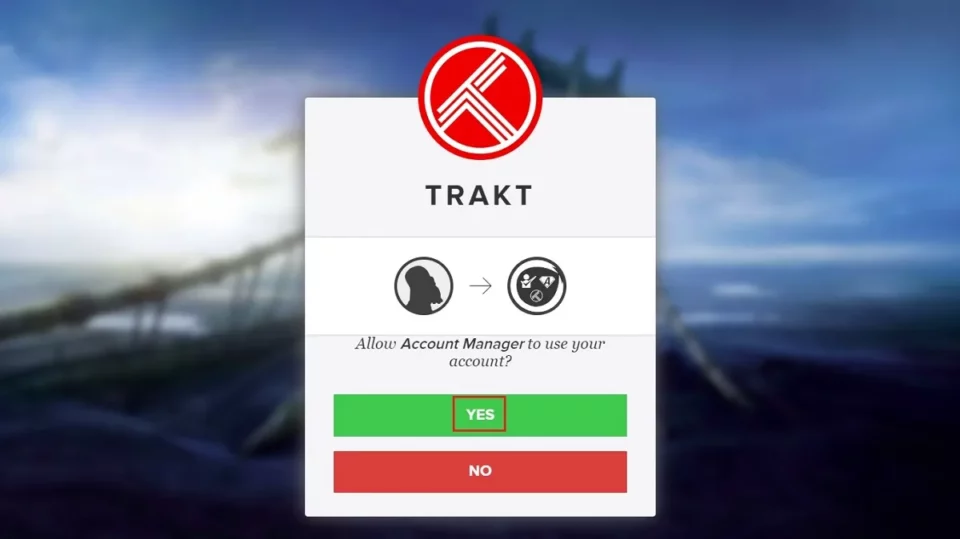
6. That’s all. You’ve successfully authenticated and integrated your Trakt account with Diggz Xenon.
Wrapping Up
This tutorial taught you how to install Diggz Xenon Kodi Build. This build lets you access movies, TV shows, music, kids’ content, and more on Kodi. The content diversity makes Xenon an all-encompassing build for Kodi. Moreover, the friendly and appealing layout ensures you easily find what you want.
Related:
- How to Install Grindhouse Kodi Build
- Chains Wizard Kodi Build
- Green Monster Kodi Builds
- How to Install BMC Kodi Build

Suberboost Your FireStick with My Free Guide
Stay Ahead: Weekly Insights on the Latest in Free Streaming!
No spam, ever. Unsubscribe anytime.

hi after following through with the procedure isntall everything but when i click on diggz repository is says could not connect to repository. what went wrong
Hi Shawn, yes, it happens from time to time. However, it works instantly when I connect to a VPN.
Xenon doesn’t seem to be working with 20.3 or is it just me.
Hi, I just checked and it is working on Kodi 20.3. You may have run into a temporary issue.
Installation fails at step 22 due to missing accountmgr and accview dependencies. Help !
Hi Matt, it seems you ran into a temporary error. It is working now.
What is the password today? July 14 2022
Hey Angelo!
Which password are you referring to?
Diggz adult channel password won’t work have it changed or do I have the wrong password
Hi Ken,
Passwords for such things are subject to change over time, sometimes multiple times. If you want to keep up-to-date with potential changes, I suggest browsing Diggz Xenon related forums and searching for new passwords using your internet browser.
Can not get MP3 Streams to work. best addon in here any chance on fixing?
Hi Terence. Here is our guide on how to install MP3 Streams Kodi Addon.
I am trying to install diggz xenon plus (v7.7) and I keep getting an error saying check the log for more information. I do but doesn’t tell me what I need to do to get it to work. Please help
Hi Cameron. Here is our guide on how to check Kodi error log and quick fix.
How do you locate the version of Kodi after installation?
Hi Lloyd. You can find the Kodi Version by scrolling the horizontal menu and clicking on Addons –> click Recently Updated –> click Version Check.
Why do I keep getting the box one or more items failed to play. Check the log for more information about this message
Hi Tim, sometimes certain links will be down. When you get that message, you can just try another link until finding one that works.
I am not seeing the diggz xenon free plus the only one showing up is Diggz Xenon Plus. Do I select that one?
Hi Joe. Yes, select the Diggz Xenon Plus. To access the free content you will need to scroll the menu bar to the right until you see the word “Free”.